This easy french macaron recipe includes a step-by-step tutorial and troubleshooting guide on how to make perfect french macarons, every time!
What are French Macarons
French macarons are a type of meringue based pastry made with egg whites, sugar, and almond flour. This is very different from coconut macaroons which have two o's in the spelling.
There are two main methods of making French macarons, the French meringue method and Italian meringue method. The French method involved whipping the egg whites and adding it to an almond flour/powdered sugar mixture. The Italian method involves heating a sugar syrup and adding it the egg whites. This tends to make a more stable macaron but it does involve an extra step of making the syrup.
If you're new to macarons I recommend the French method as it really is so easy! This recipe adapted fromStella's Parks now defunct Bravetart website. She had so many amazing tips and tricks on her site, which unfortunately for all macarons lovers is no longer available.
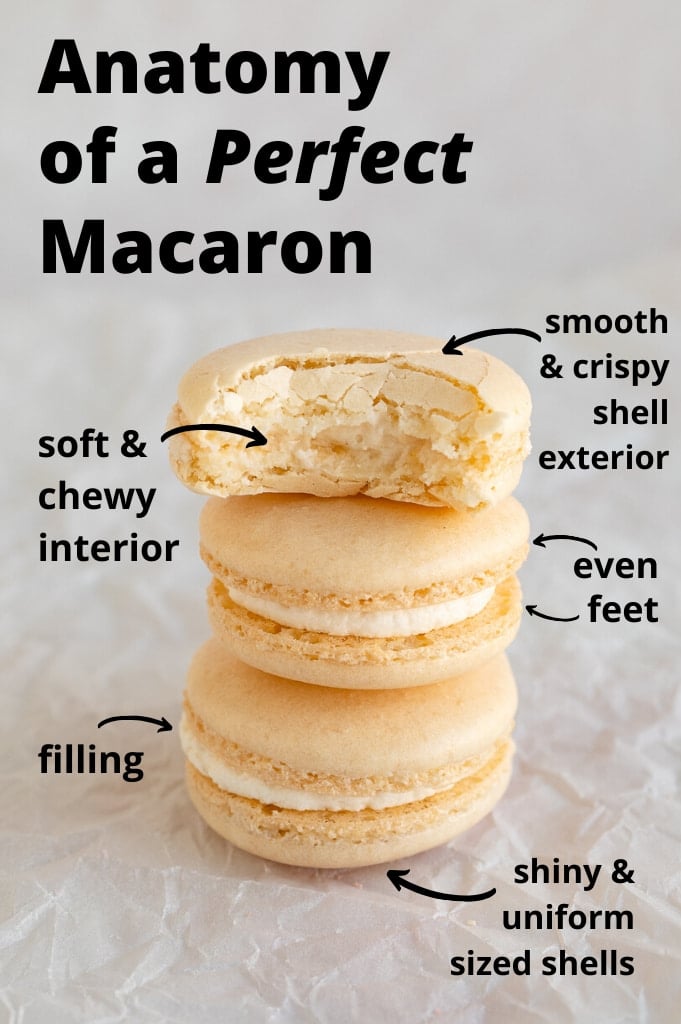
Why this recipe is great for beginners:
- No need to age the egg whites or bring them to room temperature.
- No cooking thermometer or making a sugar syrup. The Italian Meringue method requires an extra step of boiling a sugar syrup to add to the egg whites. This recipe requires no such thing.
- You whip the egg whites to very stiff peak, eliminating the guesswork of soft peaks versus stiff peaks. Once the egg whites clump around the attachment, they're ready.
- You do not need to rest the piped macaron shells. Resting the unbaked shells adds an additional variable. Are they over rested? Under-rested? The time you rest them can alter the final macarons. With this recipe, you pipe the shells, pop any air bubbles, and put them right in the oven.
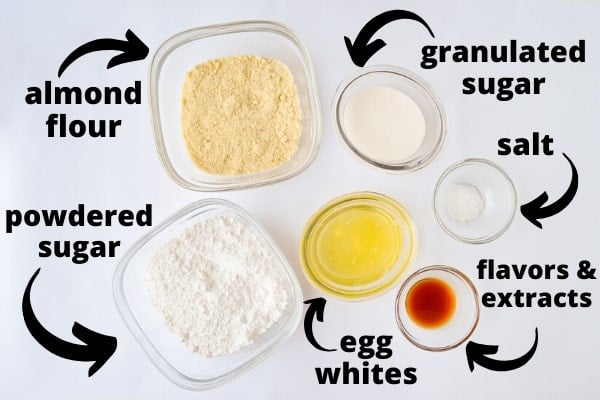
Ingredients
-
- Almond Meal/Flour – It's really important to have finely ground almond flour. Bob's Red Meal is always a good choice but I've used Trader Joe's and now I use Costco Brand and it works great (and is super affordable!). If you can't find almond flour you can also grind and sift your own almonds, but make sure you have a very strong food processor, they are very finely ground, and you've sifted out any larger chunks of almond.
- Powdered Sugar – To mix with the almond flour. If the powdered sugar is old or lumpy you’ll want to sift it or double sift the almond flour/powdered sugar mixture.
- Egg Whites – For this recipe they do not need to be at room temperature or aged. But, aging the egg can help with the stability of the macarons if you're new at making them. So, if you want, you can keep loosely covered egg whites in the fridge for a few days. It is very important when whipping egg whites that the bowl is very clean and does not have any oil or egg yolks in them as that will cause the egg whites to not whip up properly.
- Granulated Sugar – When you add the sugar to the egg whites it help stabilize them. This means the whipped eggs whites will be less likely to break or get over mixed.
- Salt –The original recipe calls for kosher salt, which is what I normally use but I’ve used sea salt and regular salt without an issue.
- Extracts – You can add any type of non-oil based extract or flavor to your egg whites. If it is an oil based extract (e.g. mint), save the flavoring for the filling as it can deflate your egg whites.
- Food Coloring – use gel or powdered food coloring. Regular water based food coloring can alter the consistency of the batter.
Tools and equipment
- Kitchen Scale – This is very important. French macarons are notoriously finicky and having a kitchen scale really helps ensure everything is correct.
- Standing Mixer with a Whisk Attachment or Hand Held Mixer with Large Bowl– unfortunately it would be very difficult to make these without some type of mixer. Standing mixers are the easiest since you need to whip the egg whites for awhile, but you can also use a hand held mixer.
- Flour Sifter– to sift together almond flour and powdered sugar. You can pulse together in a food processor if you do not have a sifter.
- Pastry Bags with Large Piping Tip – for piping the macarons. I recommend at least a 12-16 inch pastry bag to fit the macaron batter along with a large piping tip such as a Wilton 1A. The larger tip helps with piping perfectly round macarons.
- Heavy Duty Baking Sheets – it helps to have two baking sheets so you don’t need to wait for one to cool. I've found baking pans with ridges such as jelly roll pans restrict airflow and can cause cracked macarons. You can rest the piped macarons prior to baking to combat this.
- Rubber or Silicone Spatula – This is used to scrape down the sides of the bowl and also mixing the egg whites and sugar mix together.
- Silicone Baking Mat orParchment Paper – I personally prefer a silicone baking mat (silpat brand) for making macarons.
- Toothpick or Scribe – to help pop air bubbles in your piped macarons
- Oven Thermometer (optional) – This is optional, but if you think your oven temperature is off, you can test with an oven thermometer.
How to Make French Macarons
Prep:
- Preheat the oven 350 degrees℉ with the baking rack in the middle.
- Line a baking sheet with a silicone baking mat or parchment paper.
- If using a standing mixer, set up with a whisk attachment and a very clean bowl.
- Place a large piping tip in a pastry bag. Tip: place the pastry bag in a large cup with the sides folded over. This helps you fill the bag with minimal spillage.
Measuring Ingredients and Making meringue:
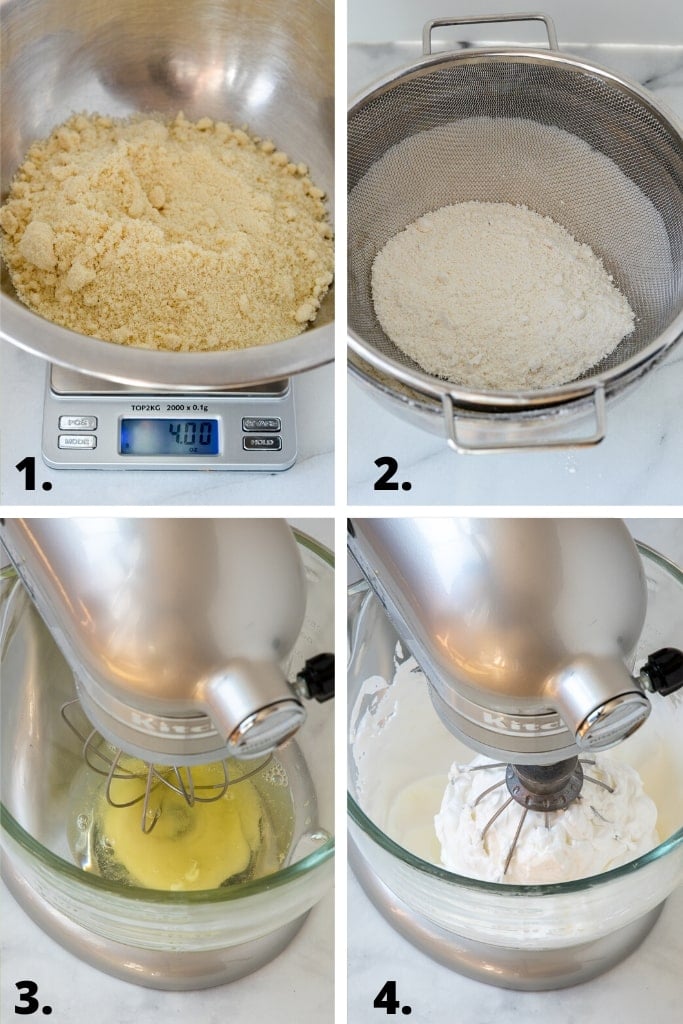
- Measure out all your ingredients using a kitchen scale.
- Sift together the powdered sugar and almond flour and set aside. There might be some small chunks of almond left, which you can discard. If the powdered sugar is old and/or lumpy or your almond meal is homemade or not super fine, sift it twice. Set aside.
- Add your egg whites, salt, and sugar into the bowl of a standing mixer with a whisk attachment and mix. Mix for about 5 -7 minutes on medium high and after that check every 30 seconds to see when the meringue starts to clump in the middle.
- As soon as it starts to clump in the middle, stop mixing. Add any extracts and food coloring and mix again only until incorporated, scraping dow the sides of the bowl if necessary.
Macaronage
Now comes the most important part of making macarons, the macaronage. This is the process of folding together the egg whites and almond/powdered sugar mix. The purpose is to deflate some of the egg whites while still leaving enough intact that they puff up leaving those cute little feet on the macarons.
Pour your almond meal mixture into the egg whites and using a spatula stir the mixture together, making sure to scrape the bottom of the bowl. The original recipe adds all the almond meal and then mixes while a lot of recipes call for adding the almond meal in thirds. With this recipe, I've found both ways work just fine.
Use a spatula and scrape around the sides and fold it in. At first the batter is lumpy but as you mix it starts to get smooth and glossy. You want to make sure to scrape the bottom of the bowl and make sure everything is incorporated.
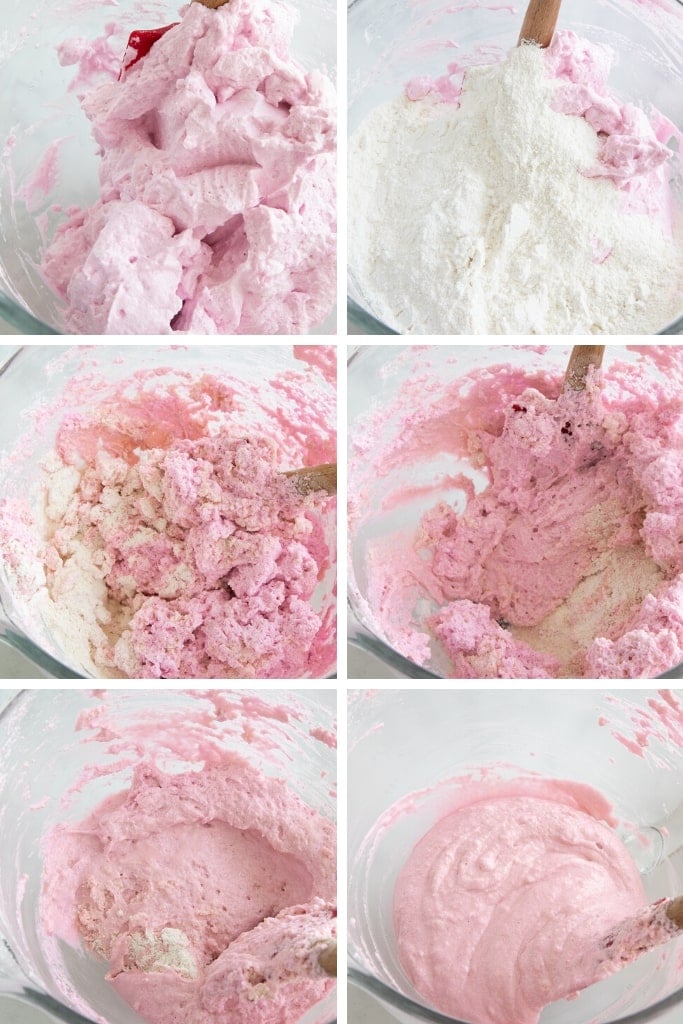
Be patient and go slow. You're trying go deflate the egg whites so you don't need to be super gentle, but it helps to take your time. When you're getting close to the proper consistency, do one stir at a time and then test it. It sounds like it can be annoying, but its actually pretty fun trying to get the perfect macaronage.
Indulge with Mimi has a good video on the process here and what the finished macaronage looks like. I highly recommend watching a few videos on macaronage prior to making your first batch.
Here are the most common ways to tell if the batter is done:
- Mix until the batter will flows off the spatula in a very slow stream that doesn't break. It's often compared to honey or lava.
- There is the figure 8 test, where you are able to drag the batter off the spatula into a figure 8.
- When you do a plop of a bit of batter it takes about 10 seconds for the edges of the batter to smooth out, and 20-30 seconds to re-incorporate back into the batter.
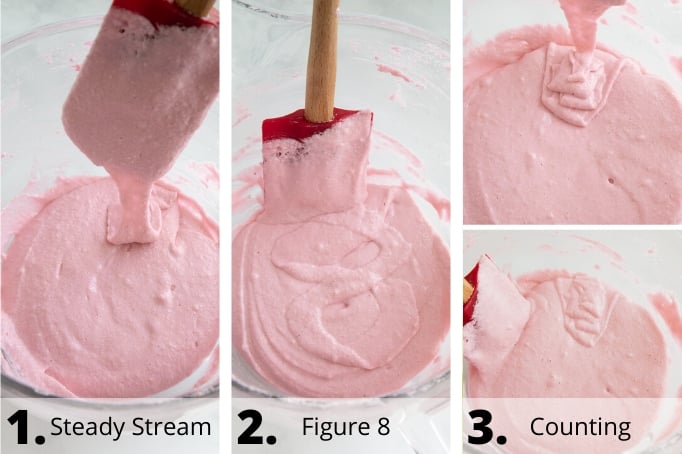
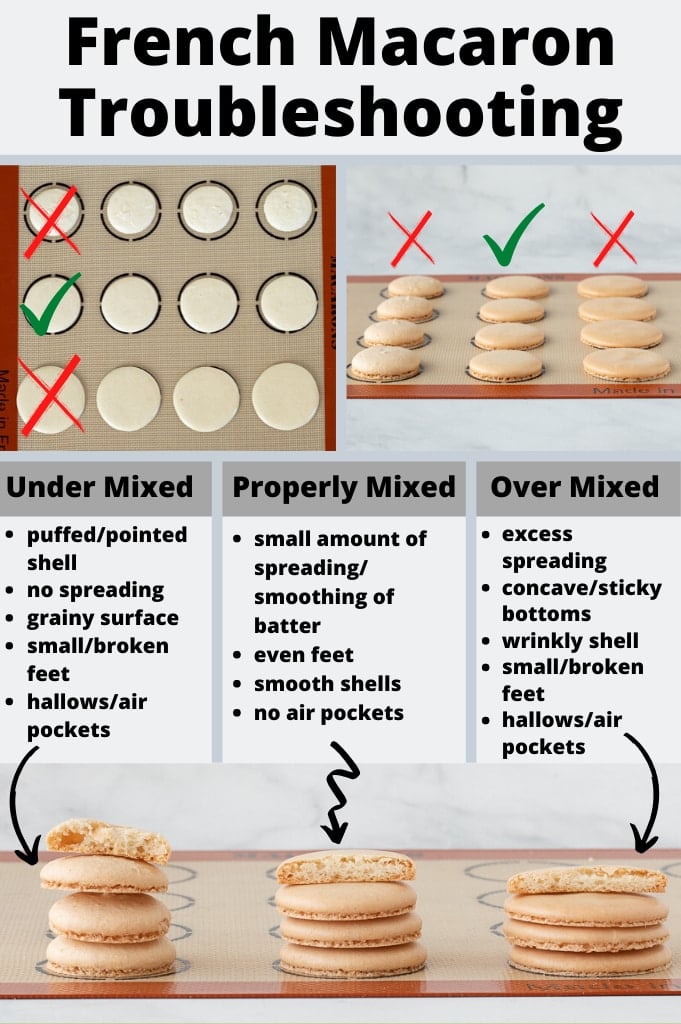
And, don't worry and have fun with it! As shown in the below troubleshooting section, unless the batter is completely runny and over mixed, they'll most likely still turn out completely edible and delicious macarons.
Piping the batter
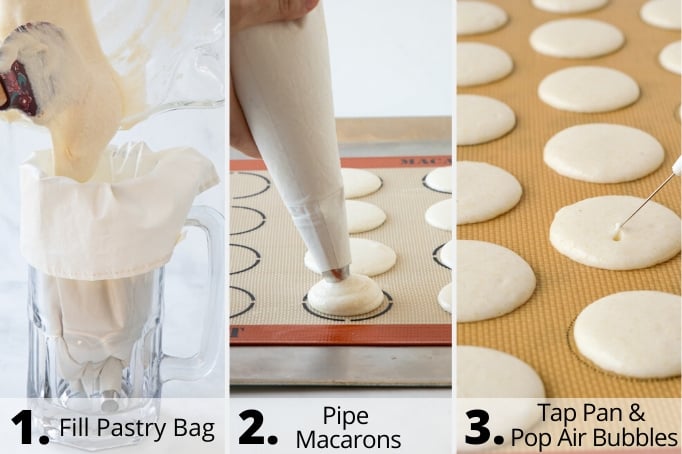
After mixing the batter, fill the prepared pastry bag about ½- ¾ the way full and secure with a rubber band or twist the top so the doesn't spill out.
Then, pipe the 1 inch macarons onto the prepared baking pan, at least 1-2 inches apart. The batter will spread a little bit so don’t pipe them too close. If you have a baking mat with pre-marked circles, you’re good to go. You can make the macarons smaller or bigger, but note might will alter the baking time.
Once you're done piping, take the piping tray and tap it very hard on the counter. Then, turn it 180 degrees and tap it again. This is very important and releases the air bubbles to the top of the piped macarons. Once the air bubbles come to the top take a toothpick or scribe and pop them.
Baking and Filling the Macarons
Now that you've piped the macaron batter, put in the oven and turn down the heat to 300 ℉. Bake for 17-19 minutes, or until you can lift a macaron without it sticking. This can be difficult to gauge with a silicone mat, so watch for the edges to and tops to start to brown.
When done, remove the tray from the oven and let cool completely before you try to remove the macarons.
While the first batch is cooling, turn the oven back up to 350 and pipe the second tray of macarons and repeat the process.
I helps to have two baking trays and silpats, but you can wait for your original baking sheet and silpat to cool if you only have one set. The batter is fine to stay the piping bag for little bit.
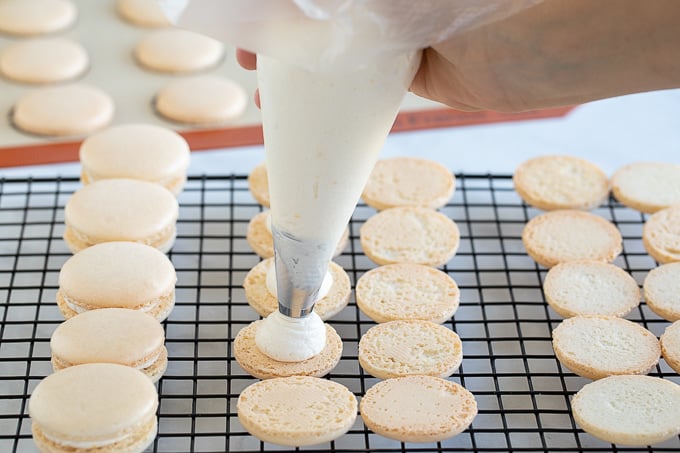
Once the macs have cooled completely, remove from the baking sheet and match up the shells by size. Then, line up the shells and add your favorite filling to the bottom shell and sandwich with the top shell:
Maturing and Storing Macarons
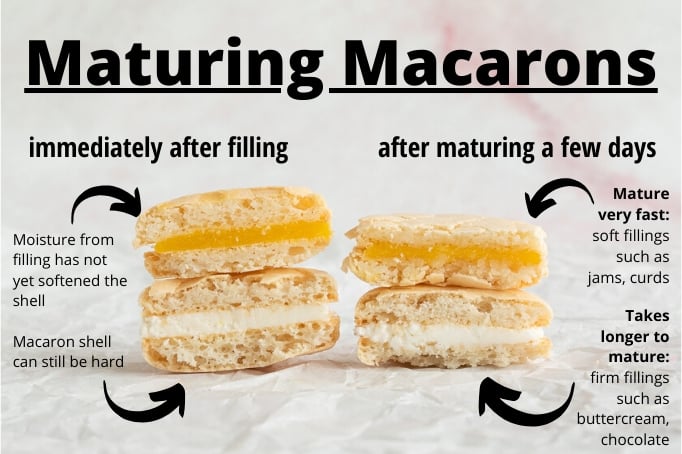
At this point you can either serve them or let the filled cookies sit in the fridge for a few days to soften up. This is called maturing or hibernating. It’s something even professional french macarons makers do and it is especially necessary if the shells are slightly over baked.
I like to let keep my filled macarons on the baking sheet laying flat and store in the fridge for an hour or so to harden up. Once they're firm, I line them up in a container and keep them in the fridge for a few days to mature. Soft fillings such as lemon curd and jams mature much faster than buttercreams and more solid fillings. Letting the filled shells sit allows the flavors to meld together and moisture from the filling to soften up the macaron shells:
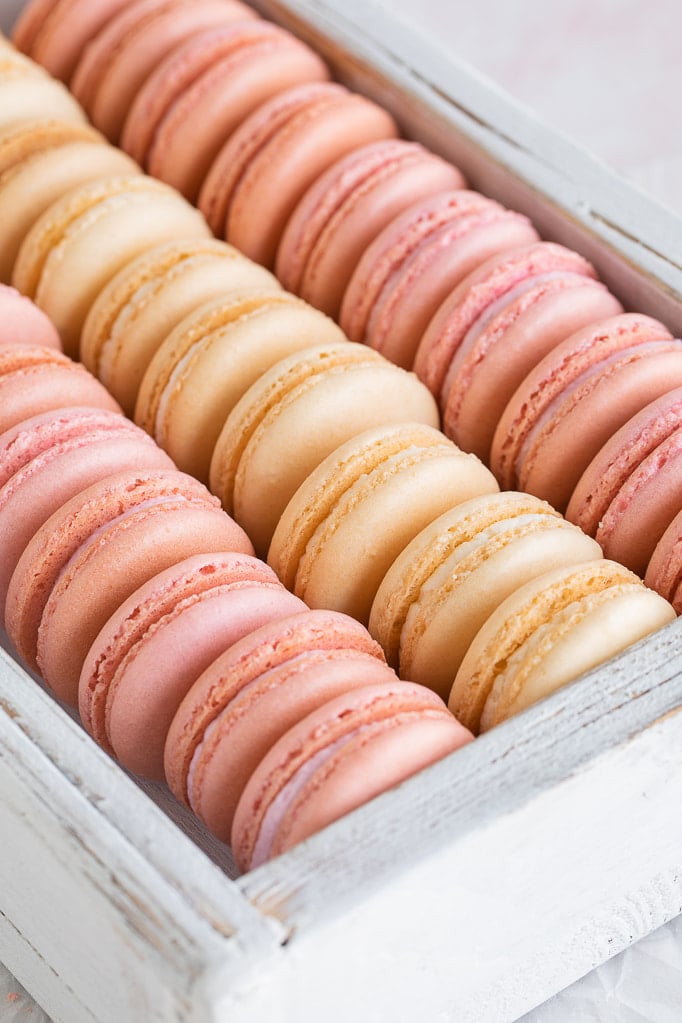
French macarons are great for holidays and parties because they last so long in the fridge and freezer and they actually taste better after they've matured. You can keep them up to a week in fridge and and then transfer them to the freezer for up to a month or two. Be sure to keep them tightly covered so they don’t take on any flavors from your fridge or freezer. These are perfect for making far in advance and freezing.
Let the macarons come to room temperature when you’re ready to serve and voila, these delicate cookies are ready to go.
French Macaron Making Tips
Prep Tips:
- Be sure to measure out all your ingredients using a kitchen scale. With macarons, it's very helpful to have exact measurements.
- Make sure there are no traces of egg yolk in the egg whites and the bowl for the egg whites is very clean. Any oil can cause the egg whites to not whip up properly.
- If you're using parchment and want consistent size circles, take a 1 inch cookie cutter and trace circles onto parchment with a pen or pencil, a few inches apart. Flip upside down on top of another piece of parchment (so the pencil or ink doesn't stain your baking sheet). Then pipe on the circles.
- Put the pastry bag with tip in a large cup with the edges folded over the cup as shown in a picture above. This is an easy way to fill the pastry bag with batter without making a mess.
Meringue and Macaronage Tips:
- If adding food coloring, use gel or powdered food coloring as it will alter the consistency less than regular food coloring.
- You can also skip food coloring and flavors/extracts if you're just starting out. It makes it easier tot get the hang of making macarons and most of the macaron flavor comes from the filling anyway.
- If you're new to macarons, watch a few videos on macaronage as linked above. This is really helpful to ensure you're mixing the batter to the right consistency.
Piping and Baking Tips:
- Don’t forget to tap the pan of piped macarons and pop any air bubbles. If you forget it can cause cracks in the macarons when baking.
- If you have issues with the shells cracking when they bake, try resting the macarons shells. Resting means you let the piped macarons sit for 20-30 minutes before you bake them, allowing the tops of the macarons to form a bit of a shell. They’re ready to bake when you can gently touch the shells without the batter sticking to your finger.
- Let the baked shells cool completely before trying to remove from a silpat. Removing them before they've cooled can cause the bottoms to stick.
- If the macaron shells are hard after baking, fill and let sit in the fridge a few days. This is called maturing, and it will soften them up as the moisture from the filling spreads to the shell.
Questions and Troubleshooting
Should I age my egg whites?
With this recipe, it is not necessary to age your egg whites. I've heard it can help to whip up a stiff meringue since the egg whites have dried out a bit, but I've never noticed a difference. Plus, sometimes you want to make a batch of macarons without planning it 3 days in advance.
If you have some leftover egg whites from making lemon curd or something, sure, you can keep them loosely covered in the fridge for a few days to age them before making some macs. But, much like resting the piped batter, it could help if you're new to making macarons, but it's not necessary.
The piped macarons have a tip that does not reincorporate in the batter
The batter is under-mixed. If you've already piped them, you can use a toothpick or scribe to try to flatten it out when you pop air bubbles. You can also use a damp finger, but don't use too much water or it will cause the macarons to crack.
The batter is very thin and runny
You've over-mixed the batter. Unfortunately once the batter is over-mixed, there is not much you can do to fix it so try not to over mix it.
Should I let my macarons rest before baking?
For this recipe, you do not need to rest the macarons. As you can see below the difference between rested and not-rested batter in this recipe is minimal:
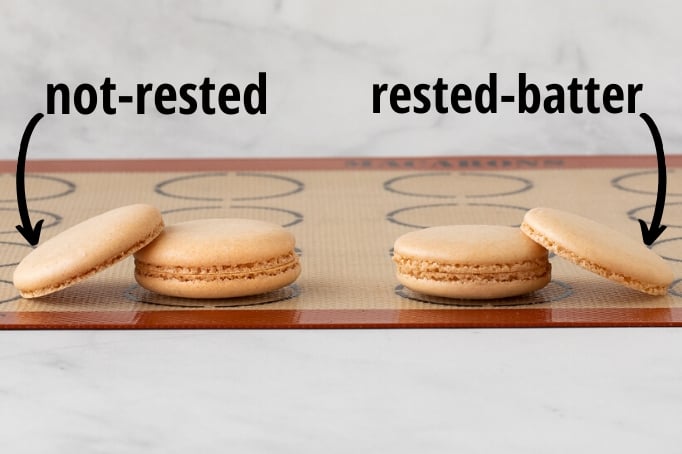
That being said, resting the batter can help combat cracked shells, especially if using a pan with ridges or your oven has an uneven baking temperature. So, if you have jelly-roll pans and/or have an issue with cracked shells, you can try letting the piped macarons rest for 20-30 minutes after piping, until you can gently touch the top of the macaron without it sticking to your finger. Then, bake as normal.
But again, this is extra insurance against cracking and I've found you don't need to do it if you're using a flat baking sheet such as this.
How will I know the macarons are done?
The whole macaron will lift off the parchment. If just the top macaron of the macaron shell comes off, bake another 30-60 seconds. This can be difficult to gauge on a silicone baking mat, so look for browning around the edges and on the top. And, keep in mind it’s better to slightly over-bake than under-bake, as you can rest the macarons to soften them up.
The baked shells are cracked
This is a really common problem for a lot of people just starting out. It can happen because the batter was not properly macaronaged, the meringue was over beaten, or you forgot to tap the tray/pop air bubbles.
For this recipe, I've never had a problem with the shells cracking unless I've used a jelly roll pan or some other pan that restricts or alters airflow. I've heard the same can happen if your oven has warm or hot spots. Below is the same batter baked un-rested on two different pans. The first cracked and second baked perfectly:
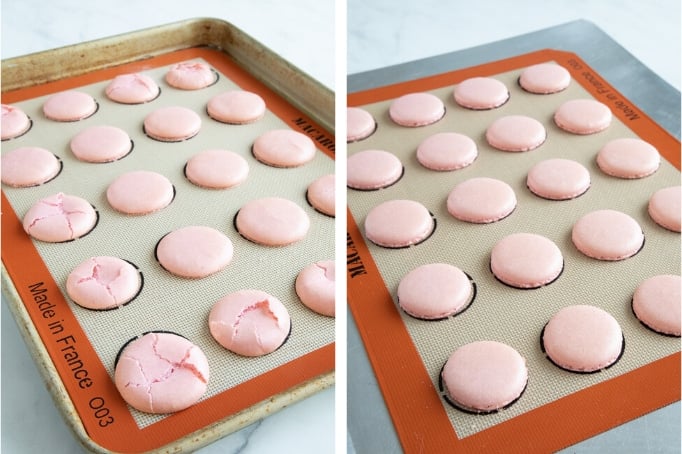
Does that mean you need to buy a new pan or call an oven repair specialist? Nope! Just rest the macarons.
Resting the macarons means you let the piped macarons sit for 20-30 minutes before you bake them, allowing the tops of the macarons to form a bit of a shell. You'll know they're ready to bake when you can gently touch the top of the shell and it feel tacky but doesn't stick to your finger. I’ve found resting can add extra insurance against cracking if that is an issue.
I would test out your oven and macarons. If the shells crack, try resting them first and see if you get better results.
My baked macarons are not circles and/or are mis-shaped
You've baked them on parchment. Unfortunately parchment paper can cause the macarons to bake in oval shapes or have weird non-curricular edges. I've found macarons baked on parchment to be more structurally sound with taller feet and less likely to have hallows, but the slight oval shape and wonky edges are so annoying, I always bake them on a good silicone baking mat.
If you're looking to become a french macaron making connoisseur and want perfect circle shaped macarons, I highly recommend investing in a few high quality silpats. That being said, baking on parchment is fine and once the cookies are filled and sandwiched it is not as apparent they are not perfect circles.
The bottoms are sticking when I try to remove from the parchment/silicone mat
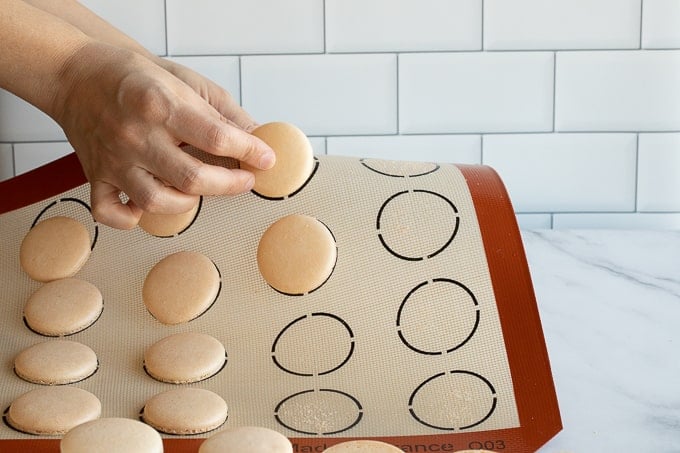
If you've baked on parchment, bake another 30-60 seconds. If you're on a silicone mat, make sure let the shells cool completely before you try to remove them. They will often sick if you remove them before they've completely cooled. And, rather than lift the shell straight up from the silpat, peel the silpat from the shell as shown below:
If the macarons have completely cooled and they still stick, the batter is either over-mixed or the macaron shells are under-baked. If you think they’re over mixed batter, do a few less strokes next time.
Silicone mats can sometimes lead to sticky or concave bottoms in general, especially cheaper silicone baking mats. Cheaper mats still work, but it helps to slightly over bake the macarons so they don't stick, especially if the batter wasn’t perfectly macaronaged. But remember, it doesn’t take much to over bake – an extra 30 to 60 seconds is all. Again, you can fill them and let mature to soften up.
Baking at a higher temperature – 325 ℉ for 14-16 minutes – can also help combat sticky bottoms if it is a consistent problem.
My shells are very hard after cooling
The macarons have been over-baked. It’s very easy to over bake these macarons. Often, it's only a matter of a less than a minute between a perfect macaron and one that is slightly over baked. And, this is fine! It’s much better to slightly over bake rather than under bake as they will soften as they mature.
My baked macarons have air pockets in them
This is a very common problem and one that plagues even the most experienced macaron bakers. I will say this recipe is slightly more prone to air pockets (also called hallows) than the Italian meringue method. The main causes of hallow macarons are under/over mixing the batter and under baked macarons.
Making sure the macaron batter is properly mixed and the shells are baked enough will help combat this. One of the reasons macarons are hallow is they are under baked and collapse when they cool.
Can I use boxed egg whites?
The short answer is no, they won't whip up as well. Especially if you are new to making macarons use real eggs. But, that being said if you've got the basics down I've found boxed egg whites will work in a pinch and can actually be helpful if making a lot of macarons.
But, it does make them more prone to air pockets and boxed egg whites tend to vary a lot by brand. For example, Trader Joe's organic egg whites will not whip up at all. But, I’ve found the cheap generic boxed egg whites from my local superstore whip up just fine. So, try at your own risk and only after you've mastered macaronage and making macarons.
What can I do with all the extra egg yolks?
- Homemade Lemon Curd (the perfect filling for macarons!)
- Vanilla Pastry Cream
- Creme Brulee
- Custard
- French Canelés
- Hollandaise Sauce
French Macaron Filling and Flavor Suggestions
The filling options for macarons are basically endless! The most common filling is chocolate, jams and curds, and buttercream. Here are a few more of my favorites:
- East Lemon Curd
- Chocolate Buttercream
- Melted Chocolate or Ganache
- Caramel Sauce
- Cookie Dough Frosting
- Cake Batter Frosting
- Mint Frosting
- Thick Strawberry Filling
- Jams and Jellies
Looking for more French Pastry Recipes? Check these out!
WANT TO JOIN THE PARTY? Subscribe to my newsletter and follow on Pinterest, Instagram, and Facebook for all the latest recipes!
French Macarons
Equipment
- Standing Mixer with a Whisk Attachment or Hand Held Mixer with large bowl
- Flour Sifter
- Pastry Bags with Large Piping Tip
- Rubber or Silicone Spatula
- Silicone Baking Mat or Parchment Paper
- Toothpick or Scribe
INGREDIENTS
French Macarons
- 4 ounces fine almond flour 115g
- 8 ounces powdered sugar 230g
- 5 ounces egg whites 144g (4-5 eggs)
- 2 1/2 ounce sugar 72g
- 2 tsp vanilla extract or the scrapings of 1 vanilla bean
- 1/2 tsp kosher salt 2 g
- gel food colors optional
Filling of Choice - examples:
Instructions
Prep:
- Preheat oven to 350 degrees, making sure your oven rack is in the middle.
- Prepare a pastry bag with a medium sized tip. My favourite method to do this is to put the pastry bag with the tip into a large cup, folding the edges of the bag over the edges of the cup to allow for easy filling with the macaron batter.
- Put your slipmat or parchment on a baking sheet.
- Set up your standing mixer with a whisk attachment, or prepare a large bowl and hand held mixer. Make sure your bowl is clean and dry, with no remnants of oil in it from previous use.
Measure your ingredients:
- Measure almond flour and powdered sugar. After measuring sift together and set aside.
- Measure egg whites, making sure to get no yolk in the whites
- Measure sugar
Make and Bake:
- Add egg whites, sugar, and salt into the bowl of your standing mixer. If using vanilla bean instead of extract, add now as well
- Turn on medium to medium high speed and whip about 5-7 minutes, until stiff peaks form and the egg whites start to clump in/around the middle to the beater.
- Once they start to clump, stop mixing and add vanilla extract and optional food colors
- Beat again until everything is combined. Try not to beat too much so that they start to break or get grainy.
- Remove bowl from mixer and add the sifted almond flour/powdered sugar mix
- Macaronge the batter with either a flexible spatula or large spoon. You’ll want to mix until the powdered sugar mixture is fully incorporated into the egg whites, so take extra care to scrape the bottom of the bowl. Some say it takes about 50 strokes and will look like honey or lava when finished. It should not be too thin or watery, that means you’ve overmixed it.
- Fill your prepared pastry bag with macaron batter and when you’re ready to start piping the macarons, push the batter all the way down to the tip and twist the top to prevent the batter from spilling out the top.
- Start piping your macarons about 1.5 inches in diameter. If you’ve have pre-drawn circles, fill until almost to the edges as they will spread a bit.
- Once you've filled your tray, tap it hard on the counter to bring up any air bubbles. Turn 180 degrees and tap again. Then pop any air bubbles with a toothpick or scribe.
- Put in the oven and turn the temperate down to 300 ℉. Bake 17-19 minutes until you can lift the macaron without it sticking or the start to brown around the edges and top.
- Remove from oven and let rest until fully cooled.
- Once cooled, match the macaron shells by size and fill with filling of choice. You can eat right away, or let mature in the fridge a few days until they get to the desired consistency.
Notes
- Because macarons can be tricky at first, I recommend reading through the entire post before you start the recipe.
- Be sure to measure out all your ingredients using a kitchen scale. With macarons, it’s very helpful to have exact measurements.
- Make sure there are no traces of egg yolk in the egg whites and the bowl for the egg whites is very clean. Any oil can cause the egg whites to not whip up properly.
- If adding food coloring, use gel or powdered food coloring as it will alter the consistency less than regular food coloring.
- Skip food coloring and flavors/extracts if you’re just starting out. It makes it easier to get the hang of making macarons and most of the macaron flavor comes from the filling anyway.
- If you’re using parchment and want consistent size circles, take a 1 inch cookie cutter and trace circles onto parchment with a pen or pencil, about 1.5-2 inches apart. Flip upside down on top of another piece of parchment (so the pencil or ink doesn’t stain your baking sheet). Then pipe on the circles.
- Put the pastry bag with tip in a large cup with the edges folded over the cup as shown in a picture above. This is an easy way to fill the pastry bag with macaron batter without making a mess.
- If you’re new to macarons, watch a few videos on macaronage as linked above. This is really helpful to ensure you’re mixing the batter to the right consistency.
- Don't forget to tap the pan of piped macarons and pop any air bubbles. If you forget it can cause cracks in the macarons when baking.
- If you have issues with the shells cracking when they bake, try resting the macarons shells. Resting means you let the piped macarons sit for 20-30 minutes before you bake them, allowing the tops of the macarons to form a bit of a shell. They're ready to bake when you can gently touch the shells without it sticking to your finger.
- Let the baked shells cool completely before trying to remove from a silpat. Removing them before they’ve cooled can cause the macarons to stick.
- If the macaron shells are hard after baking, fill and let sit in the fridge a few days. This is called maturing, and it will soften them up as the moisture from the filling spreads to the shell.




AmyT says
It’s “hollows,” not “hallows.” Overmixing can also cause big feet with a completely hollow separated top.
Saema Valls says
I also made this recipe, hopeful it would work but it didn’t. I followed the complete recipe, for once I read the whole article which I never normally do! I too had no feet to my macarons. Gutted as I was so hopeful. Maybe it’s the 2 tsp’s of vanilla extract that messes things perhaps. My macarons cracked, no feet and formed air bubbles after banging the trays as you mentioned with the whole 180 degree instruction and using a pin to pop them! 😭😭😭 Sadly, back to the drawing board!
Patti H says
Does this make 24 shells so 12 filled macarons or enough for 24 filled macarons?
Sophia says
Hi, enough for 24 filled macarons
michelle says
I made my first ever batch of macarons using your recipe, for a wedding cookie bar tasting. They came out perfect and the bride/groom loved them. I now have to make 1500 of them, so glad that I can freeze them. Thank you for the easy to use recipe.
Sophia says
Wonderful, so glad they turned out and the couple loved them!! 1500 is a huge order, good luck and have fun! You’ll be a macaron pro after that!!
Catherine says
First time making macrons and this recipe was amazing!! I love all the details you included. It helped so much as a first timer. I was so shocked they turned out so amazing on my first go. Thank you!!
Sophia says
wonderful, so happy to hear they turned out great!!
Julie says
The macarons in the post are wonderful colors! What are the food coloring and filling options you used for these?
Sophia says
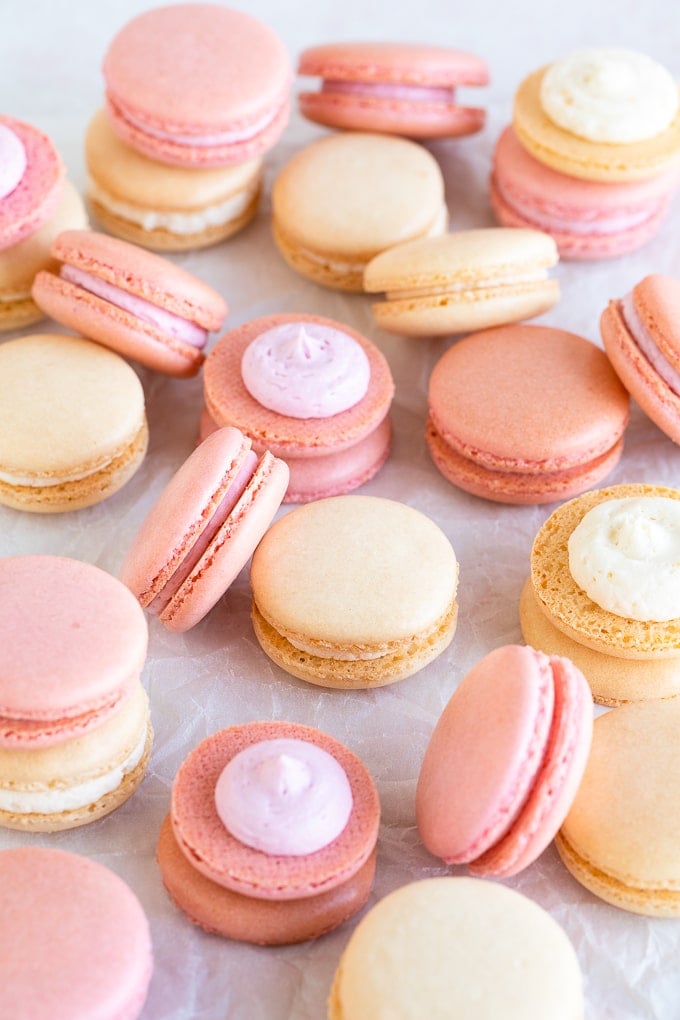
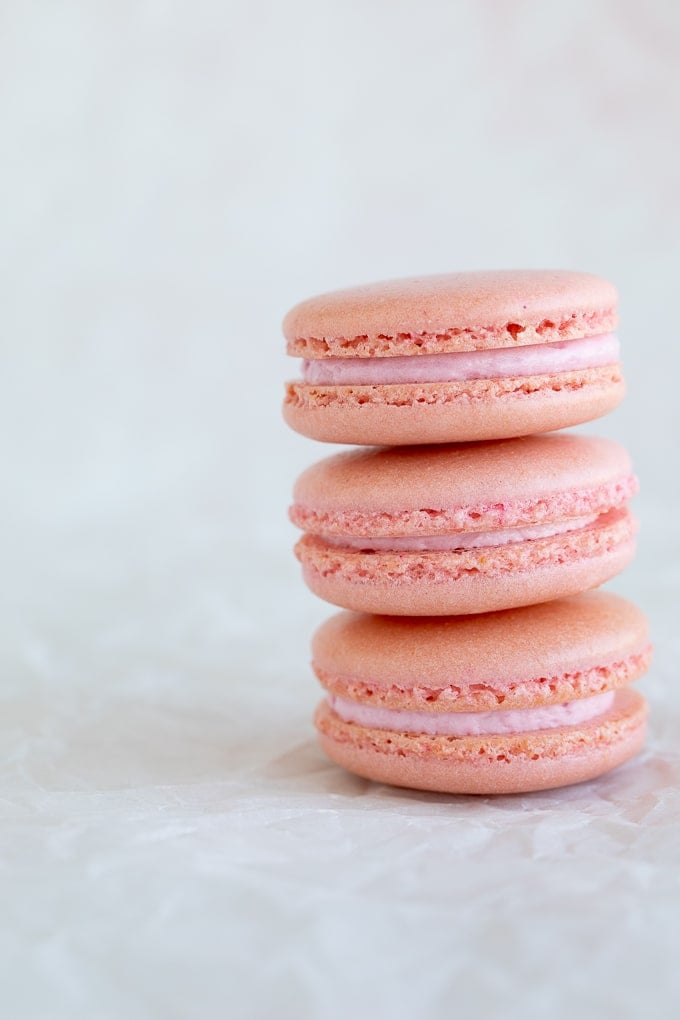
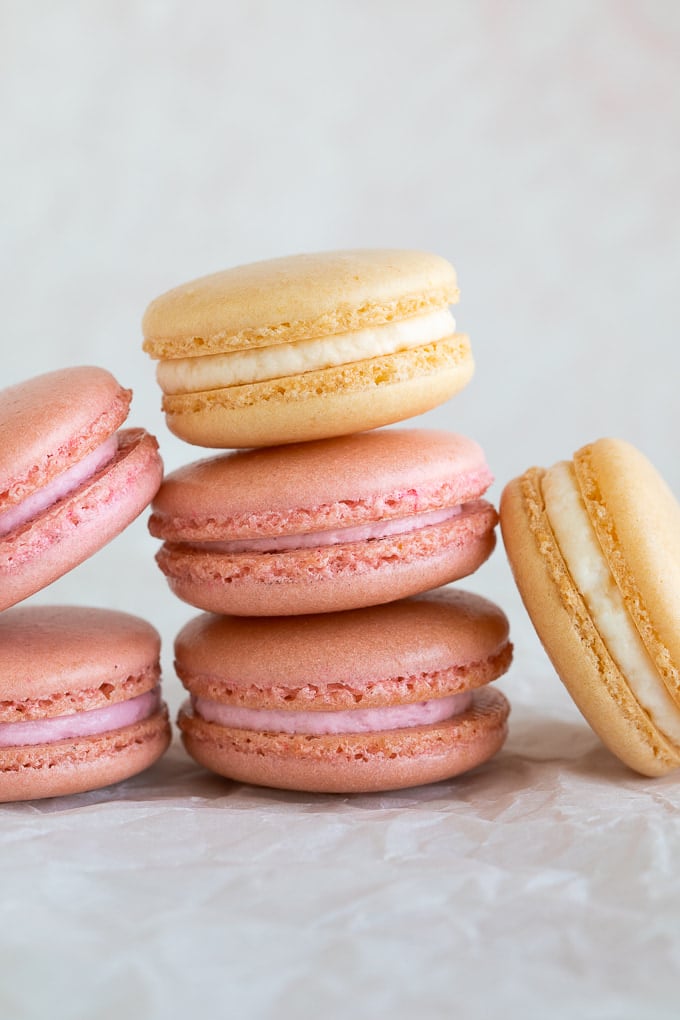
Thanks! The yellowish white ones are just the basic macarons with no food coloring and the pink is using the rose pink from this kit, but any light pink or bakers pink gel food coloring should give a similar color!
Sarah Koehler says
This is a great recipe. This is the best ingredient ratio compared to others that I looked at. I did watch several other people’s videos. That lead me to use parchment and use my pans with an edge. I had no problem at all with cracking but I did have an issue with my macarons sticking to the parchment even after letting them cool completely. My batter was a little thin when piping and it was coming out too quickly so some of them touched each other. I’m not sure what I did wrong. Next time I’ll use a smaller round tip and see if that helps. I’ll also add some cream of tartar as suggested in many of the videos that I saw. This will be the main recipe that I go with.
Stephanie says
There is a typo on this recipe, says preheat over to 350 but on the bottom when you read the instructions it says put it in a over at 300. Which is it??
Sophia says
Hi, you pre-heat at 350 but then turn it down to 300 when you put in the macarons.
lauren says
this recipe did not work for me. I believe it is the addition of liquid extracts that makes the batter too wet. Both batches had no feet. I’ve made macarons a lot and this has never happened to me. Sad!
Courtney says
If you read this, it specifically states to use gel or powdered food coloring and reading directions carefully before starting.
This is one of the most thorough recipes I’ve read in awhile, and for someone who doesn’t know anything about baking this would help a lot.
tinleigh says
can u half the recipe?
Sophia says
Yes, you can half the recipe.