Whip up this easy white chocolate bark recipe in minutes with just 3 ingredients! A quick, delicious treat or gift for any occasion!
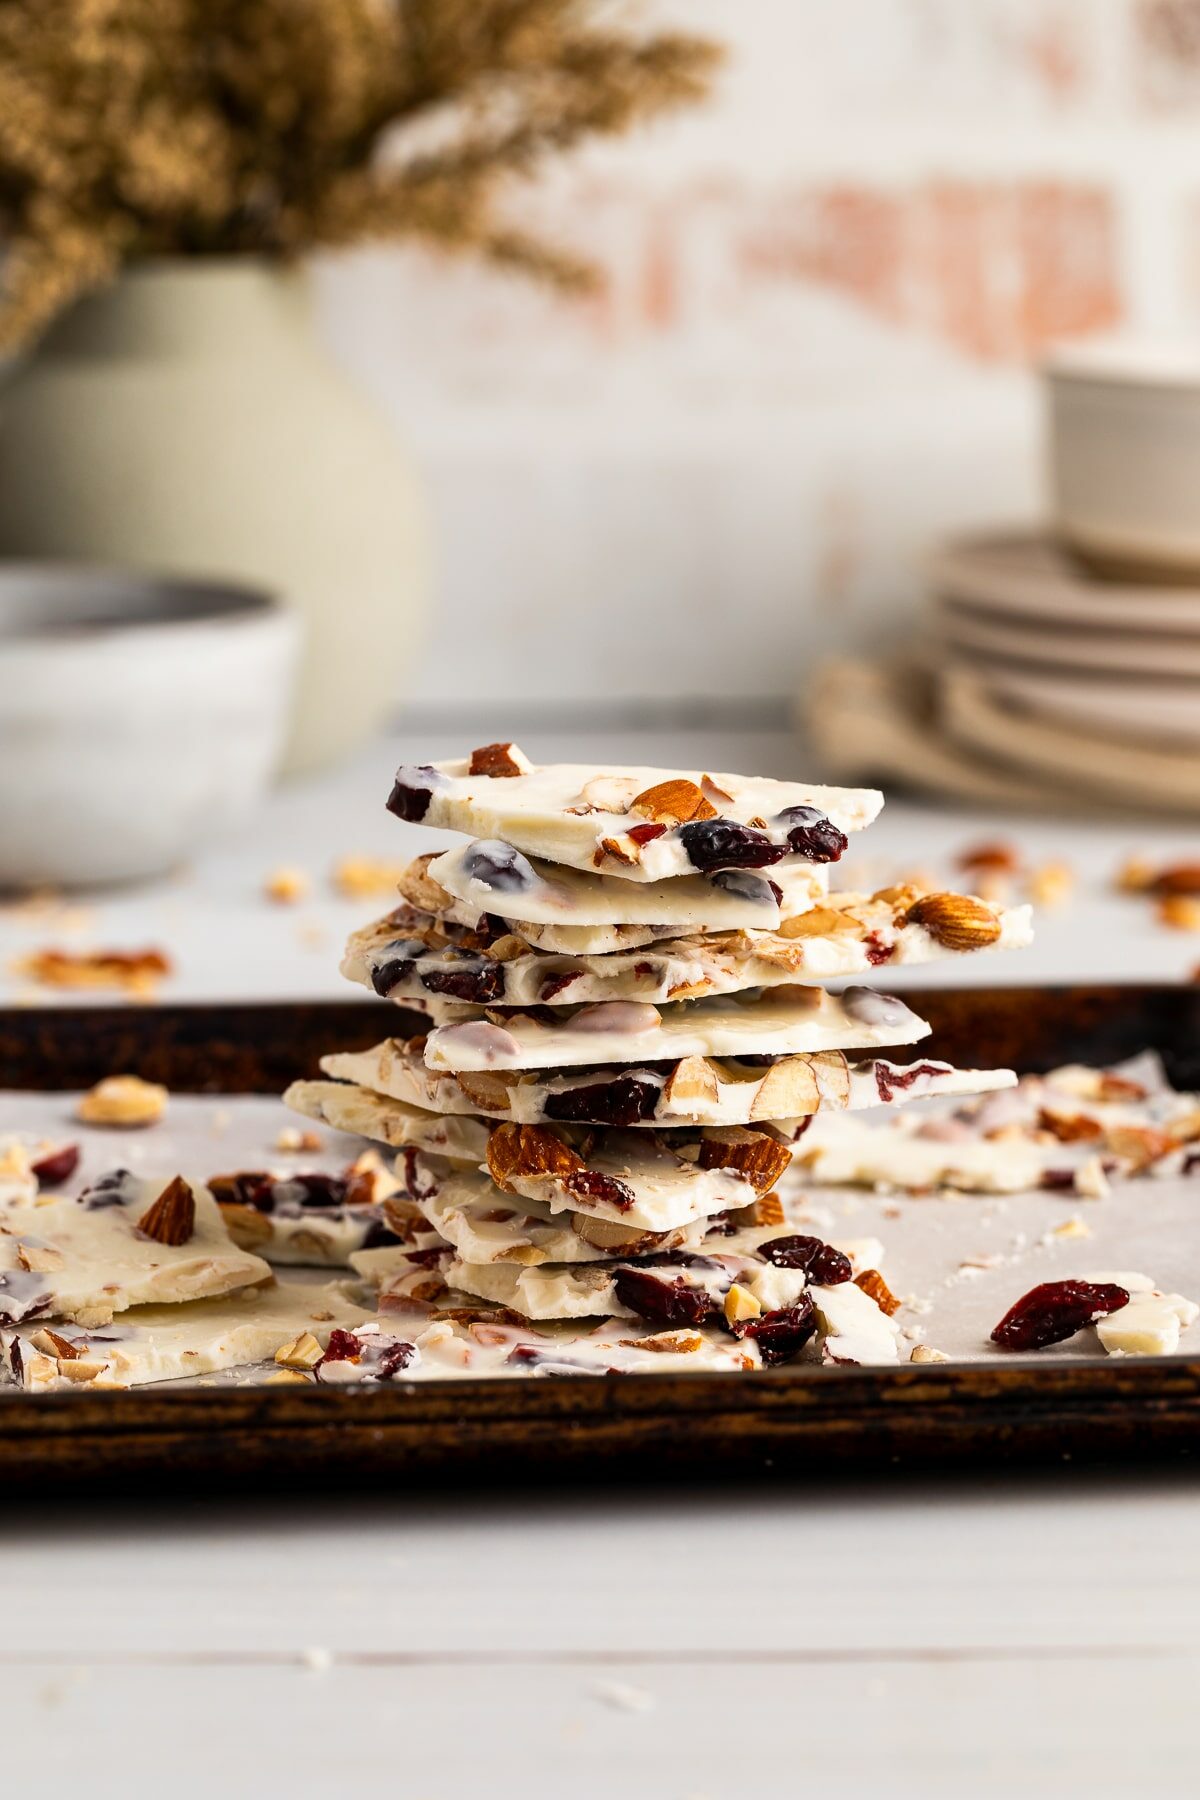
If you're looking for an easy to make and delicious treat, white chocolate bark is the answer!
It's endlessly customizable and its simplicity makes it a staple at Christmas and holiday parties. Plus, similar to cakesicles and jar cakes, it makes a wonderful homemade gift.
Traditional chocolate bark's origins are unknown. Some say it is because it looks like the bark on a tree – others say it was a variation on the French Mendiant. But, regardless of where it comes from, once thing is certain – this chocolate bark made with white chocolate rather than dark or semi sweet chocolate is a fun and delicious no-bake dessert!
Why you'll love it:
- Simple: This bark is so easy to make, requiring just a few ingredients and minimal effort, yet you'll often find in gourmet patisseries and chocolateries!
- Quick: this dessert comes together in mere minutes, making it ideal for last-minute cravings, unexpected guests, or a fun activity with the kids.
- Customizable: Chocolate bark is a blank canvas for creativity! Add your favorite toppings, such candy, sprinkles, pretzels, Oreos- really the options are endless.
Ingredients
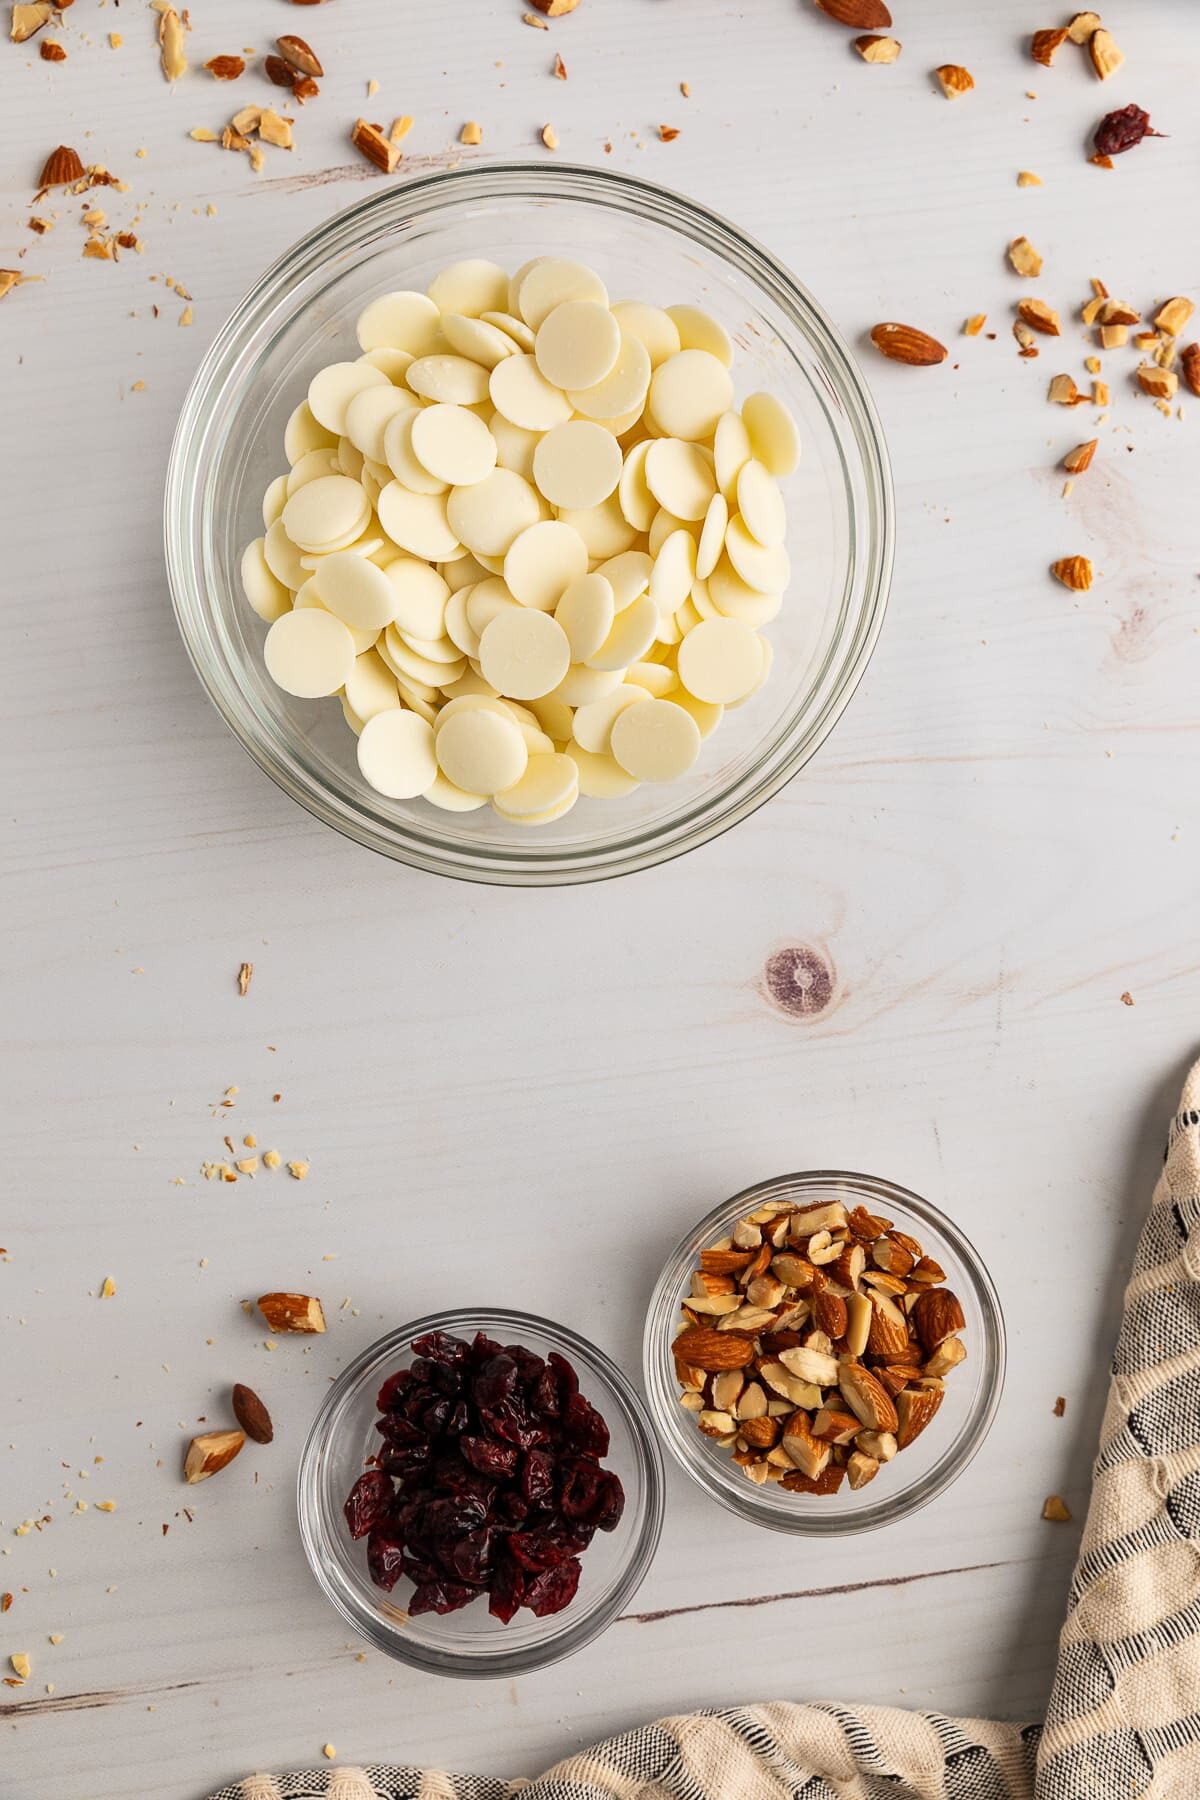
- White Chocolate: I recommend using a high quality chocolate bars or melting chocolate such as Ghirardelli, Guittard, or Callebaut. I like this Ghirardelli vanilla melting chocolate because it melts really easily and tastes delicious, and not too sweet like some other brands. Plus, it is readily available at most grocery stores and at Target. You can also use candy melts or almond bark.
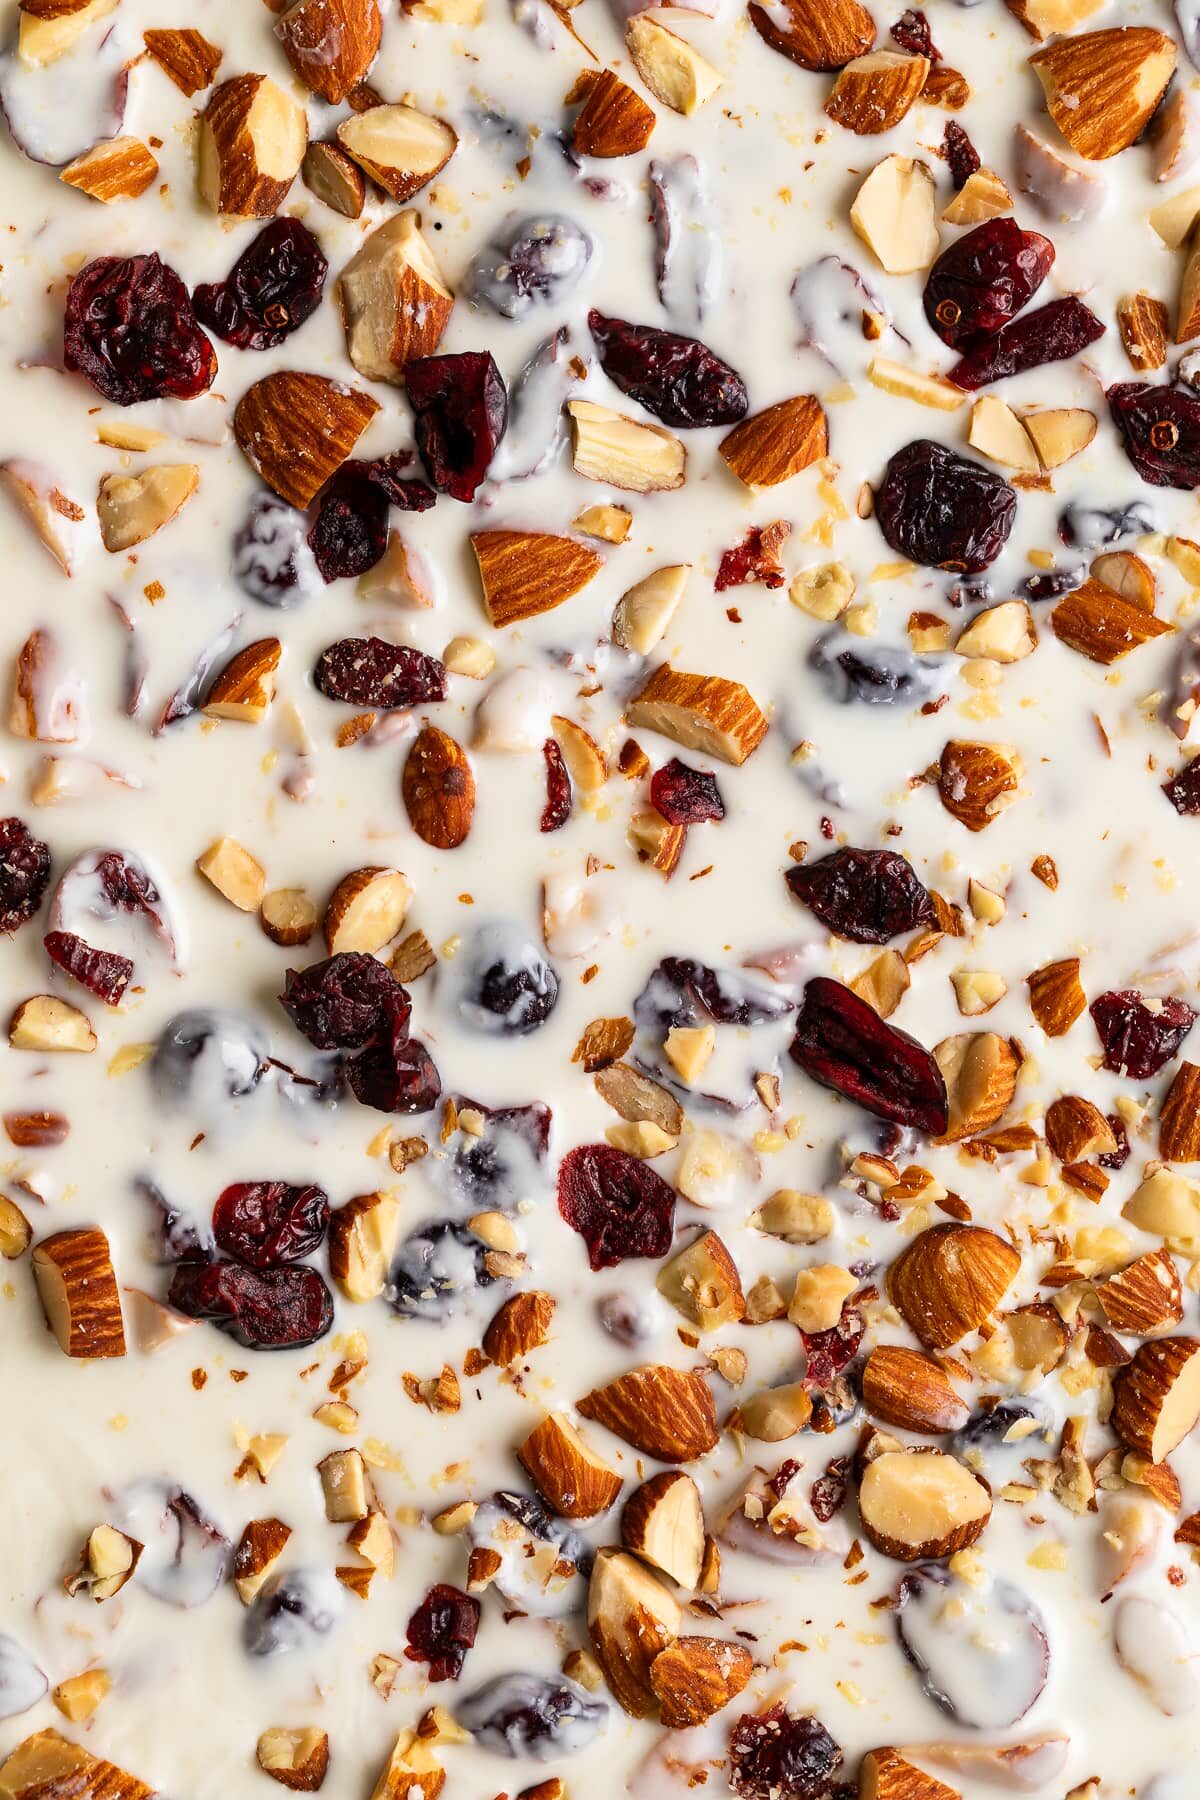
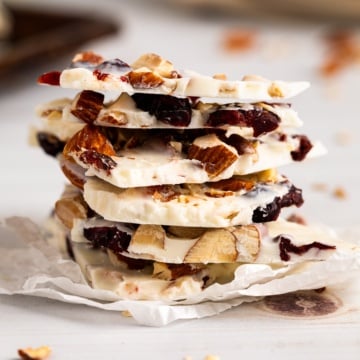
- Toppings and Mix-Ins: This is where you can get really creative! You can add candy, popcorn, sprinkles, candied pepitas, really anything you want! For this bark I'm using dried cranberries and roasted unsalted almonds for a delicious cranberry almond bark.
How to Make
Step 1: Melt chocolate
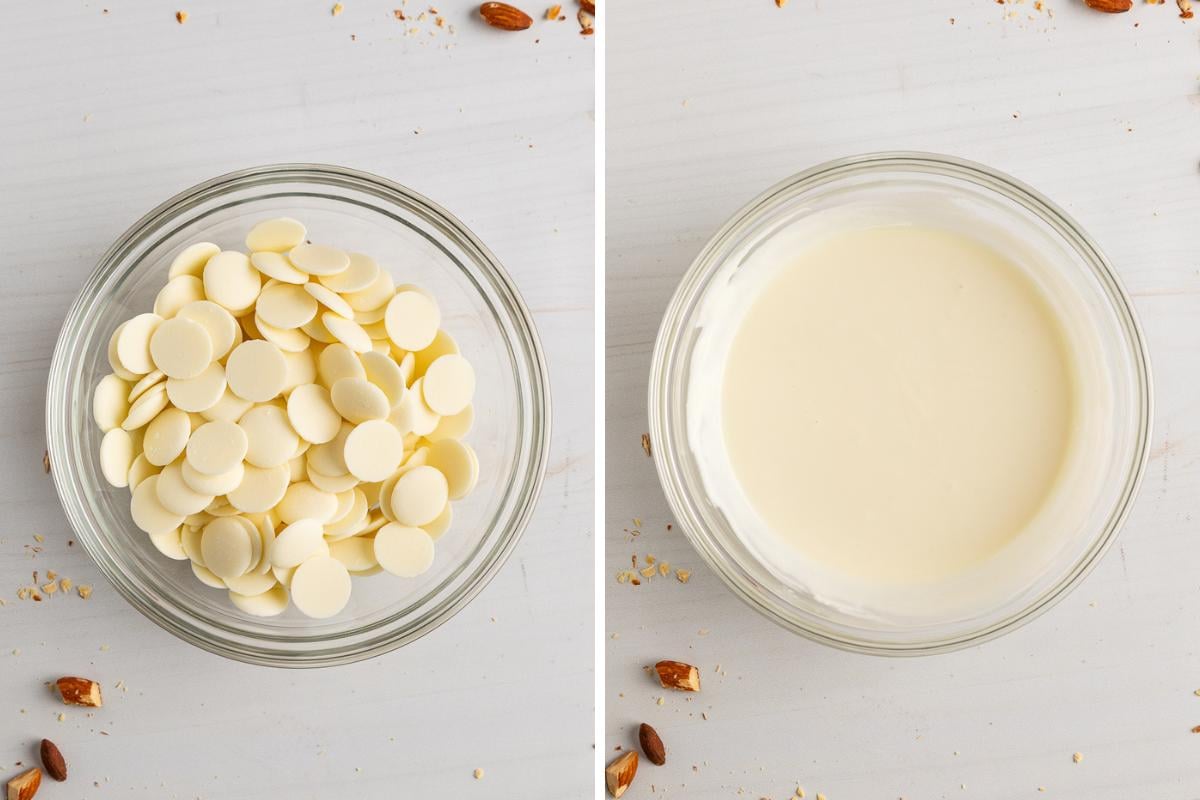
Heat the white chocolate by placing the chocolate into a microwave-safe bowl and microwaving the chocolate in 20-second intervals at half power, stirring well between each interval. Continue until the chocolate is completely melted and smooth. Alternatively, you can use a double boiler to melt the chocolate over low heat on the stovetop.
If using candy melts, almond bark, or melting wafters, melt according to the instructions on the package as they can vary from brand to brand.

If adding mix-ins: Add any desired mix-ins while the chocolate is melted. For this version, I've used cranberries and almonds for a cranberry almond white chocolate bark. But, you can do anything you desire such as Oreos for Oreo bark, peppermint for peppermint bark, candy for candy bark, etc.
Step 2: Spread on baking sheet
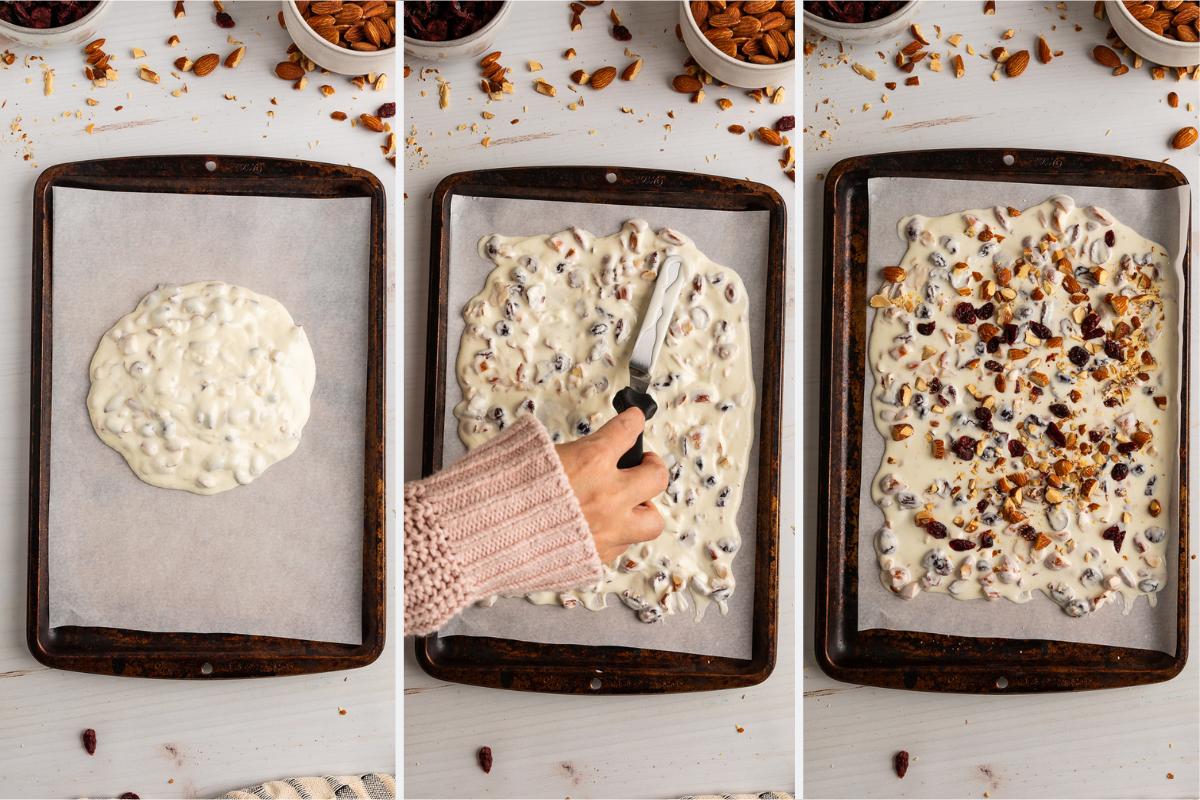
Line a baking pan or baking sheet with parchment paper or wax paper. You can also use a silicone baking mat. This will make it easier to remove the bark once it has set.
Pour the melted chocolate onto the lined baking sheet and spread the chocolate around with a spatula until you get your desired thickness (typically about ¼ to ½ inch thick).
Add any additional toppings such as more nuts, dried fruit, or sprinkles to the top of the chocolate while it is still melted. Gently tapping the pan a few times can help to make sure the bark is evenly spread and distributed. You can also use a toothpick or a skewer to create swirls or marbled patterns in the chocolate by gently dragging it through the chocolate and toppings.
Step 3: Let Dry, Break Apart, and Enjoy!
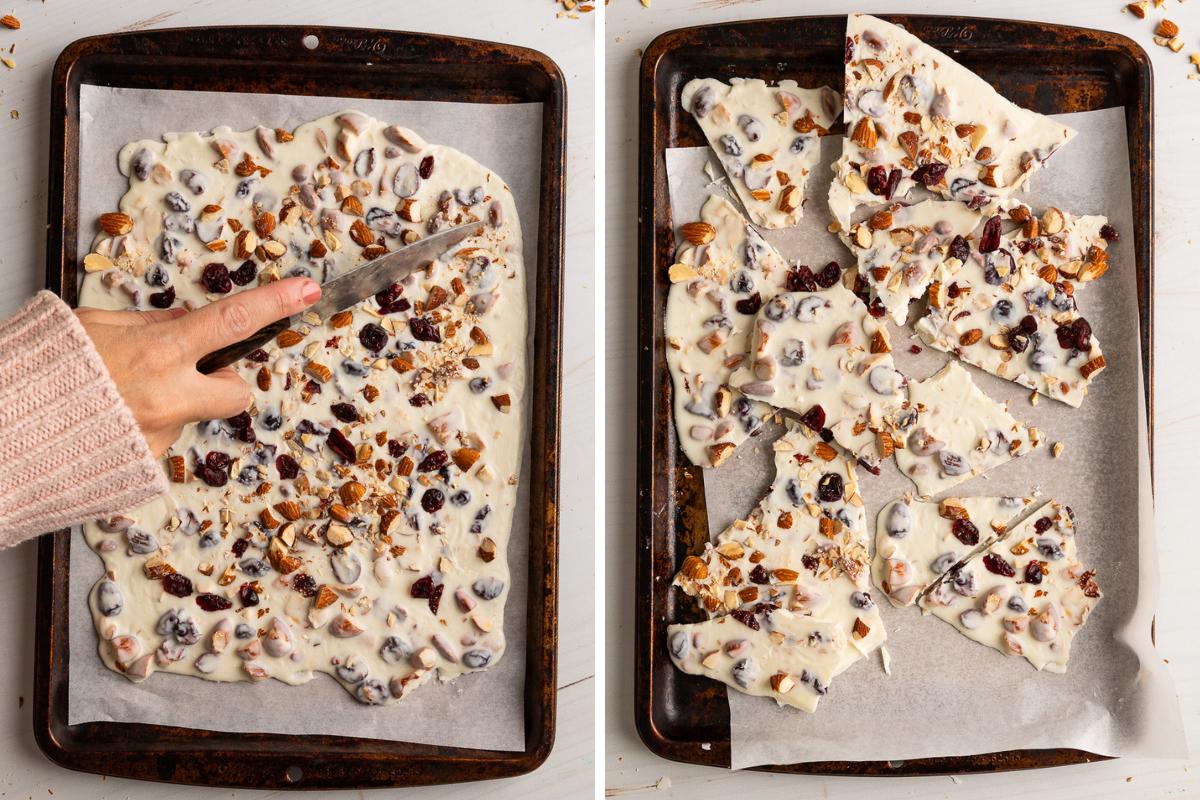
Let the white chocolate bark cool and harden at room temperature for an hour or two, or until it’s completely set and hard. If you’re in a hurry, you can place it in the refrigerator for about 30 minutes to speed up the process.
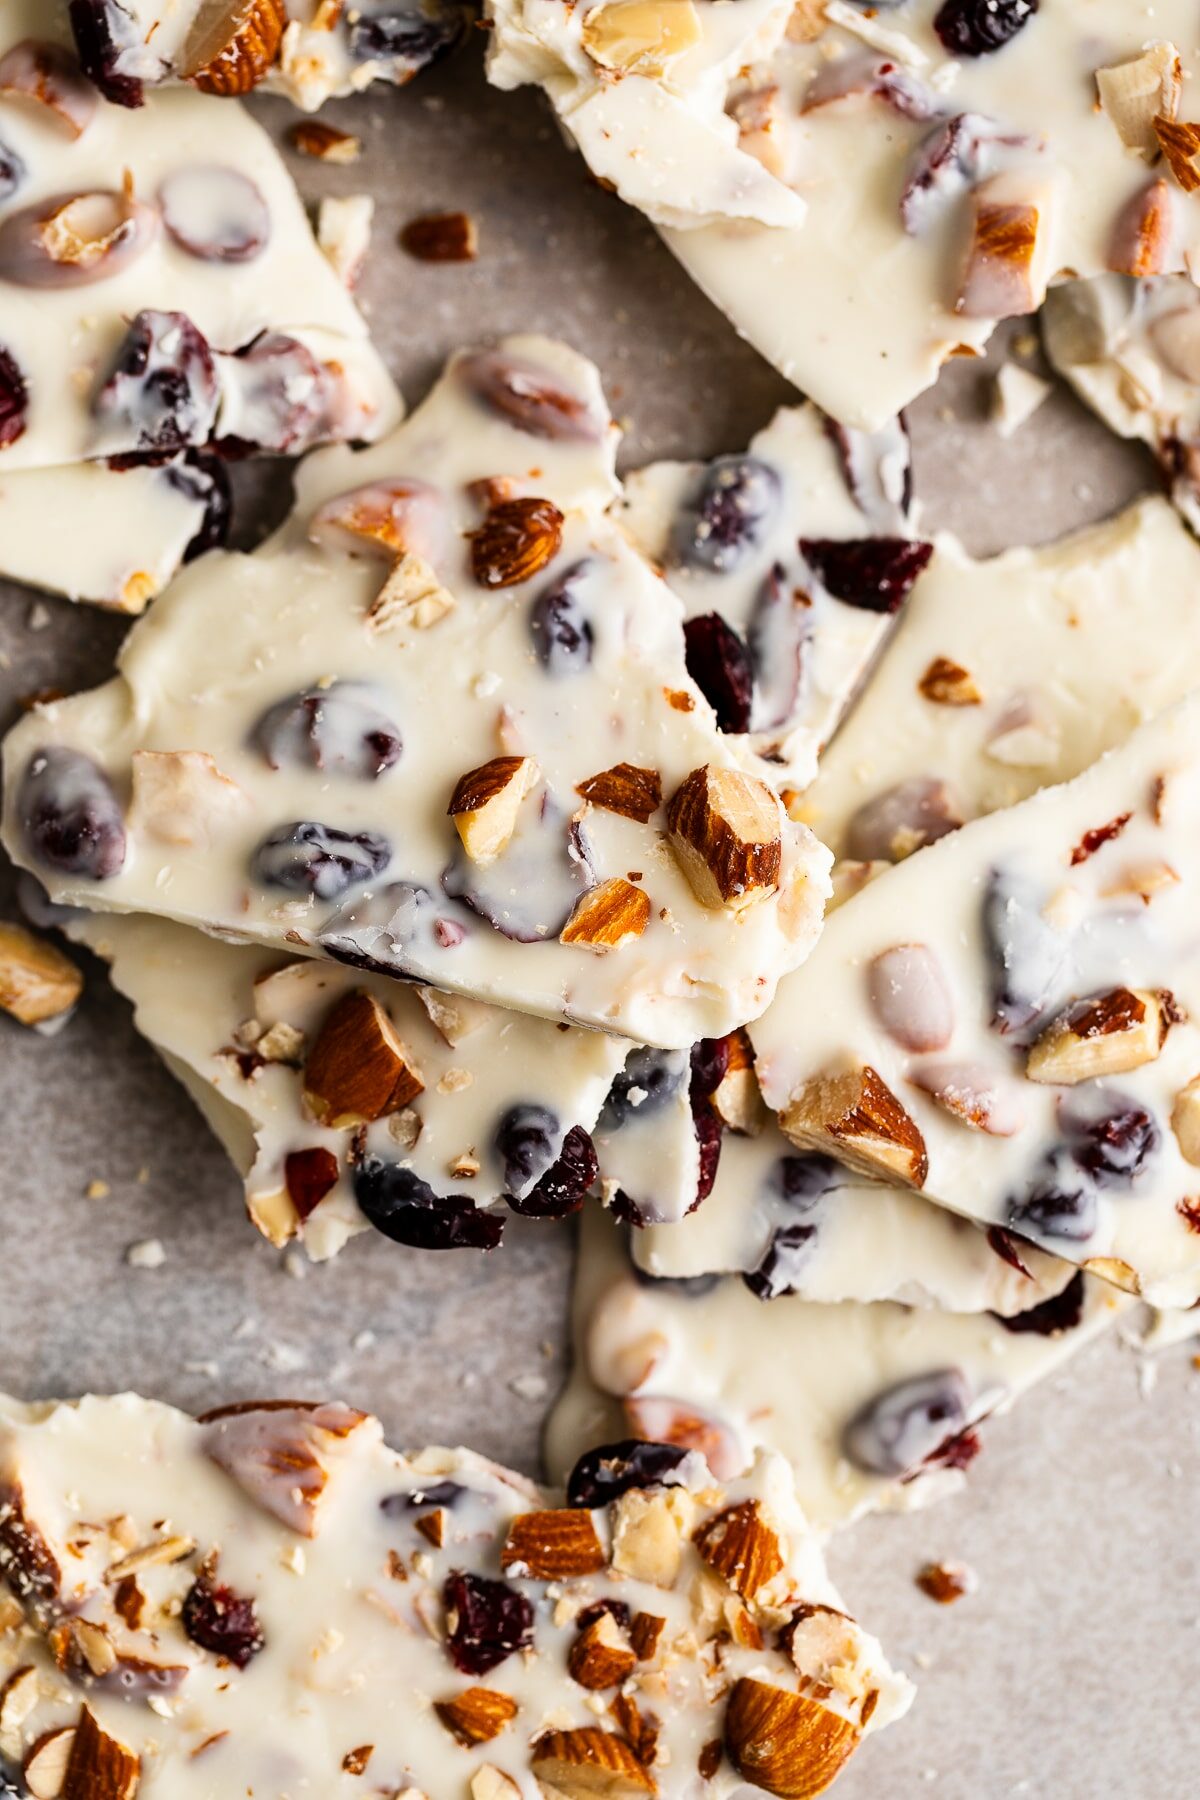
Once the bark is firm and fully set, use a sharp knife to break it into irregular pieces or shards. You can also break it apart with your hands for a more rustic look. Then, gift or enjoy!
Tips and Tricks
- Choose High-Quality White Chocolate: High quality white chocolate or melting chocolate works best. Avoid white chocolate chips, as they may contain stabilizers that can affect the texture and melting ability.
- Make sure your utensils are dry: any liquid can cause the chocolate or candy melts to seize up and get grainy.
- Prepare Your Toppings in Advance: Have your chosen toppings, such as nuts, dried fruits, or crushed cookies, ready before you melt the chocolate. This ensures a quick and smooth assembly process without the chocolate hardening.
- Get the Desired Consistency: If using candy melts and it appears too thick after melting, you can add vegetable shortening 1 teaspoon at a time until you get a pourable, spreadable consistency.
- Adding Flavors and Food Coloring: If adding food coloring or flavors like peppermint or orange to your chocolate bark make sure they are oil based rather than water based. Water based extracts and food coloring can cause the chocolate to seize up and get grainy.
Variations and Flavor Ideas
Add-In and Topping Ideas:
- Fruit: Dried cherries, apricots, raspberries, strawberries, apple, blueberries, pomegranate, really anything you can think of! Candied lemon and orange peels are also delicious!
- Nuts: Pistachios, macadamia nuts, pecans, almonds, are a great compliment to white chocolate.
- Candy: try adding M&Ms, Kit Kats, chopped peanut butter cups, candy canes, Andes Mints, skittles, etc.
- Cereal: cereals like Rice Krispies, Chex mix, Cheerios, and Lucky Charms all add a delicious crunch to the bark.
- Sprinkles: These are a simple way to add fun and flare to your chocolate and sprinkles are great for themed bark. You can easily make a Halloween Bark, Valentine's Day themed bark, or 4th of July theme, etc., just by the type of sprinkles!
You can also add or mix in marshmallows, toasted coconut, popcorn, pretzels, toffee, graham crackers, really anything you can think of! I recommend starting with ½ -1 cup total add-ins per 8-10 oz of chocolate, but you can you really add as much or as a little as you want.
Themed White Chocolate Bark Ideas:
- White Chocolate Peppermint Bark: this is the most popular Christmas bark around! Simply mix into the melted chocolate ¼ tsp peppermint oil and about ½ cup of crushed candy canes (plus more for sprinkling on top).
- Unicorn Bark: Like unicorn popcorn, you can use candy melts in brightly colored pinks and purples, along with unicorn sprinkles for a fun and kid-friendly treat.
- Oreo Bark: Mix in about 1 cup of roughly chopped Oreo cookies or other chocolate sandwich cookies into the melted chocolate, plus more for sprinkling on top.
FAQ and Troubleshooting
Chocolate chips have extra additives to help them hold their shape when baking, so they're not the best for melting down to a smooth chocolate.
While I recommend using white chocolate bars or melting chocolate as they melt much better than white chocolate chips, if you do decide to use white chocolate chip I recommend a high quality chip such as Ghirardelli or Guittard.
There are two reasons chocolate can seize up and get grainy. The first is it was overheated. You can combat this by making sure to follow the instructions exactly when melting your chocolate. If using a microwave heat on half power and use a double broiler if heating on the stovetop. Do not ever heat any type of chocolate or candy melts directly in a pan on a stovetop. It will always overheat and seize up.
The second reason is because liquid somehow got mixed in with the chocolate. Be sure your bowl and utensils are completely dry before adding and melting the chocolate. And, if adding flavors or food coloring make sure they are oil based.
Yes, but if you want to add food coloring to your white chocolate or melting chocolate, be sure to use candy colors which are oil based food. Regular or gel food coloring will cause the chocolate to get grainy.
Yes, white chocolate bark is very freeze friendly.
When to serve
Bark is wonderful because it's a super easy, kid-friendly treat that can be customized for so many occasions like Valentine's Day, Easter, and Christmas. While it is most commonly found around the holidays (who hasn't snacked on white chocolate peppermint bark at a holiday party!), it's really a delicious treat all year round.
It makes a great addition to a dessert board, picnic, BBQ, or game day spread. Or, a simple sweet snack to have when a sugar craving hits.
Gifting White Chocolate Bark
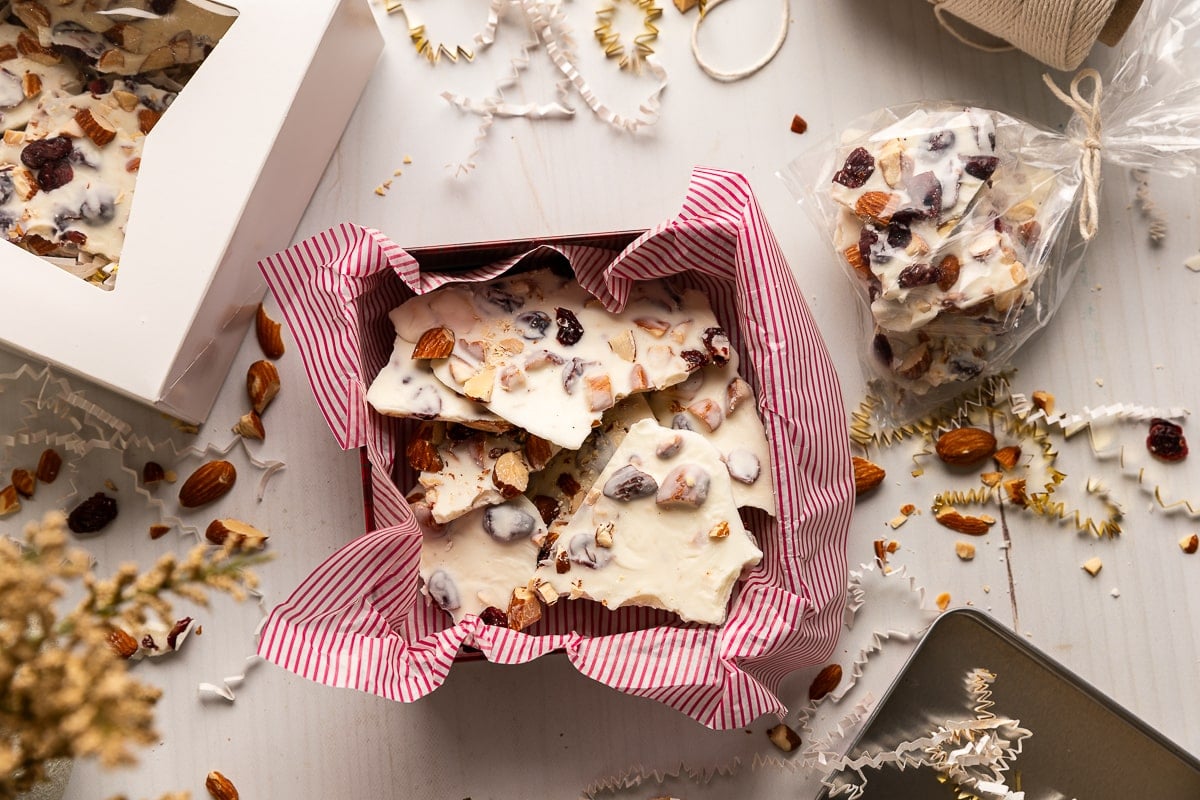
This bark makes such a fun homemade gift! There are three main ways I like to package chocolate bark:
- Bags: I prefer clear plastic bags because they allow all the bark to show through. But, you can also use bakery bags.
- Boxes: This is a great way to gift the bark. Boxes are perfect for when you are gifting a lot of bark or more than one treat such as pairing the bark with chocolate covered strawberries, decorated sugar cookies, or macarons.
- Tins: Cookie tins are not just for cookies! These decorative tins are so cute and festive! Plus, they are a great option for shipping and the least likely to get damaged in transport.
Storing and Making Ahead
This chocolate bark can be stored in an airtight container at room temperature for about a week or in an airtight container in the refrigerator for 2-4 weeks, depending on the toppings (topping with pretzels, popcorn, etc. will go bad or stale faster than topping with candy or nuts). You can also freeze the bark for 2-3 months in an airtight container.
Looking for more no-bake recipes? Check these out!
- Edible Cookie Dough
- Peanut Butter Cornflake Candy
- Oreo Fluff
- No Bake Peanut Butter Pie
- Marshmallow Pops
WANT TO JOIN THE PARTY? Subscribe to my newsletter and follow on Tik Tok, Pinterest, Instagram, and Facebook for all the latest recipes!
White Chocolate Bark Recipe
Equipment
- Microwave Safe Bowl
INGREDIENTS
- 8-10 oz White Chocolate Bars or White Melting Chocolate high quality
- ⅓ cup Dried Cranberries plus more for sprinkling on top, optional
- ⅓ cup Almonds, roughly chopped plus more for sprinkling on top, optional
Other Fun Mix-Ins and Topping Ideas
- Sprinkles, M&Ms, chopped cookies, pretzels, etc., about ½-1 cup total
Instructions
- Line a baking sheet with parchment paper, wax paper, or a silicone baking mat.
- Prep any mix-ins and toppings such as chopping nuts, cookies, etc.
- Melt the white chocolate by placing the white chocolate in a microwave-safe bowl and melting according to instructions on the package, or microwave in 20-second intervals at a half power, stirring between, until the chocolate is completely melted and smooth. Alternatively, you can melt the chocolate using a double boiler on the stove.
- While the chocolate is melted, stir the almonds and cranberries, or any other desired add-ins.
- Immediately pour the mixture onto the prepared baking sheet. Use a spatula to spread it out into an even layer, about 1/4 to 1/2 inch thick.
- Sprinkle extra dried cranberries, almonds, or toppings evenly on top of the melted chocolate. You can gently press them down to make sure they stick or gently tap the pan.
- Let the bark cool and harden. It will take an 1-2 hours at room temperature of 20-30 minutes in the refrigerator.
- Once the white chocolate bark is firm, use a sharp knife to break it apart. You can also break it apart with your hands for a more rustic look.
Notes
- Make sure your utensils are dry as liquid or water can cause the chocolate to get grainy.
- Have your chosen mix-ins and toppings, such as nuts, dried fruits, or crushed cookies, ready and chopped before you melt the chocolate. This ensures a quick and smooth assembly process without the chocolate hardening.
- If using candy melts and it appears too thick and almost pasty, you can add vegetable shortening 1 tsp at a time until you get your desired consistency.
- If adding food coloring or flavors like peppermint or orange to your chocolate bark make sure they are oil based rather than water based. Water based extracts and food coloring can cause the chocolate to seize up and get grainy.
- This recipe makes enough bark to fill a 7 x 10 baking sheet (about 4 generous bark servings) and can easily be halved or doubled as needed.
- This bark will last up to three weeks in an airtight container in the refrigerator and up to three months in the freezer.


Leave a Reply