Cut-out sugar cookies are a simple recipe for perfectly shaped cookies that hold their form and taste delicious! Add royal icing or buttercream frosting and you have a fun cookie for any occasion!

Cut-out sugar cookies are the perfect party cookie because you can make and bake them into any shape! They're a classic holiday and event cookie for a reason.
Topped with Royal Icing, American Buttercream Frosting, or Powdered Sugar Icing, this is a delicious holiday staple that the whole family can enjoy making and decorating together. Plus, they use very simple ingredients you probably already have in your pantry!
Ingredients
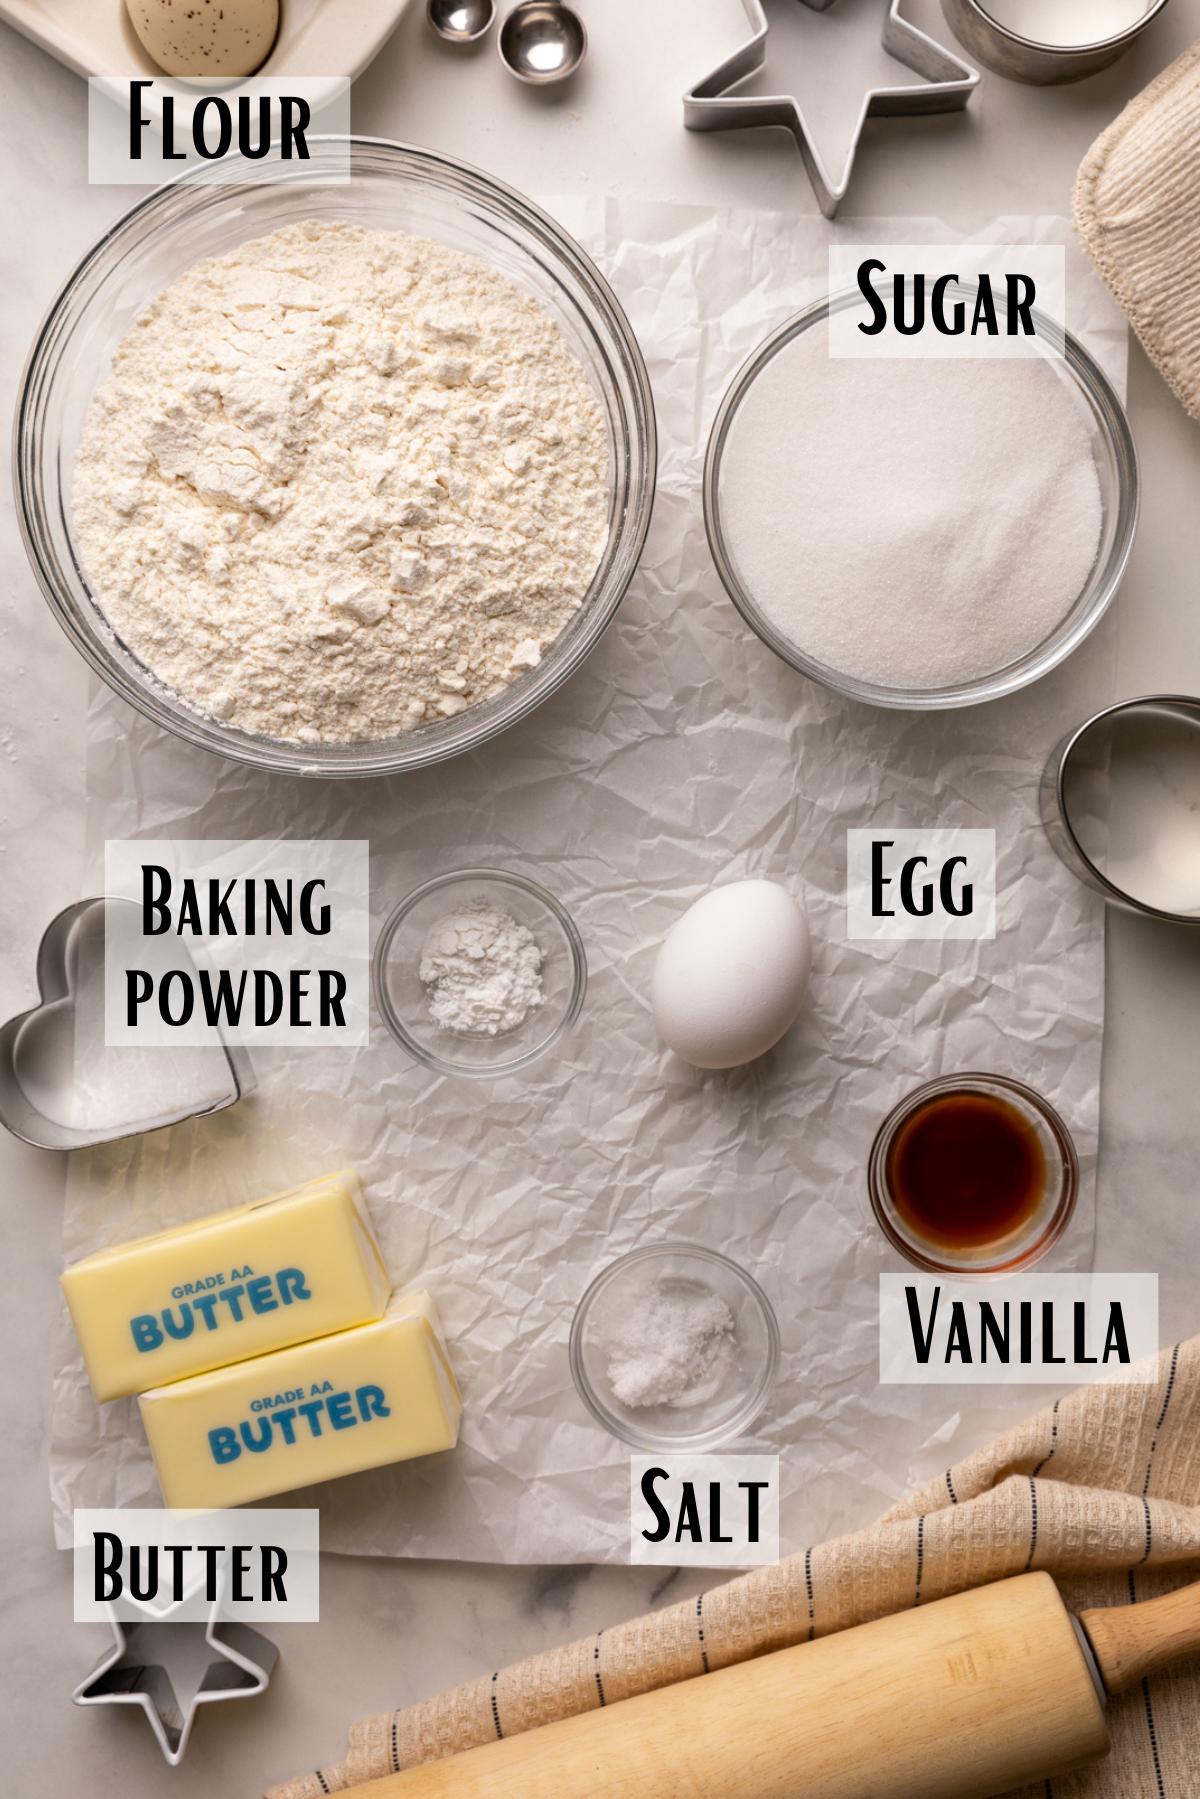
- Unsalted Butter: This recipe uses unsalted butter. You can use salted, just decrease the salt in the recipe by about ¼ tsp.
- Vanilla Extract: I personally like vanilla extract in this cookie recipe, but sometimes I'll also add almond extract or lemon extract as well!
- All-Purpose Flour: be sure to weigh the flour or use the spoon and swipe method of measuring.
cut-out sugar cookies Process
Step 1: Making the Cookie Dough

Mix Flour, Salt, Baking Powder: In a medium bowl, whisk together the all-purpose flour, salt, and baking powder. Set Aside.
Cream Butter and Sugar: Then, using a sanding mixer with a beater attachment, or a hand held mixer in a large bowl mix the soft the softened butter and sugar until it is just incorporated, about a minute.
Add Egg and Vanilla: Once it’s mixed, add the egg and continue beating until it is combined, about 15-30 seconds.
Add Flour Mixture: Finally, add the flour and mix until it is just combined. Do not over mix as it can lead to the cookies spreading in the oven. It should clump around the paddle attachment and when you push your finger into the dough it shouldn't stick.
Step 2: Chill Dough
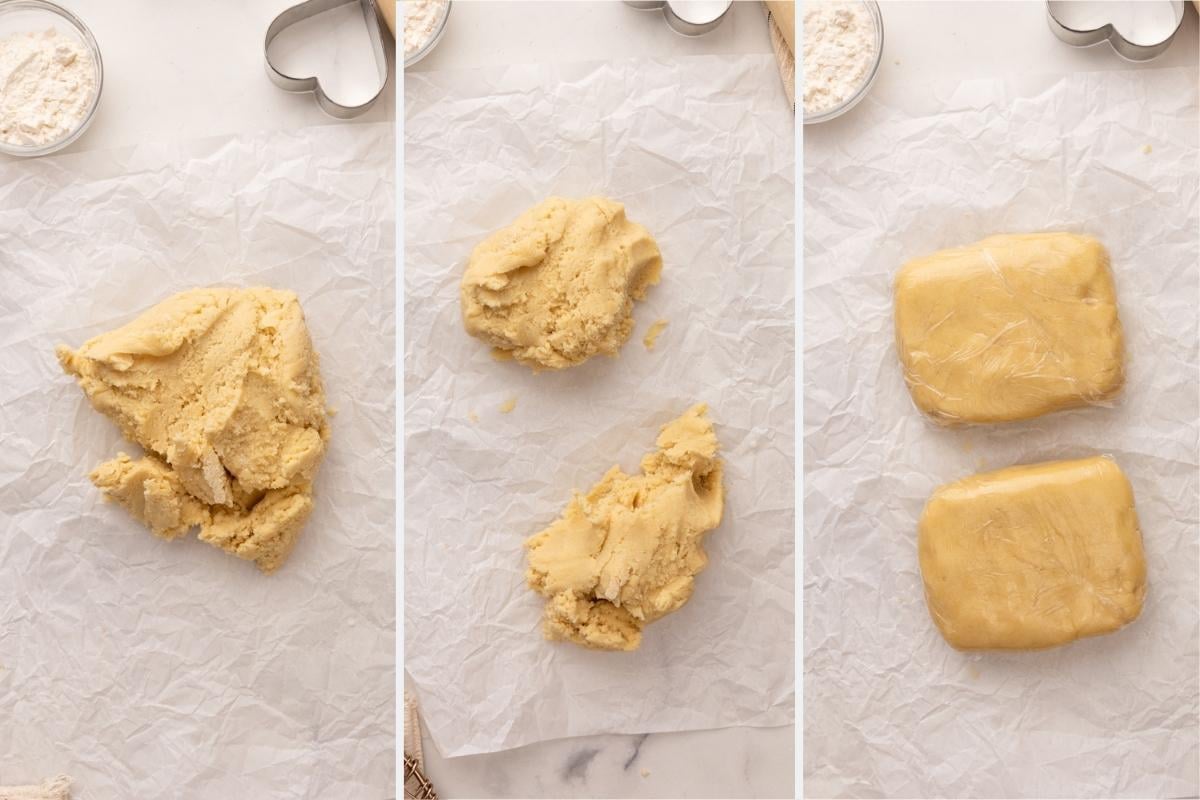
Wrap Dough: Divide the dough in half. Form two disks with the dough and wrap tightly in plastic wrap. Chill the dough at least an hour, or up to 5 days.
Alternatively, you can roll out the sugar cookie dough before you chill it. Both methods work.
Step 3: Roll Dough and Cut Cookies
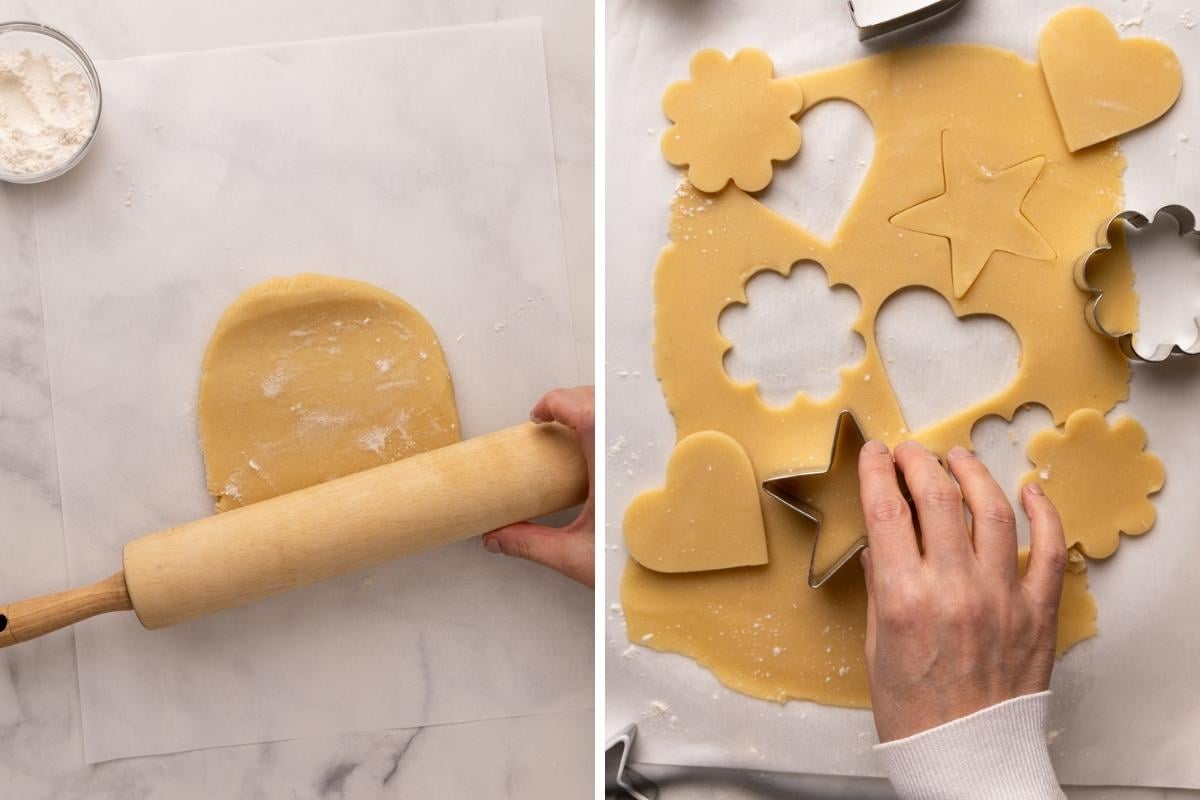
Roll Out Dough: place the disk of cookie dough on a clean counter, piece or parchment paper, a silicone baking. Lightly dust with flour and roll out the dough to desired thickness (typically 1/4-1/2 inch thick). If the dough is too hard to roll out, let rest for 5 minutes at room temperature before rolling.
Cut out Cookies: Using your desired cookie cutter, cut out the sugar cookies and place on a baking sheet lined with parchment or a silicone baking mat. If at any point the dough becomes to soft when rolling and cutting the cookies, re-chill in the fridge or freezer for 10-15 minutes.
Re-Chill (optional): If desired, you can re-chill the cut out cookies right on the baking pan, right before baking. Just place in the fridge or freezer for 15-20 minutes before baking.
Step 4: Bake your cookies!

Bake Cookies: Place the tray of cookies on the middle rack of a 350 °F pre-heate oven. Baking times can vary depending on the size of your cookies, but for most 2-3 inch cookies, you bake for 8-12 minutes at 350 °F. Smaller cookies will need less time and larger cookies will need more. You can tell they're done when they easily move from the baking pan and they start to very slightly brown around the edges.
Cool Cookies: Cool the cookies for 5-10 minutes on the pan and then let them finish cooling on a wire cooling rack. Make sure they are completely cool before you add any frosting.
Cut, Roll, Chill, Repeat: Repeat the process of rolling out the scraps of dough, chilling until firm, cutting out new cookies, and baking, until all the cookie dough is gone.
Top Tips for Making Cut Out Sugar Cookies
- Measure out the flour using a scale or the spoon and swipe method of fluffing up the ingredients and then spooning into the measure cups and swiping the excess off the top with a knife. If you dip the measuring cup directly into the flour it can pack down and you will add too much flour to the recipe.
- If at any point, the dough becomes too soft when rolling and cutting the cookies, re-chill in the fridge or freezer for 10-15 minutes.
- When baking different sized cookies, group them together by size to ensure even baking. If you have large cookies and small cookies in the same batch in the oven, it's really easy to over bake the small ones.
How to decorate cut out sugar cookies
Now for the fun part, decorating cut out sugar cookies! There are an unlimited number of ways to decorate these cookies. That's why they're such a common cookie for holidays and events- they're super customizable. Just check out all the different cookie cutters you can find on Amazon!
The most common methods to decorate are royal icing or buttercream frosting (like these Halloween Cut Out Sugar Cookies). You can use piping tips, or tipless piping bags.
Here are some fun methods:
- Peeps Sugar Cookies (using buttercream frosting, sanding sugar, and sprinkles)
- Moss Sugar Cookies (using edible moss, perfect for Easter or Halloween!)
- Or you can decorate for holidays like these Easter cookies or these Easter Bunny Cookies:
Make Ahead and Storing
Chilled Dough: The dough can be easily be made ahead of time! .Simply form the dough into discs, wrap tightly in plastic wrap, and place in an airtight container. The dough will keep in the refrigerator for up to 3 days or in the freezer for up to 2 months. Thaw completely in the refrigerator before rolling and cutting.
Baked Cookies: Undecorated baked cookies can be stored at room temperature in an airtight container for 5-7 days. However, for longer storage, freeze them! Let the cookies cool completely, then place them in a single layer on a baking sheet and freeze for 1 hour. Once frozen solid, transfer the cookies to an airtight freezer bag or container. Frozen cookies will keep for up to 3 months. Thaw at room temperature before decorating or enjoying.

WANT TO JOIN THE PARTY? Subscribe to my newsletter and follow on Tik Tok, Pinterest, Instagram, and Facebook for all the latest recipes!

Cut-Out Sugar Cookies
Equipment
- Mixer
- Cookie cutters
- Baking Sheet
- Parchment Paper or a silicone baking mat
INGREDIENTS
- 2.5 cups All-Purpose Flour 11 oz or 312 grams
- 1/2 tsp Baking Powder
- ½ tsp Salt
- 1 cup Granulated Sugar
- 1 cup Unsalted Butter room temperature
- 1 Large Egg room temperature
- 1.5 tsp Vanilla or vanilla bean paste
Instructions
- Whisk flour, and salt in a bowl and set aside.
- Using a standing or handheld mixer, cream the softened butter and sugar on medium until fully mixed together, about 45-60 seconds.
- Scrape down the sides of the bowl and add the egg and vanilla.
- Mix on low, increasing to medium until fully combined, about 30-60 seconds.
- Add the flour mixture. Starting on low, mix for about 30 seconds, then increase to medium speed. Once the dough starts to clump in the middle it's done. You should be able to press your finger into the dough and it will indent and not stick.
- Divide your dough in half. If you're saving you dough to bake at a later time, form two disks and wrap tightly in plastic. Store in an airtight container or ziploc bag in the fridge or freeze until ready to bake.
- Chill in the fridge 1 hour.
- At this time, preheat your oven to 350 degrees.
- When ready to bake, remove from fridge and roll out each slab of dough to ¼ – ½ inch thick on floured parchment.
- Cut out the cookies. If at any time the dough gets too soft, place back in the fridge or freezer for 10-15 minutes.
- Place the cut out sugar cookies on a parchment or silicone mat lined baking sheet.
- Optional: Rechill the cut-out cookies for 10-15 minutes in the fridge or freezer to further prevent spreading.
- Depending on the size of the cookies, bake for 8-12 minutes.
- Let cool 5 minutes on baking pan, then remove to a wire rack to finish cooling.
- Re-roll the scraps of dough, repeating the process of cutting out the. cookies, chilling the dough, and baking, until all of the dough is gone.
- Let the cookies cool completely before frosting. Enjoy!
Notes
- Spoon the flour into the measuring cup, rather than dipping the measure cup right into the bag of flour. That can pack down the flour and you'll get more in the recipe than it calls for. My favorite method is to use a scale to weigh it.
- Make sure your butter is softened. This ensures the butter and sugar creams easily and you don't add too much air when mixing.
- Cream the butter and sugar until just incorporated, less than a minute. You want the butter and sugar to be mixed, but you don't want the butter to start fluffing up as this will add extra air into the dough, and that can lead to spreading when you bake your sugar cookies.
- Try not to over mix your dough. You want it to all come together and clump in the middle. If you push your finger into the dough and it makes an indent without sicking it's done.
- When baking different sized cookies, group them together by size to ensure even baking.
- The number of cookies and nutrition facts can vary by the size and thickness of the cookies
- Cookie dough can be store unbaked for 3-5 days in the fridge or up to a month in the freezer, tightly covered.
- Baked cookies can last one to one week at room temperature in an airtight container.

Ali says
The final outcome tastes SO GOOD! But at 12 minutes my cookies were still raw in the middle. And they were all really thin, so the 12 minutes should have been plenty. Other than that, they were amazing!
Beth says
I love versatile recipes like this! With all the options of sprinkles you could make these for any and all holiday’s and parties!
Annissa says
Love this good old recipe that is so versatile. Surely you can serve this classic treat all year round!
Milica Vladova says
These cookies look so cute and I bet they are ultra delicious!
Marie says
These sugar cookies look amazing! Thank your sharing all your fantastic tips for making and decorating these cookies.
Sharon Chen says
Oh these cookies look so pretty! I bet they taste great, too!
David says
Very technical recipe, but nonetheless I can’t wait to try this. Will bookmark this and give it a shot closer to my daughter’s birthday. Thanks for sharing this.