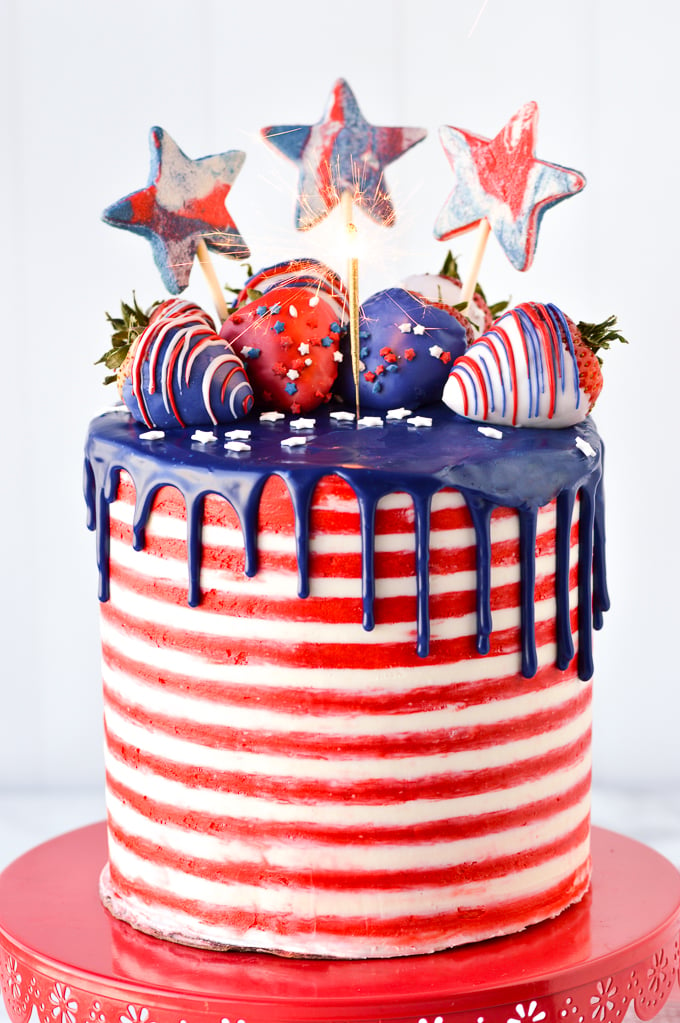
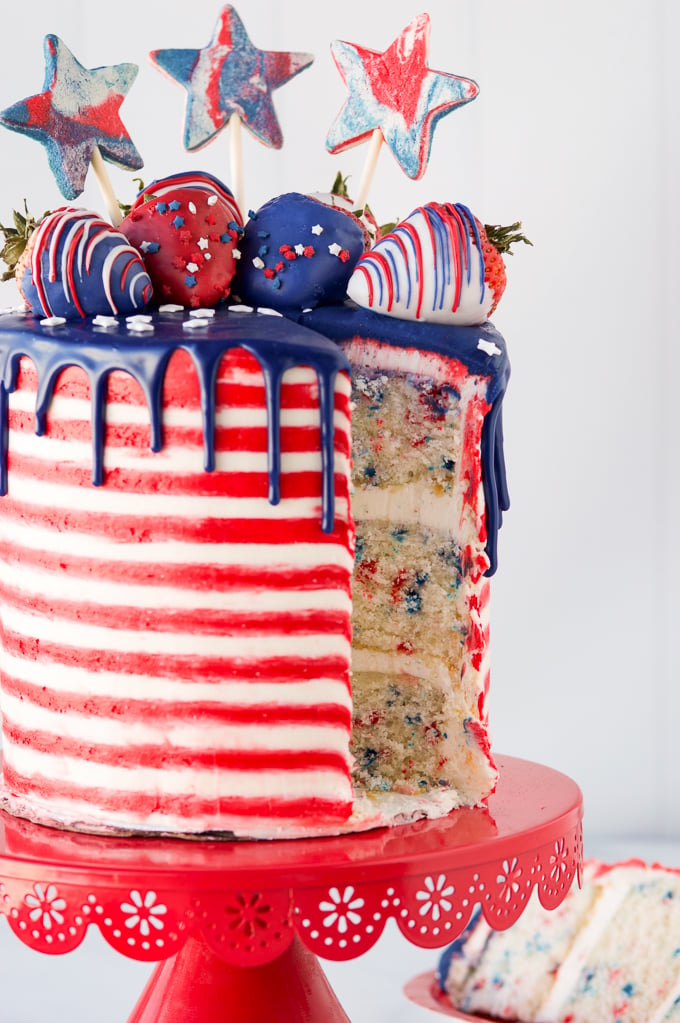
This red, white, and blue flag themed cake is a fun decorated dessert for holidays such as Memorial Day or 4th of July. Using a white cake recipe, with red and white striped buttercream frosting, a blue chocolate ganache drip, and chocolate covered strawberries this cake is perfect for your next patriotic picnic or party!
It’s almost 4th of July! What a fun way to celebrate with this striped red white and blue 4th of July cake!
It uses buttercream frosting with a navy blue chocolate drip for a fun design that looks like a flag. The nice thing about this cake is it is completely customizable! Want to use your favorite chocolate cake recipe? Do it! Don’t want to add cookies or strawberries? Skip them! You can make this cake as easy or elaborate as you want so give it a try today!
Cake Components
- Cake: I used this recipe for the cake, but you can use your favorite cake recipe.
- Buttercream Frosting: I recommend American Buttercream or Swiss Meringue Buttercream for the stripes. You can use any frosting for the filling.
- White Chocolate Drip
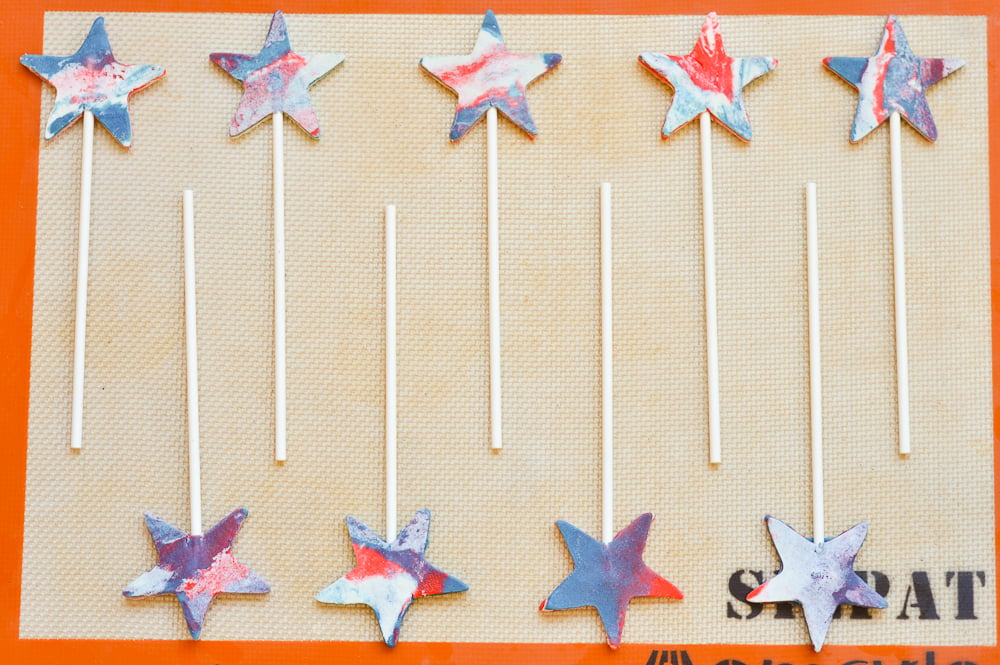
- Red, White, and Blue Cookies
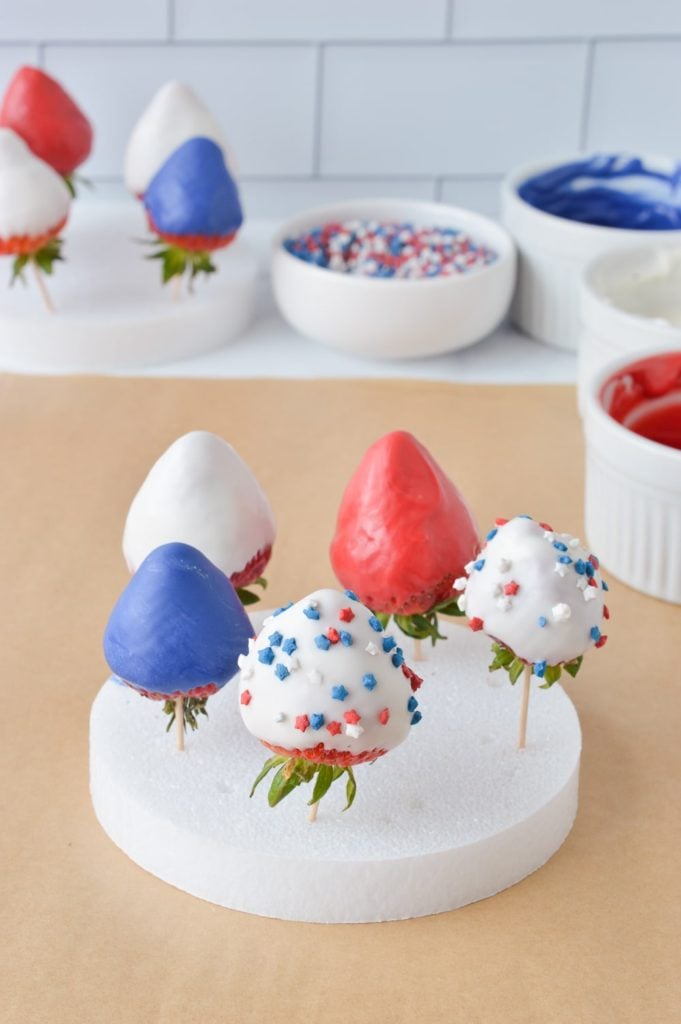
- Chocolate Covered Strawberries
How to make Cake
Step 1: Prep
- Preheat your oven to 350 ℉.
- Spray 3 cake layer pans with non-stick baking spray and line the bottoms with parchment paper to prevent sticking.
- Whisk cake flour, baking powder, and salt and set aside. In a separate bowl add vanilla to the buttermilk and also set aside.
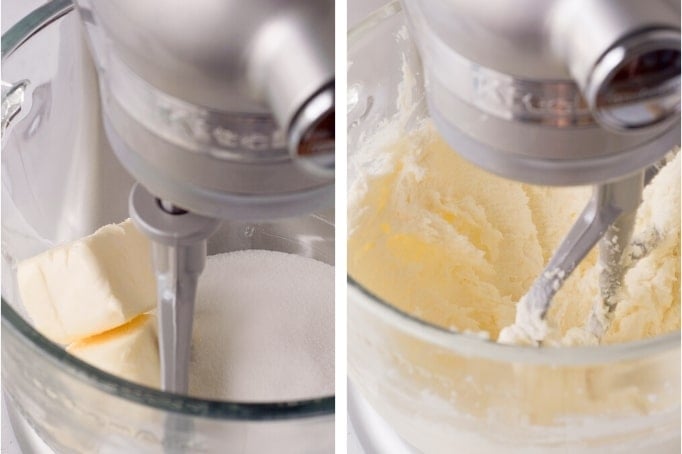
Step 2: Cream Butter and Sugar
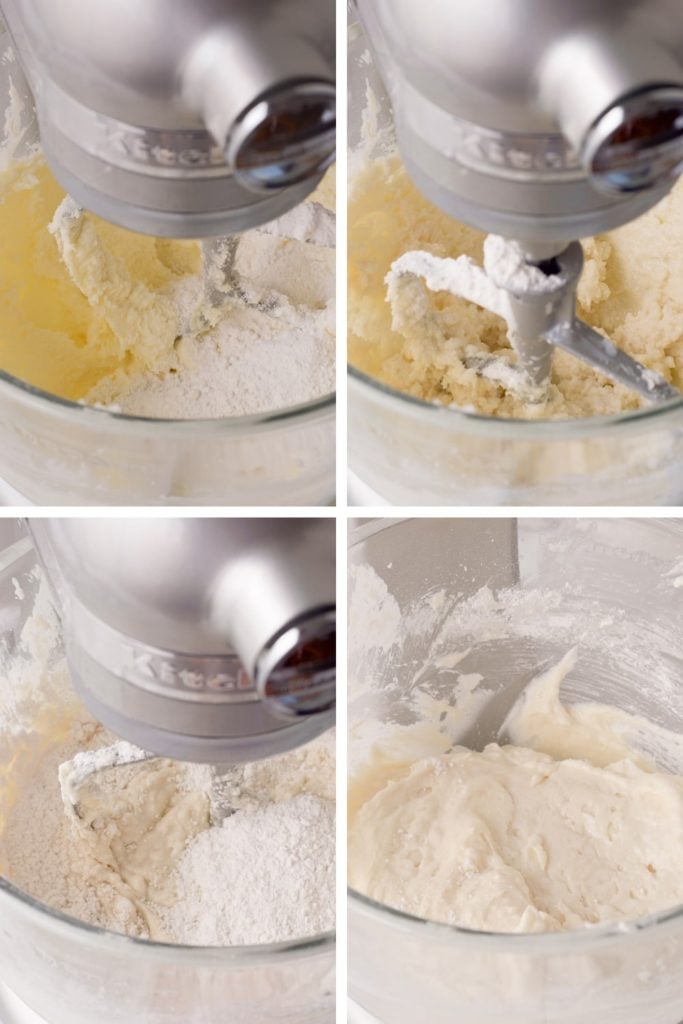
Using a hand held or standing mixer, cream the softened butter and sugar for a good 5 minutes. This whips up air into the butter and helps make the cake light and fluffy. The butter should be pale and very creamy.
Step 3: Add Dry Mix
The, you alternate adding the flour mixture and the milk mixture, starting and ending with the flour. So, you’ll add flour, milk, flour, milk, flour. You’ll want to mix until just incorporated after each addition. Do not over mix the batter.
Step 4: Whip and Fold in Egg Whites
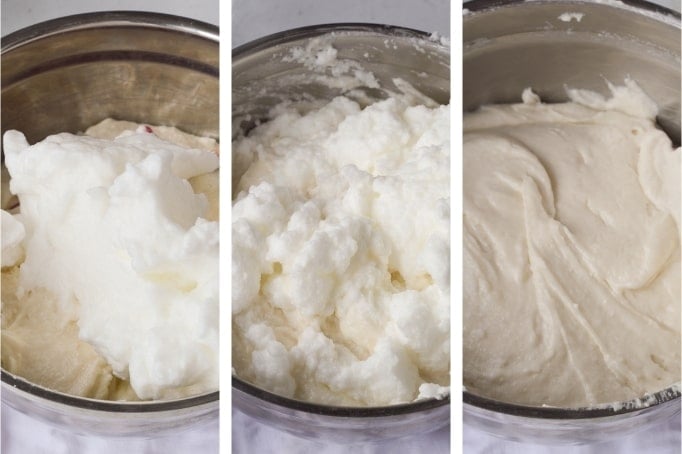
In a separate and very clean bowl, whip up the 5 egg whites. I only have one standing mixer, so I put the mixed batter in new bowl and used my stand mixer to whip the eggs. If use the same bowl or mixer, make sure to clean it very, very well. Any oil or fat can hinder the egg whites from whipping up. A trick is to rub some lemon juice on the bowl to ensure it is grease free.
Then, you’ll fold 1/3 of the whipped egg whites into the batter and make sure it’s incorporated. Then, very gently fold the rest.
Step 5: Fold in Sprinkles (optional) and Bake
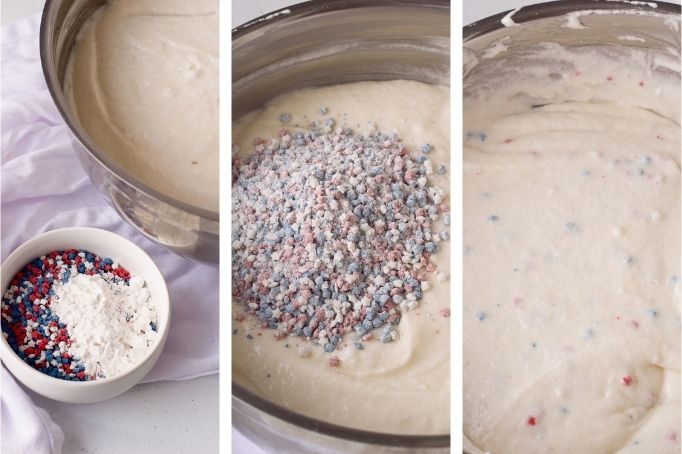
For this patriotic cake I added red, white, and blue sprinkles! I used ⅓ cup star sprinkles, which I coated in 1 tablespoon flour.
You’ll gently mix these into the batter. Once it’s all mixed, you can divide the batter evenly between the three cake pans. I used about two cups per pan.
Then, bake for 26-32 minutes. This will vary depending on the size of the cake pan you use. For a 6 in cake pan, these make very tall layers and they take awhile to cook.
Let cool in the pan for 15-20 minutes and then transfer to a cooling rack to finish cooling. Make sure they are completely cooled before you frost.
Tips for making a 4th of July white cake:
- Make sure all your ingredients are at room temperature.
- You can make buttermilk by adding 1 tablespoon lemon juice to your milk and letting it sit for 5 minutes (it will curdle, this is what you want and you’ll add the curdles to the batter).
- Try not to over mix the batter as it can lead to a dry cake.
- If using the same bowl to whip your egg whites you made the batter, make sure it is very clean to ensure the egg whites whip properly.
- After your cake has cooled, trim and level it to make sure the layers are even and there are no domes on the top. I highly recommend these bake even strips. They work really well – I almost never trim my cakes because they bake really even with the strips. You can also use wet towels, although I’ve never tried that trick.
- Make sure your cake is completely cool before you try to frost it, otherwise the frosting will melt.
Frosting
Frosting Type and color
A basic American buttercream frosting works beautifully for this cake. You can check out the full recipe here along with tons of tips and tricks. I recommend one and a half or double the recipe to ensure you have enough frosting for the cake.
Swiss meringue buttercream also works really well. You can find the recipe here.
Once you have your frosting, add about 1.5 cups for frosting to a separate bowl and using a gel food coloring, color the frosting red. This will be the stripes on the cake.
Frosting Stripes on a Cake
Step 1: Crumb Coat + Base Layer
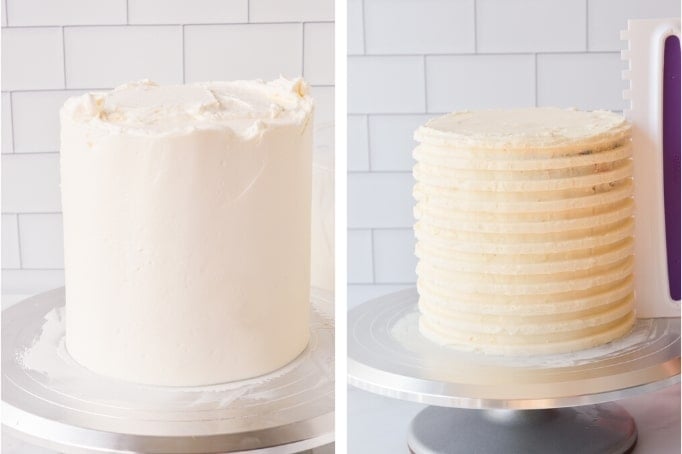
First, add a think layer of frosting on the cake lock in the crumbs. Chill for at least 15 minutes, then add a very thick layer of frosting to the whole cake.
Step 2: Create Groves and Chill
After frosting a thick layer I used this tool to create grooves in the frosting. Once the groves are deep and uniform, chill the cake another 60 minutes to firm up the buttercream.
You want the groves to be deep so that you are able to scrape a few layers of the frosting away when you add your second color.
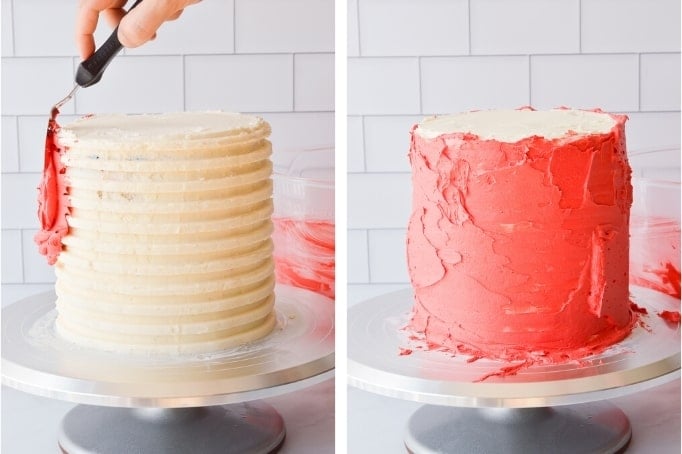
Step 3: Cover in Red Frosting
You can see below after creating grooves and letting the cake chill, I covered the whole thing is red frosting. Next time I would probably use a pastry bag to fill in individual grooves with red frosting. I think this would create cleaner stripes. But, either way works.
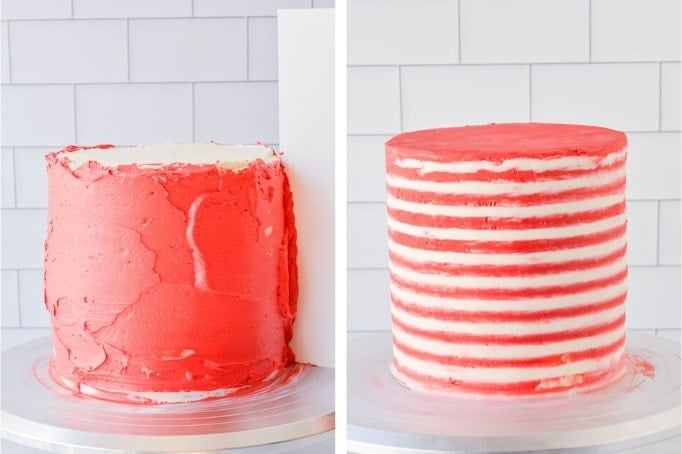
Step 4: Scrape Away Frosting
Now is the time to use a bench scraper to scrape away the excess frosting and start showing the stripes. As you scrape away outer layers the red and white stripes comes through.
When scraping, make sure you keep your bench scraper very clean. I wiped mine on paper towels after every turn. If you’ve never frosted stripes on a cake I recommend these two tutorials here and here.
Tips for frosting stripes on a cake:
- You want to create pretty deep groves. This allows for some wiggle room in case some of your sides are not even or there are air pockets in the white frosting. When you create deep grooves you’ll be able to scrape away any imperfections and still have an even cake.
- Let the cake chill at least an hour after you frost the grooves. Having the white frosting cold, helps keep the red and white frosting from mixing together when you smooth it out.
- You can either cover the whole cake in the second color or use a pastry bag to fill in the groves. Using a pastry bag to fill the groves is an extra step but it will give you cleaner stripes.
- Once you add the second color it’s very important to keep you cake scraper clean so you don’t spread the red frosting around. I recommend wiping your cake scraper clean after every time you go around.
- It will look messy at first, but keep scraping! The lines will get clearer as the more you scrape.
Decorating
Now comes the funnest part, decorating! For this cake I used the following:
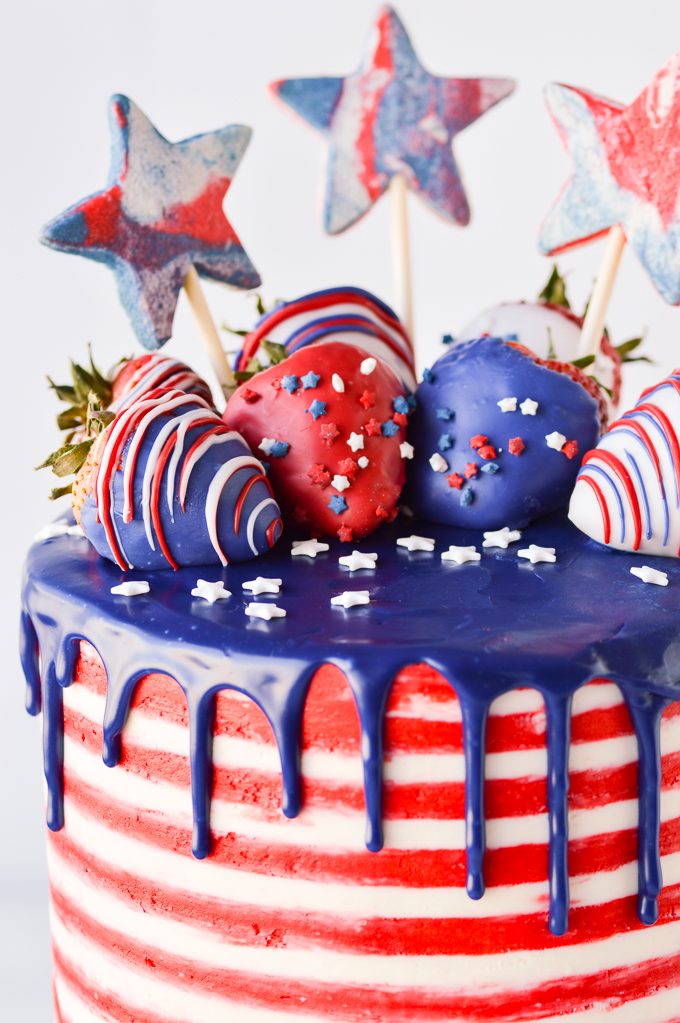
Navy Blue Chocolate Drip
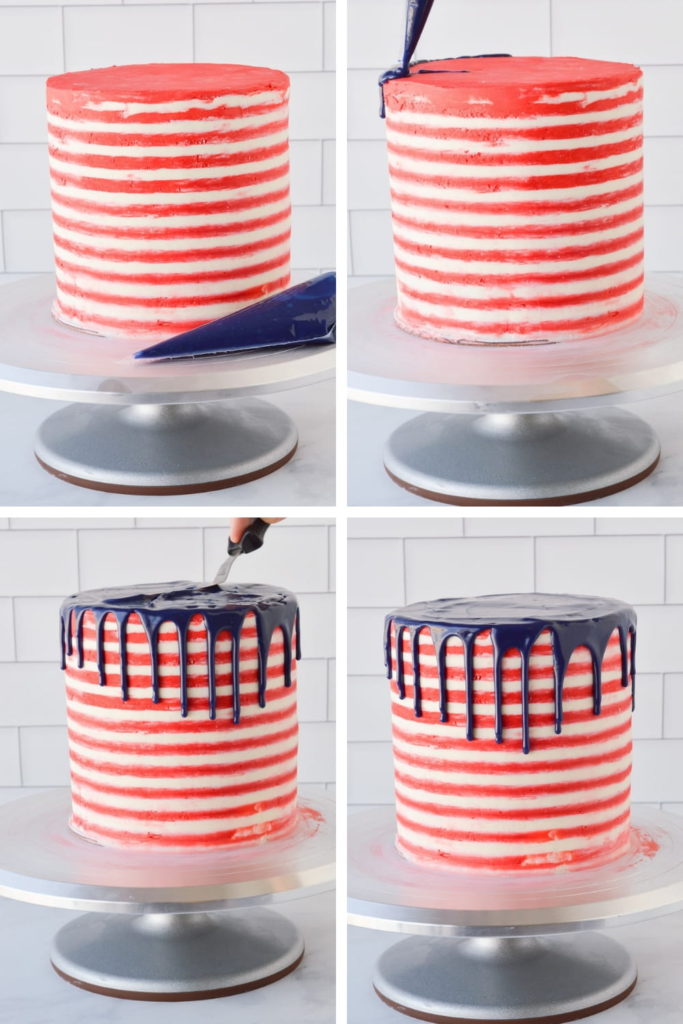
White chocolate drips are really easy and make a cake look fun and fancy. I use white chocolate melts to make a ganache and then add food coloring to color the drip navy blue. For some reason, this works better than using navy blue chocolate melts. Since there is cream in the ganache you can use regular or gel food coloring to color the drip. I have a full tutorial on how to do a white or colored chocolate drip here.
Here are some tips and tricks to make sure you get a perfect chocolate drip:
- I recommend using white chocolate melts, at a ratio of about 2 parts chocolate to 1 part cream and then using food coloring to get the drip the color you want.
- Let the chocolate cool for around 15-20 minutes, until it’s around 90 degrees.
- Make sure your cake is cold when you add the drip. This helps slow the drip down the sides of the cake.
- Using a pastry bag with the tips cut off allows for precise drips exactly where you want them.
Chocolate Covered Strawberries
Everyone loves chocolate covered strawberries! Plus, they are so easy to make. I decorated these patriotic chocolate covered strawberries in exactly the same way as this post here. All the same tips and tricks apply. The big ones are as follows:
- Make sure you use candy melts in the colors you want your strawberries as you can not add regular food coloring to white chocolate or it gets grainy.
- Make sure your strawberries are completely dry before you cover them in chocolate.
- Anything like sprinkles that needs to stick to the strawberries, make sure to add when the strawberries are still wet. If you don’t have styrofoam you can place the strawberries directly on parchment or wax paper to dry.
- They can start to leak strawberry juice after they sit for awhile, so they’re best the day you make them.
Red, White, and Blue Cookie Pops
These cake pops use sugar cookies dough colored red white and blue! Cut them out into starts and add a lollipop stick and bake as directed. They’re really fun and easy and you can make and you can make them in a few days in advance!
Timeline for Making and Decorating this 4th of July Cake
I recommend making the cookie pops, cake, and frosting the cake on day 1 and then chilling the cake overnight and making the chocolate covered strawberries, frosting the red stripes, adding the drip, and decorating on day 2.
Make it Even easier
While it seems like there are a lot of steps this is actually a pretty simple cake. But, you can make it even easier if you want to:
- You can use your favorite cake recipe or even a box mix cake to make this even easier. You can even make and freeze your cake a few weeks in advance and then defrost when you’re ready to decorate. Just make sure it’s very tightly wrapped up so it doesn’t take on any additional flavors from your fridge or freezer.
- The cookie pops can be made up to a week in advance, or skip them if you don’t feel like it. The drip and strawberries are still so cute without the cookies!
- No pastry bags? You can use ziplock bags with the tip cut off.
WANT TO JOIN THE PARTY? Subscribe to my newsletter and follow on Pinterest, Instagram, and Facebook for all the latest recipes!
4th of July Cake
INGREDIENTS
- 2 3/4 cups cake flour (305 grams)
- 1 tbsp baking powder
- 3/4 tsp salt
- 1 cup buttermilk (240 ml) room temperature
- 2 tsp clear or pure vanilla extract
- 1 cup unsalted butter (230 grams) room temperature
- 1 3/4 cup granulated sugar 350 grams
- 5 large egg whites room temperature
- ⅓ cup red white and blue sprinkles optional
- 1 tbsp cake or regular flour optional
American Buttercream
- 2 cups butter softened
- 6 cups powdered sugar 1 ½ pounds
- 2 tsp clear vanilla extract
- 2 tbsp milk or cream optional
- red food coloring
Navy Blue Chocolate Ganache Drip
- ½ cup white chocolate melts
- 3 tbsp heavy cream
- navy blue food coloring
- pastry or ziplock bags optional
Decorating 4th of July Cake
- chocolate covered strawberries
- red, white, and blue cookie pops
- extra sprinkles optional
Instructions
- Preheat oven to 350 degrees. Spray three 8 or 6-inch cake pans with baking spray and line the bottom with parchment paper.
- In a large bowl mix the 2 ¾ cup cake flour, 1 tbsp baking powder, and ¾ tsp salt.
- Combine 1 cup buttermilk and 2 tsp vanilla in a bowl
- In a standing mixer with a paddle attachment, cream the butter and sugar for 5 minutes. The butter should be very pale, light, and fluffy.
- Alternate adding the dry ingredients and wet ingredients, starting and ending with the dry ingredients. So, you’ll add the mixes for flour, milk, flour, milk, flour. Mix each until barely combined. You do not want to overmix.
- In a separate bowl (or using the same bowl cleaned very well), whisk the 5 egg whites to stiff peaks.
- Gently fold ⅓ the egg whites into the batter. Once combined, fold in the remaining egg whites.
- If adding sprinkles, mix together 1 tbsp flour and ⅓ sprinkles. Then, gently fold into the batter.
- Pour the batter evenly into the prepared cake pans. Tap on the counter to spread it evenly and release any air bubbles.
- Bake at 350 degrees for 26-35 minutes, depending on the size of the pan you use. You’ll know it’s done when you can insert a toothpick and it comes out clean and it gently springs back when you touch it.
- Let cool in the pan for 20 minutes then transfer to a wire rack to finish cooling.
- Make sure the cakes are completely cool before starting to frost.
American Buttercream Frosting
- In the bowl of a standing mixer or using a hand held mixer with a paddle attachment, whip the butter on medium for 2-3 minutes until very light and fluffy.
- Turn the mixer on low and add powdered sugar. Mix until the powdered sugar is combined with the sugar.
- Add the vanilla and turn to medium and mix an additional 2-3 minutes until the frosting is light and fluffy.
- If the frosting is too thick you can add a tbsp or two of milk or cream. If it’s too thin you can add a few tablespoons of additional powdered sugar.
Frosting the Cake
- Once the cake has completely cooled, frost the cake.
- This cake works best if you have a cake turntable to assist with frosting. Place a tiny bit of frosting on a cake board in the middle of the turntable and add the first layer. This helps it stick when you are frosting the cake.
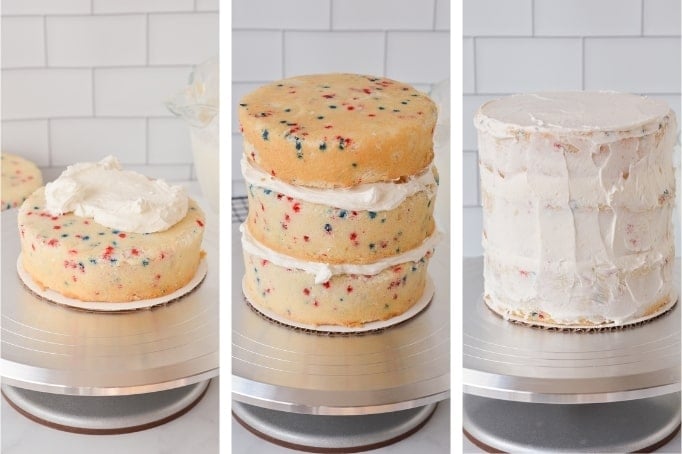
- Add about ½ cup frosting on top of the first layer and spread around evenly. Then add the second layer of cake and add another ½ cup frosting. Add the third layer and then cover the entire cake in a crumb coat, which is a thin layer of frosting that keeps the cake from getting crumbs in the next thicker layer of frosting.
- Chill the crumb coat in the fridge for at least 20-30 minutes.
- Once the crumb coat is chilled, add a thick layer of frosting and even it out using a cake smoother/scraper.
- Using a striped cake scraper, scrape deep grooves into the cake. Chill for a few hours or overnight.
- Add red food coloring to the remaining buttercream.
- Cover the cake in red frosting, making sure all the grooves are filled with frosting. You can also add the red frosting to a pastry or ziplock bag with tip cut off, and fill in the groves that way.
- Using a flat edges cake smoother, start scraping/smoothing away the outer layer of the frosting. It will look messy at first, but keep scraping until you have clean and clear stripes. Make sure to clean the scraper after every ½-1 turn of your cake turntable. This helps keep the cake clean and helps with clean stripes.
- Keep smoothing the cake until you are satisfied with the stripes.
- Chill the cake until you are ready to add the drip and decorating.
Navy Blue Chocolate Ganache Drip
- Chop up ½ cup white chocolate melts and add to a microwave safe bowl
- Add 3 tbsps heavy cream
- Microwave in 20 second intervals, stirring in between each interval, until the chocolate is melted and smooth.
- Stir in navy blue food coloring and mix until combined.
- Let the ganache cool for 15-30 minutes until it is about 85-95 degrees.
- Once it’s cooled, add to a pastry bag.
- Cut off the tip of the bag and drip the ganache around the edges of the cake and then fill in the top with the ganache. Smooth the top of the ganache with a cake spatula if needed. You can also pour the ganache directly on top of the cake and let it drip naturally, but you have less control of the drips this way.
Decorating this 4th of July Cake
- Once you’ve added the drip you can top with more sprinkles, chocolate covered strawberries and red, white, and blue cookie pops and you're ready to serve!






What else can be perfect other than this cake for July 4 celebration? Perfectly made and I just love those drips.
thank you, so glad you like it!
OMG what a lovely looking cake! Perfect for July 4th!
Wow! You went all out for this patriotic cake. The recipe really looks delicious and the photos are great to help in creating the cake. Thanks!
What a great cake! I have a Fourth of July baby (well, not so much a baby anymore) and this would be perfect for her birthday cake!
I am super astonished at how beautiful this cake looks, I was very intimidated until I read your step by step instructions and looked over your images— I really think I can do this! I hope it turns out as beautiful as yours when I do!
Oh wow, what a festive cake! I love how you have created the stripes, and drizzled strawberries are always a good idea!