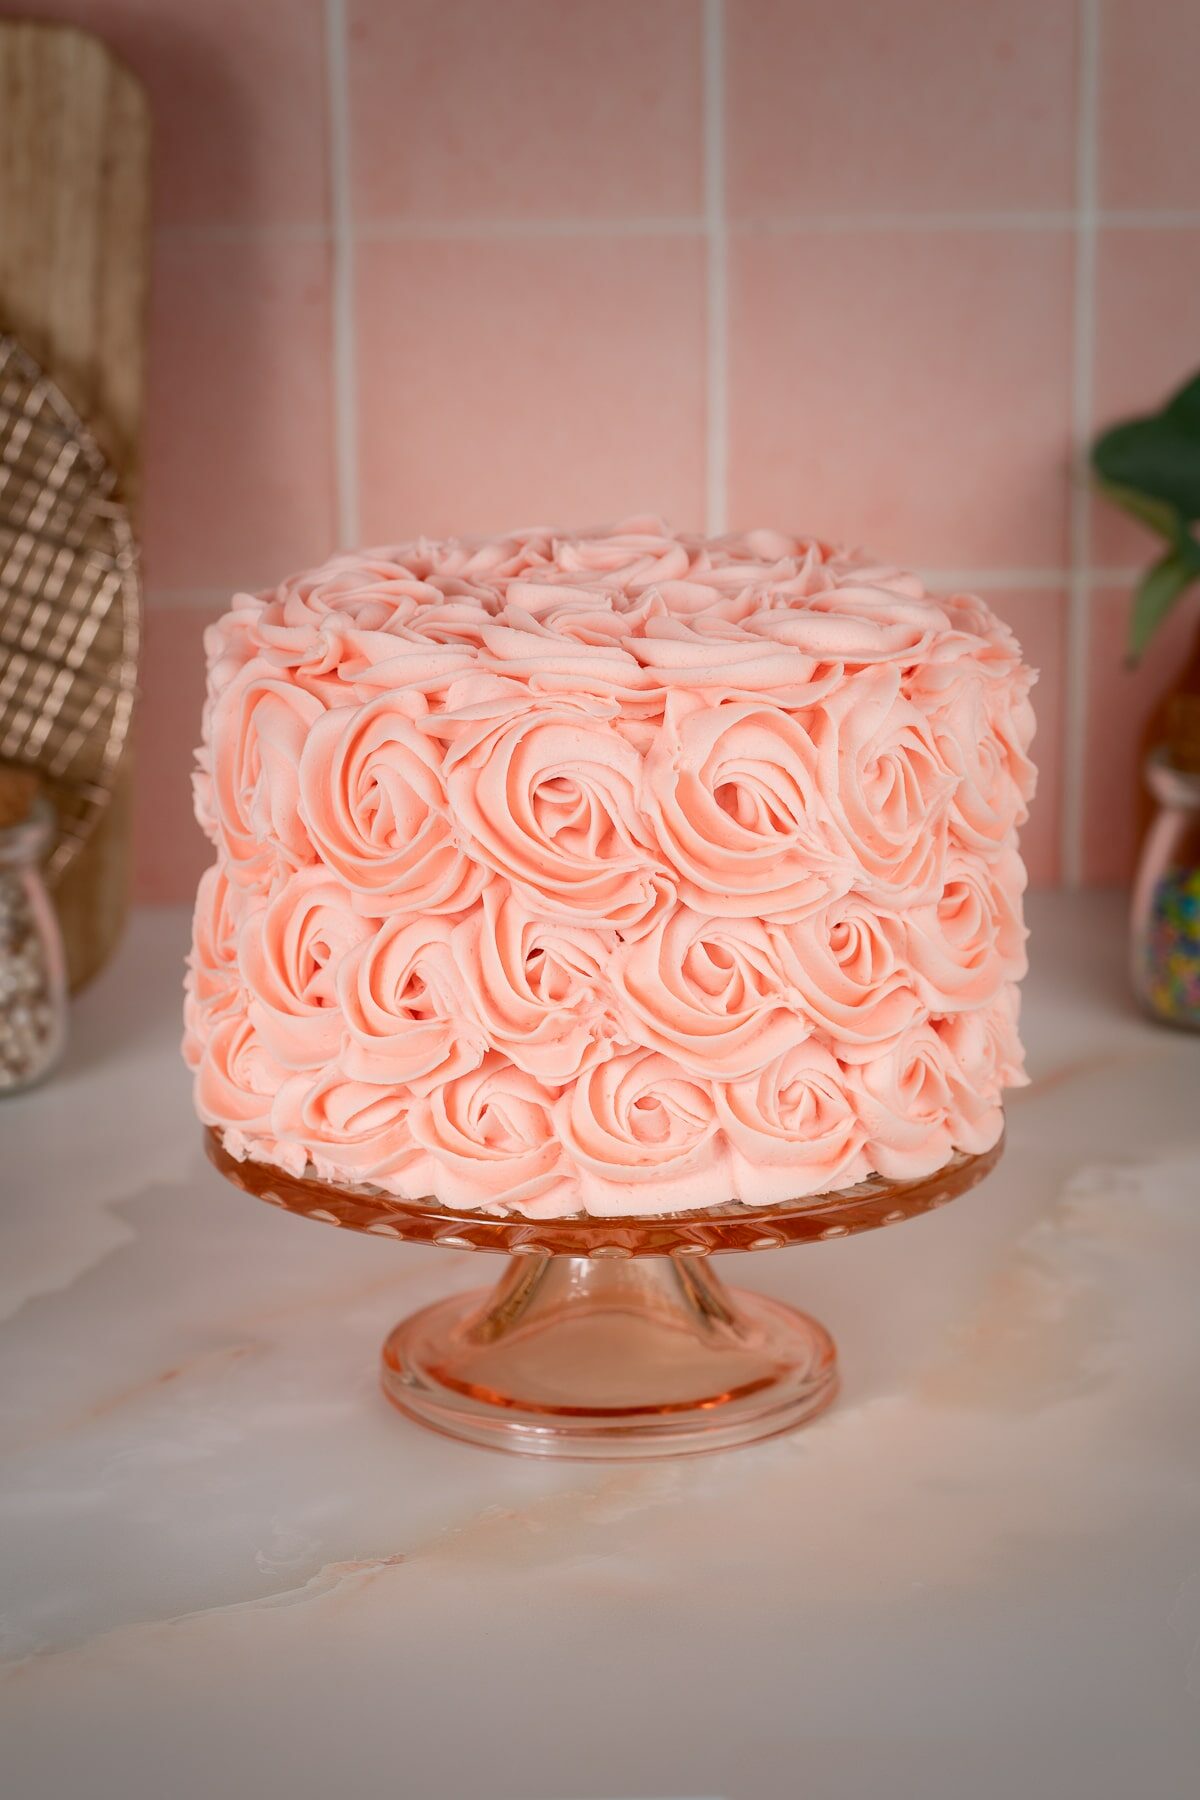
This easy rosette cake tutorial shows you exactly how to make a rosette cake with smooth, bakery-style buttercream swirls. You will learn the best piping tips, frosting consistency, and step-by-step method to decorate a cake in perfect rosettes for birthdays, showers, and parties.
🔍 Quick Look: How to Make a Rosette Cake
- ⏱️ Prep Time: About 30 to 45 minutes (prep cake and frosting)
- ❄️ Chill Time: 30 minutes (for crumb coat to set)
- 🧁 Decorating Time: About 30 to 45 minutes (frosting rosette cake)
- 🕒 Total Time: About 1.5 to 2 hours (depending on cake size and experience level)
- 🎂 Yield: 1 frosted layer cake (6 to 10 inch, depending on your base cake)
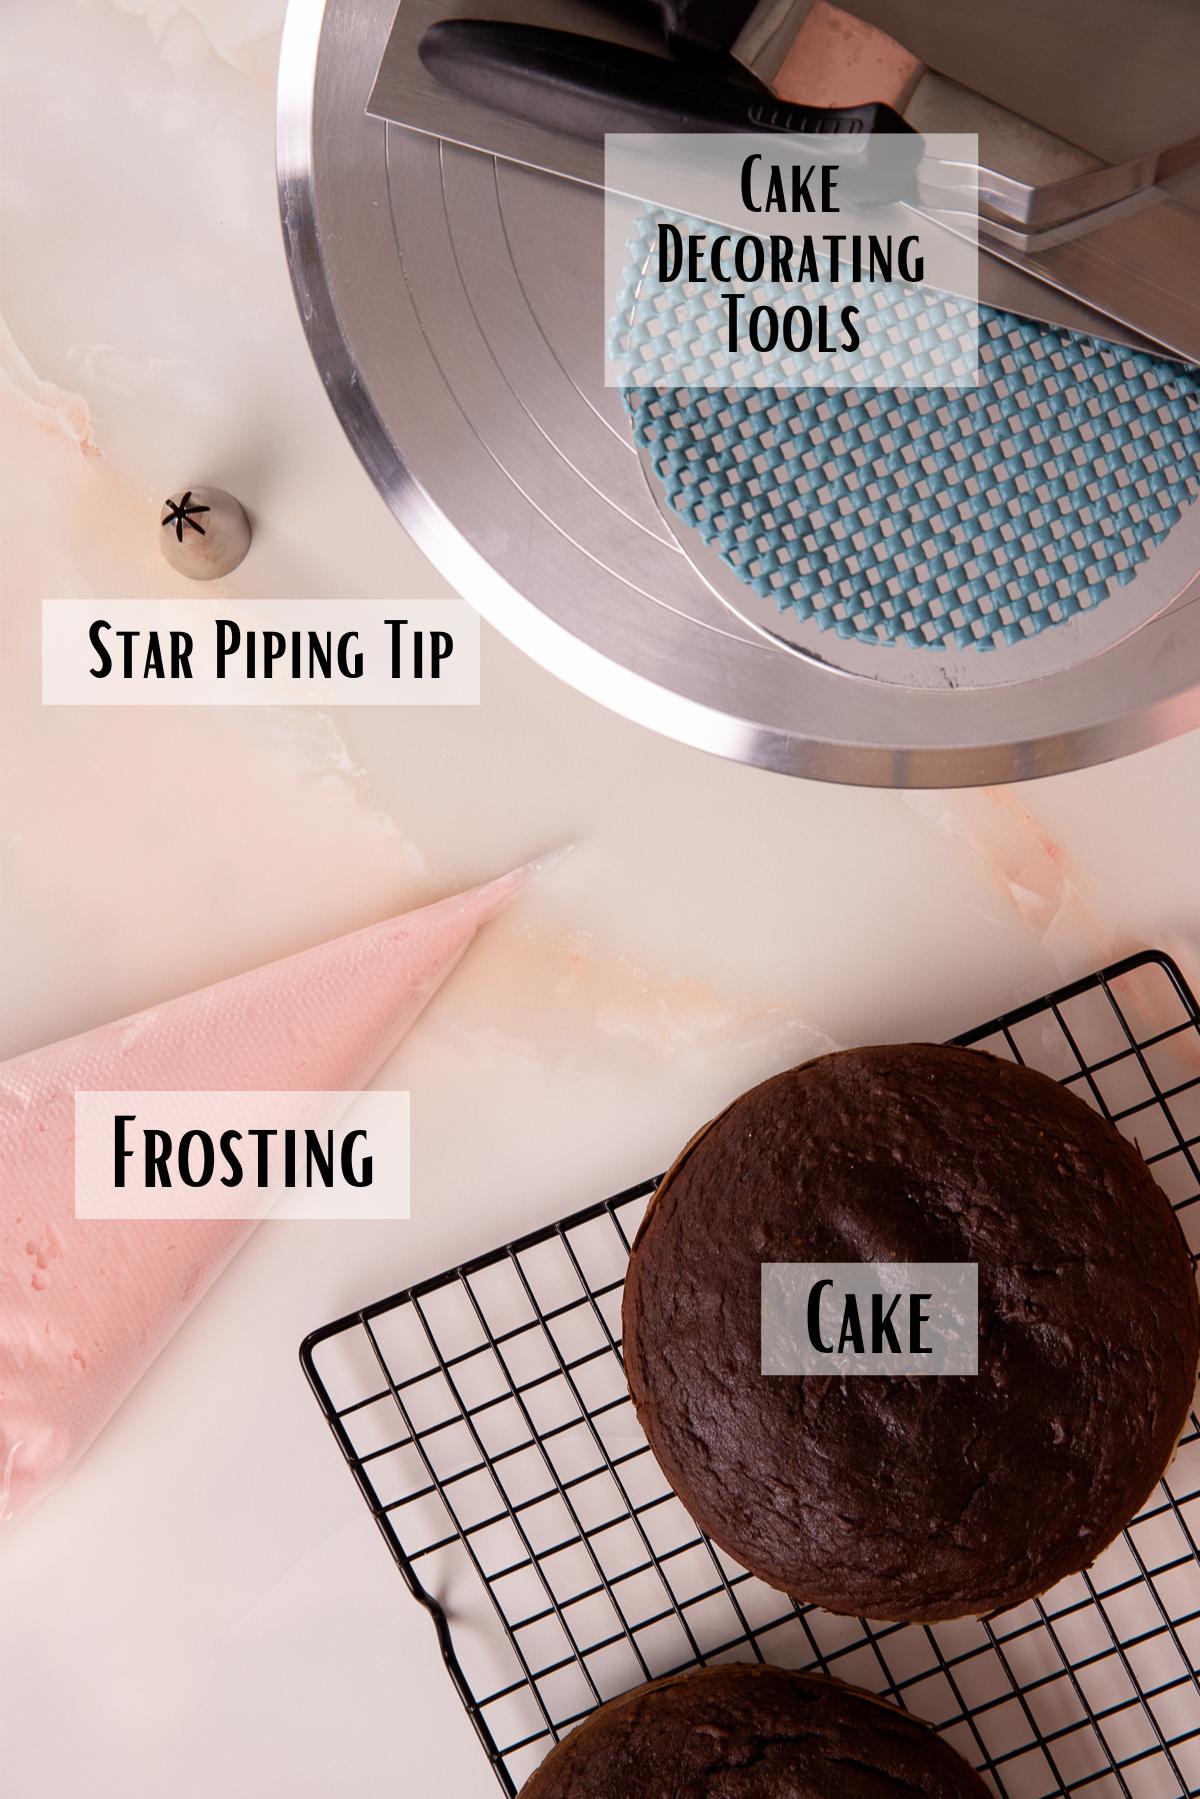
- 🥣 Tools: Offset spatula, piping bag, large star piping tip (1M or 2D), cake turntable, bench scraper/cake scraper, cake board
- 🎉 Perfect For: Birthdays, baby showers, bridal showers, weddings, Valentine’s day, Easter, party cakes, special celebrations
- ⭐ Difficulty: Easy to Moderate (beginner-friendly with a little piping practice)
Summarize and Save This Content On:
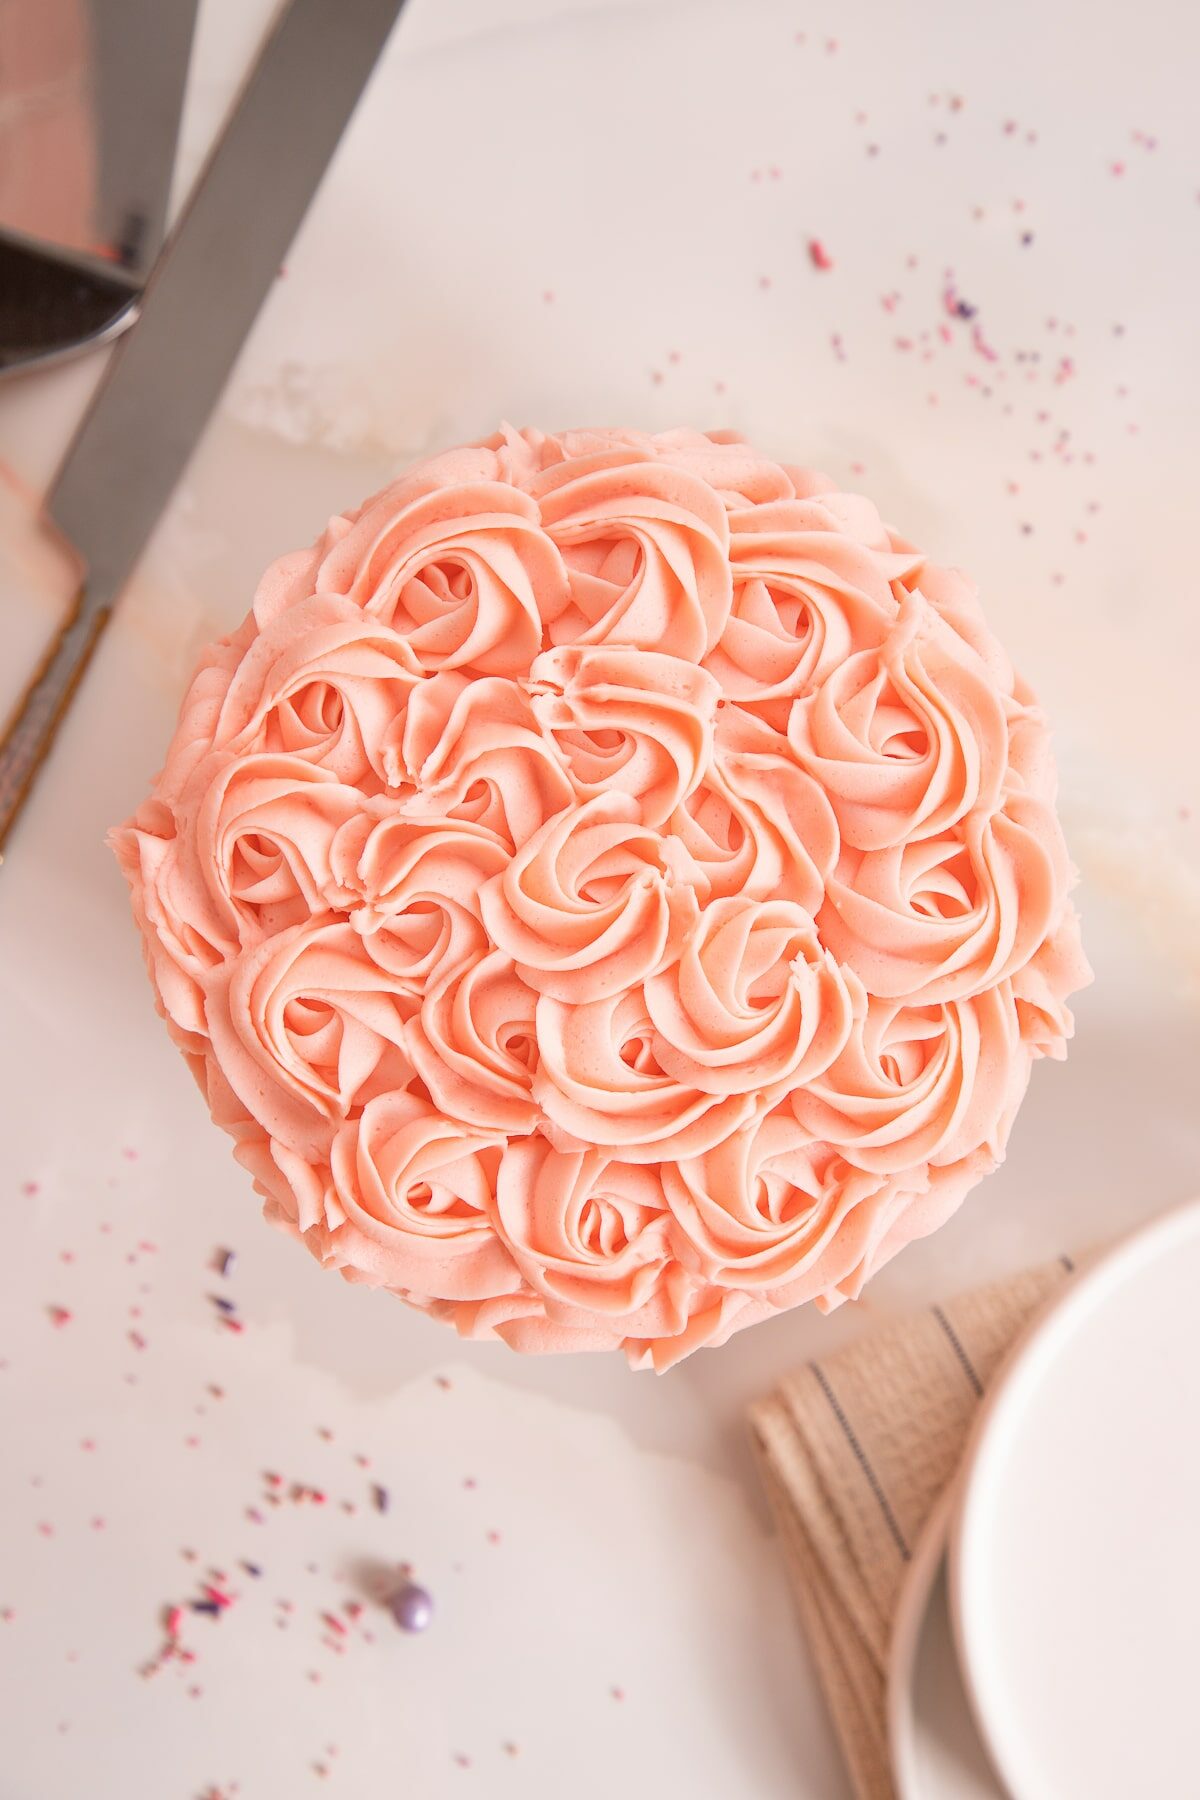
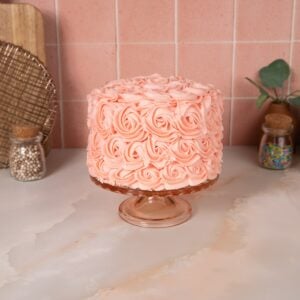
Rosette cakes are a simple and elegant cake decorating style made by piping buttercream swirls in a circular pattern with a star piping tip. The result is a bakery-worthy cake, but is surprisingly easy to make at home with just a few basic tools and your favorite cake and frosting recipe.
This step-by-step tutorial shows you exactly how to pipe smooth, consistent rosettes for birthdays, weddings, and special celebrations.
❤️ Why You'll Love This Rosette Cake Tutorial
- Easy decorating technique: This rosette cake tutorial uses a simple rosette piping method that beginners can follow with confidence.
- Works with any cake and buttercream: You can use your favorite cake flavor and almost any buttercream frosting to customize this rosette cake!
- Bakery-style results at home: Create a beautiful rosette cake that looks professional without paying bakery prices.
Jump to:
- 🔍 Quick Look: How to Make a Rosette Cake
- Ingredients and Tools
- 🎂 Start Here: Cake Decorating Basics for Your Rosette Cake
- How to Make A Rosette Cake
- 🌟 Top Tip: Remove Air Bubbles from Frosting for Smooth Buttercream Rosettes
- How to Pipe a Rosette
- Piping Rosettes on a Cake (Step-by-Step)
- Tips and Tricks
- FAQ
- Make Ahead and Storing
- More Cake Recipes
- How to Make a Rosette Cake
Ingredients and Tools
See the recipe card for a full list of ingredients and quantities.
- Cake: use your favorite cake recipe.
- Buttercream Frosting: You can use almost any type of buttercream frosting.
- Piping Tips: Large star piping tips such as a Wilton 1M or Ateco 848 work best for piping rosettes.
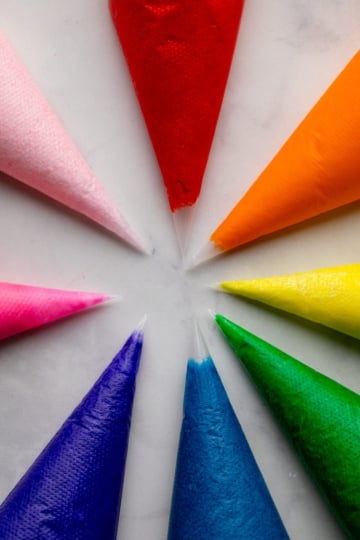
- Food Coloring (optional): I recommend gel food coloring for more vibrant colors.
- Piping Bags: For holding frosting.
- Cake Decorating Tools (optional): Such as a turntable, scraper, and cake board. These are not necessary, but super helpful when making a rosette layer cake (or any decorated layer cake!). You can also pipe rosettes onto sheet cakes or cupcakes.
🎂 Start Here: Cake Decorating Basics for Your Rosette Cake
Before you decorate your rosette cake, these quick guides will help you get the best results, especially if you are new to layer cakes or piping buttercream:
- How to Frost a Layer Cake for leveling, stacking, and crumb coating your cake
- How to Color Buttercream Frosting for getting bright colors or making ombre rosette cakes
- How to Use a Piping Bag and Piping Tips for filling piping bags, choosing star tips, and piping smooth rosettes
How to Make A Rosette Cake
Prepare Cake
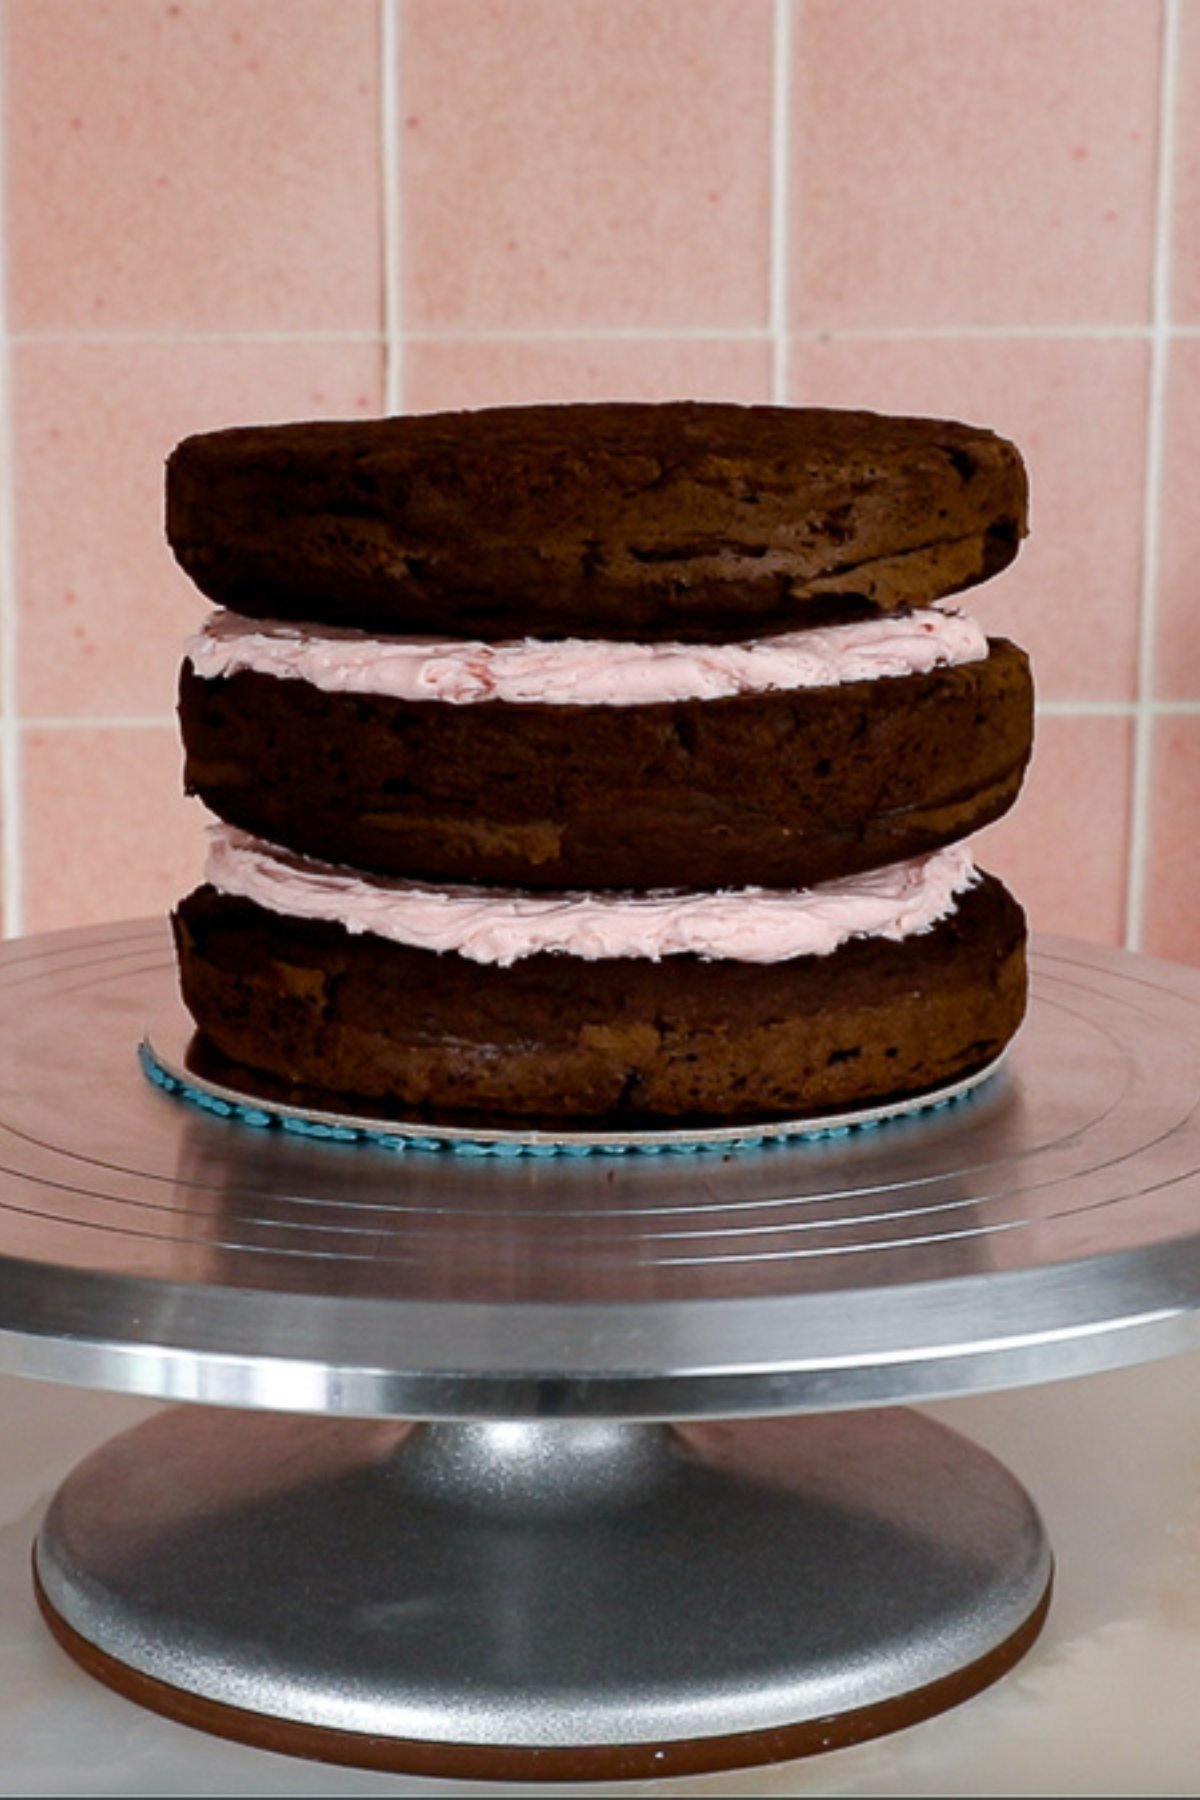
- Bake, Level, and Stack the Cake: Start by baking your favorite layer cake and letting it cool completely. Level the tops of the cake layers so they stack evenly, then fill and stack the layers with a thin layer of frosting. A flat, stable cake makes piping rosettes much easier and helps your buttercream swirls look clean and consistent.
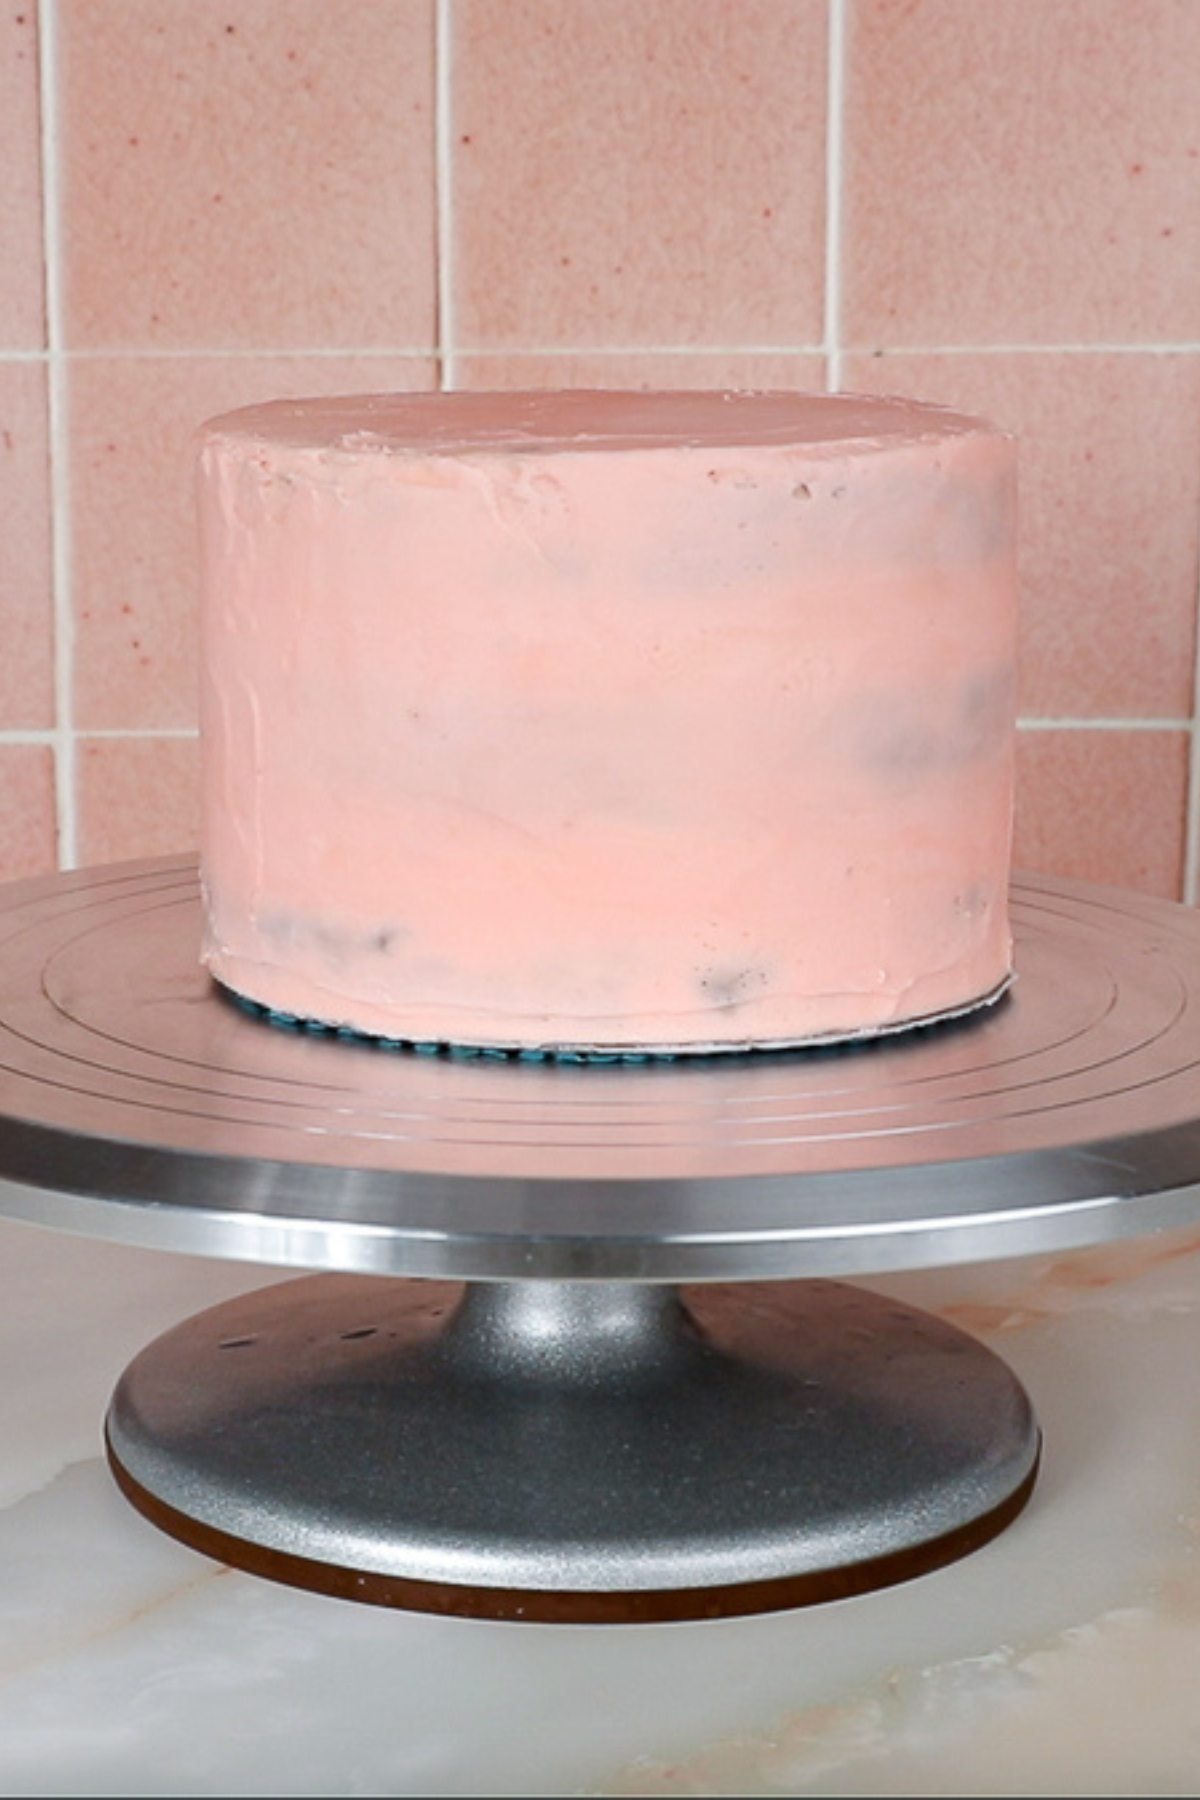
- Apply a Crumb Coat and Chill: Spread a thin crumb coat of frosting over the top and sides of the cake to seal in any loose crumbs. This does not need to look perfect since it will be covered with rosettes. Chill the cake for 20 to 30 minutes, or until the frosting is firm to the touch. A chilled crumb coat gives you a smooth base for piping buttercream rosettes.
Measure and Mark Rosette Rows on Cake
To keep your rosettes even and evenly spaced, measure the height of your cake with a ruler. Divide that number by how many rows of rosettes you want. Most standard layer cakes look great with two or three rows, while taller cakes can support four rows of rosettes.
Use a small knife or toothpick to make light guide marks at each interval. For example, if your cake is 6 inches tall and you plan to pipe three rows of rosettes, mark the cake at 2 inches and 4 inches all the way around. These guide marks help you keep each row straight and evenly spaced as you decorate.
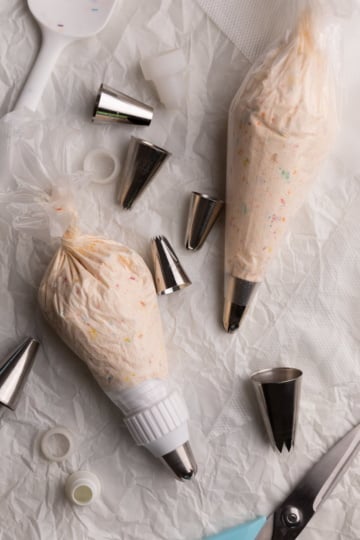
Prepare Your Buttercream and Piping Bag
Make your buttercream frosting and adjust the consistency so it is smooth and pipeable but still holds its shape. The frosting should be soft enough to squeeze easily but stiff enough that the rosettes keep their ridges.
Fit a piping bag with your chosen star tip, such as a Wilton 1M or 2D, and add about 1 to 2 cups of buttercream frosting. If this is your first time piping rosettes, practice a few swirls on parchment paper or a silicone mat before decorating the cake.
🌟 Top Tip: Remove Air Bubbles from Frosting for Smooth Buttercream Rosettes
For smoother, cleaner rosettes, remove air bubbles from your buttercream before piping. If using a standing mixer, mix the frosting with a paddle attachment on the lowest speed for 3 to 5 minutes. If you don’t have a standing mixer, stir the frosting with a rubber spatula to push out trapped air. You can also transfer the frosting to a food processor or use an immersion blender and pulse for a few seconds (not too long or it can melt!). The slight warmth from mixing smooths the frosting, which prevents holes in your buttercream rosettes and gives your rosette cake a more professional, bakery-style finish.
How to Pipe a Rosette
- Hold the piping bag at a 90 degree angle from the cake.
- Apply a fair amount of pressure to the piping bag so a frosting star (from the star piping tip) starts to form.
- Then, while still adding pressure to the piping bag, slowly drag the piping bag around the formed star in a circular motion. The more times you go around in a circle the larger the rosette will be. For classic rosette cakes going around once is common.
- Slowly let up on the amount of pressure when ending the rosette, and pull away.
Piping Rosettes on a Cake (Step-by-Step)
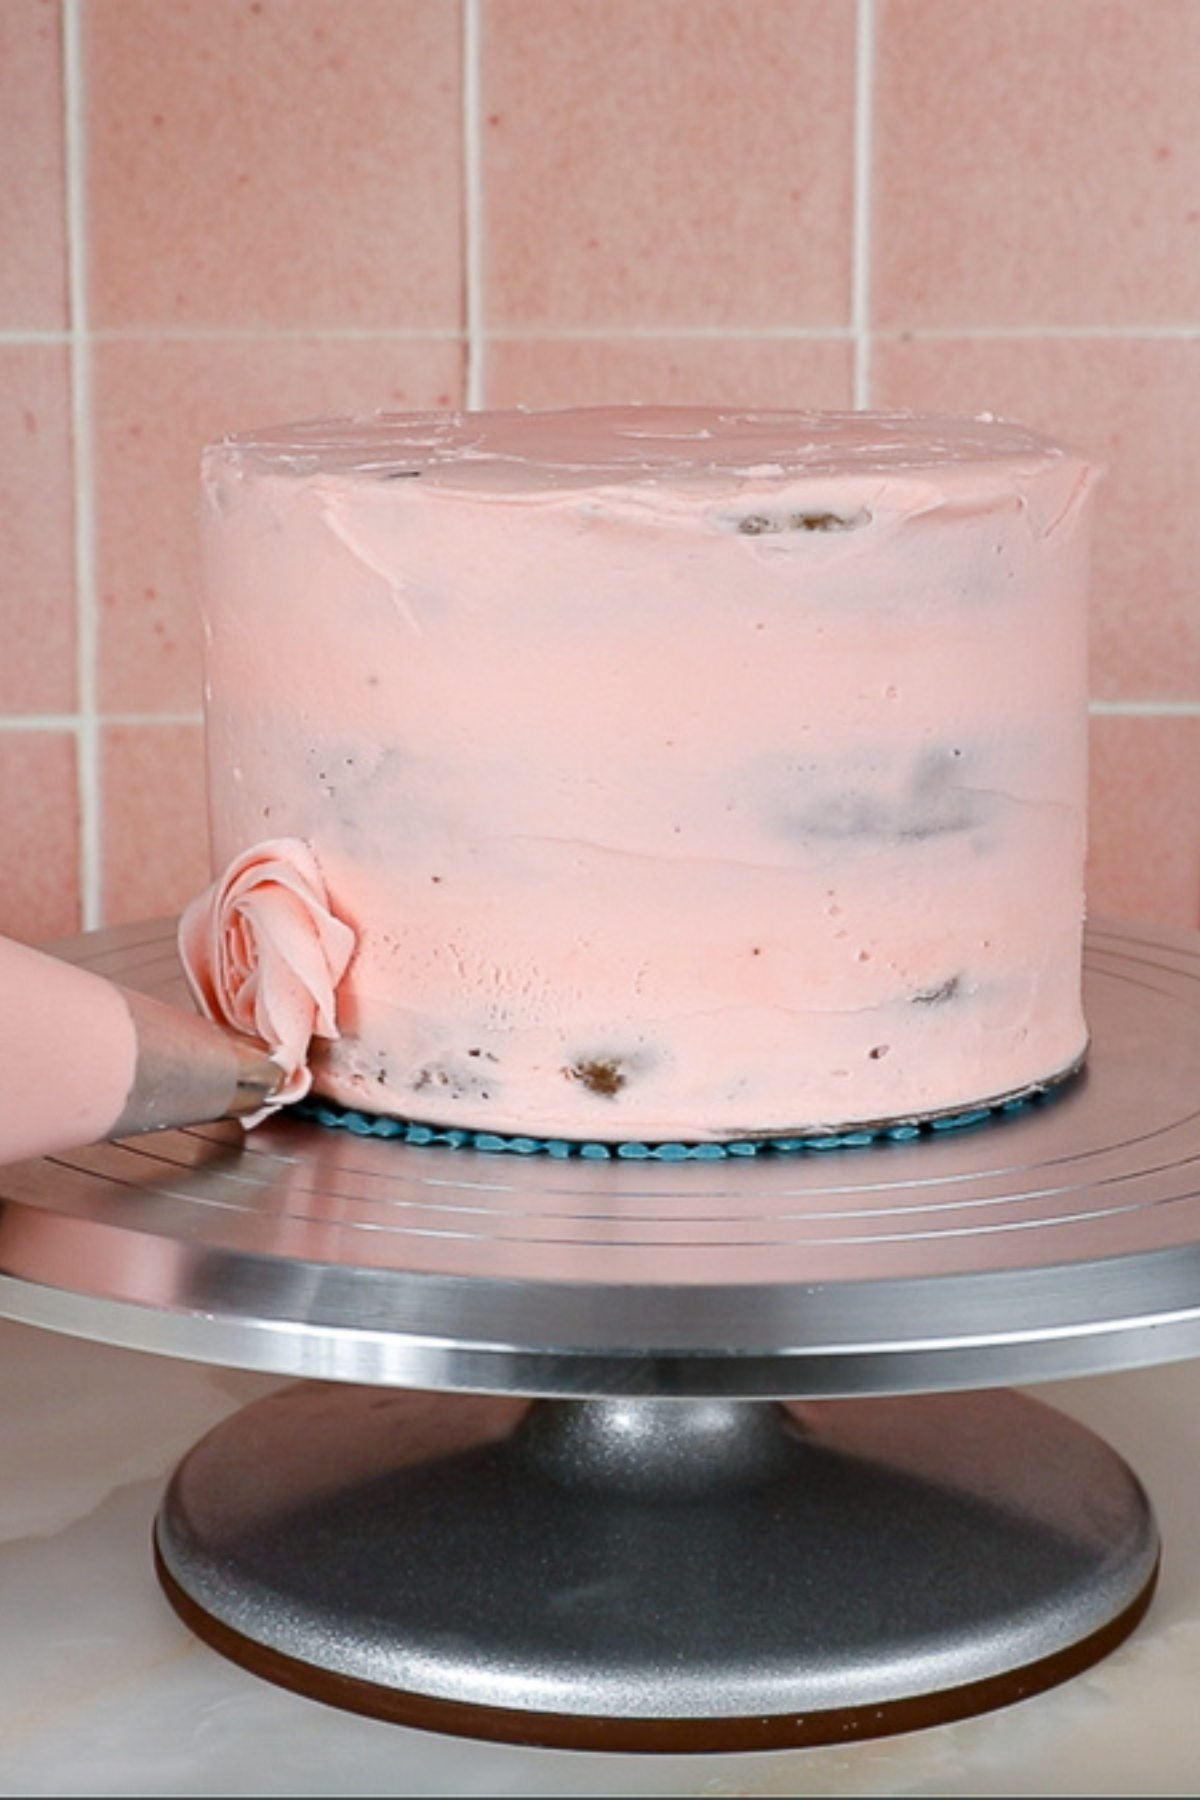
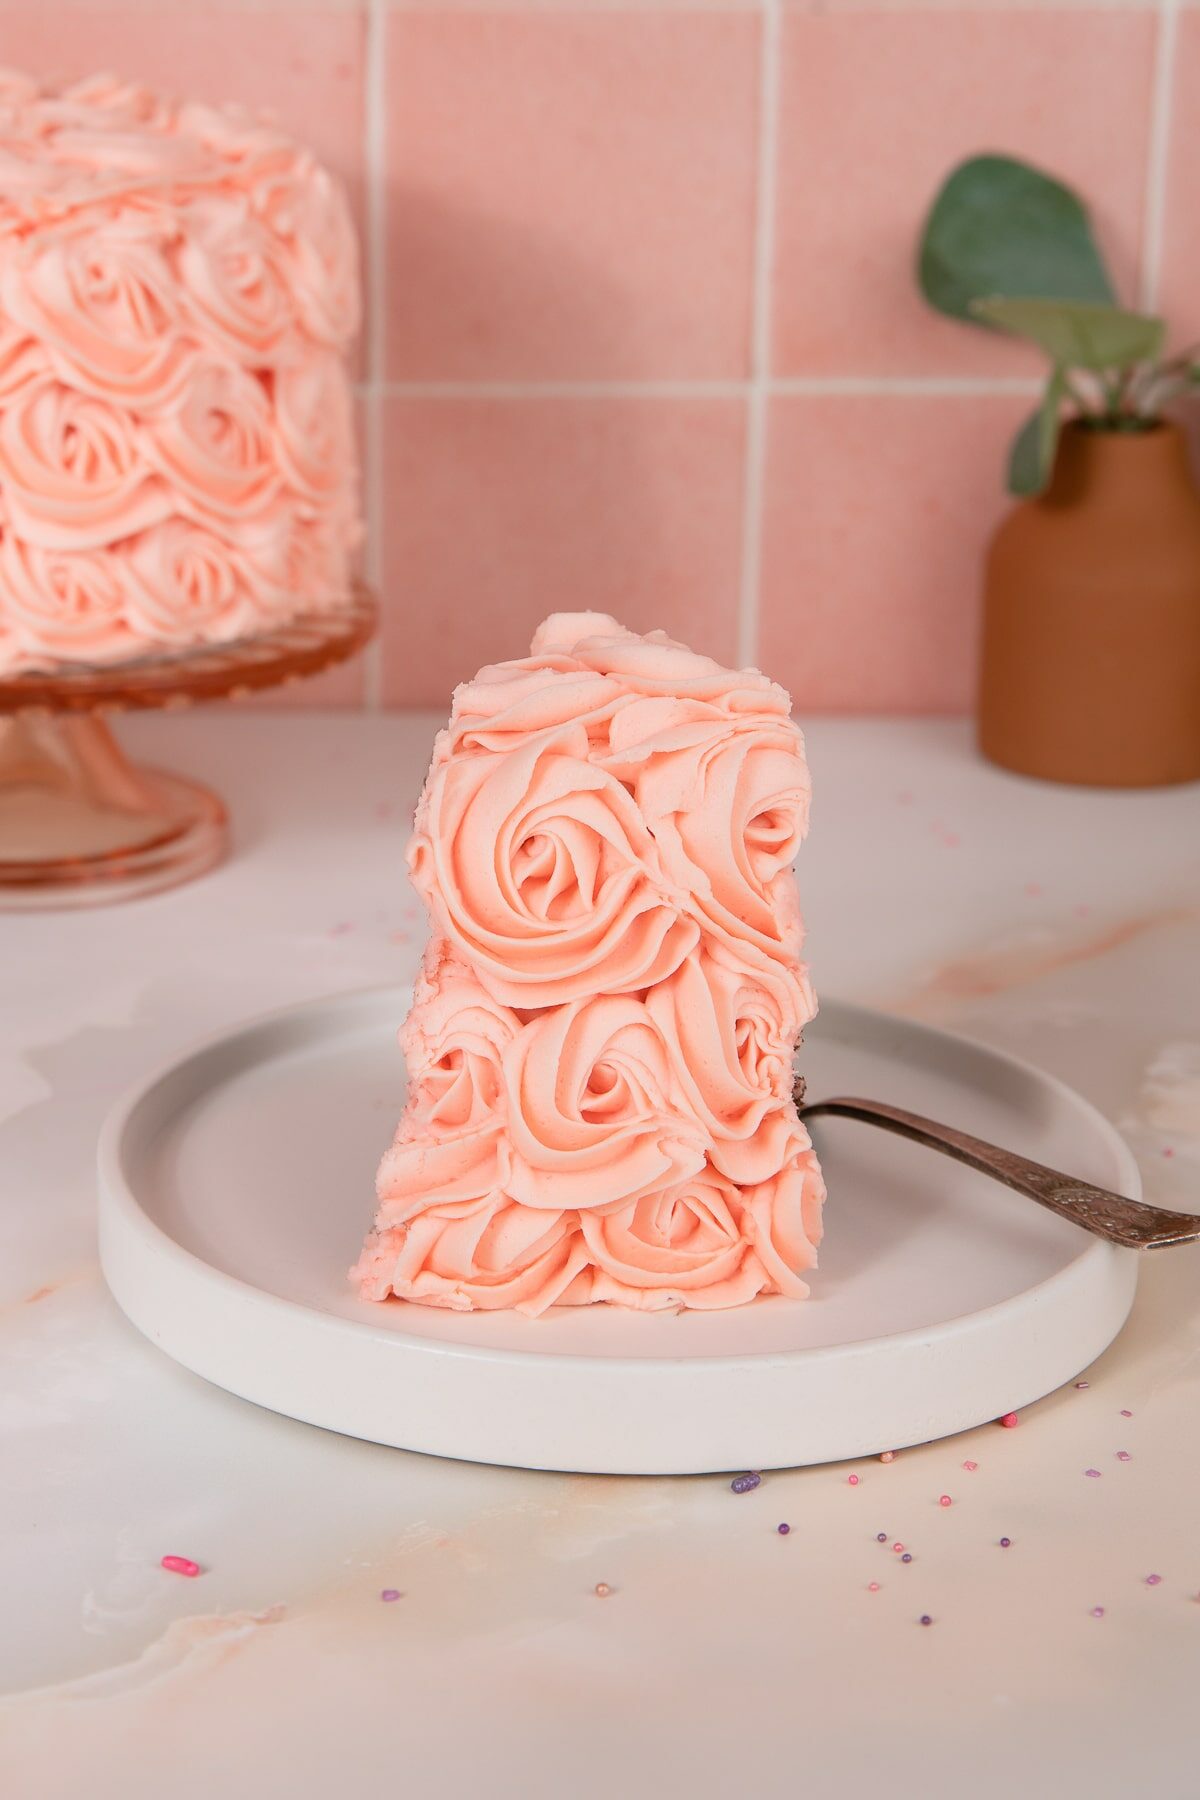
- Pipe First Row of Rosettes: Begin piping rosettes at the bottom edge of the cake, trying to keep the rosette between where you’ve measured the rosette layers. Work your way around in a straight, even row and place each rosette right next to the previous one so there are no gaps. Be sure to keep your piping direction consistent, so if the first rosette is piped clockwise, continue piping all rosettes clockwise. Try to end each rosette in the same spot, such as the right-hand side, and overlap the tail with the new rosette.
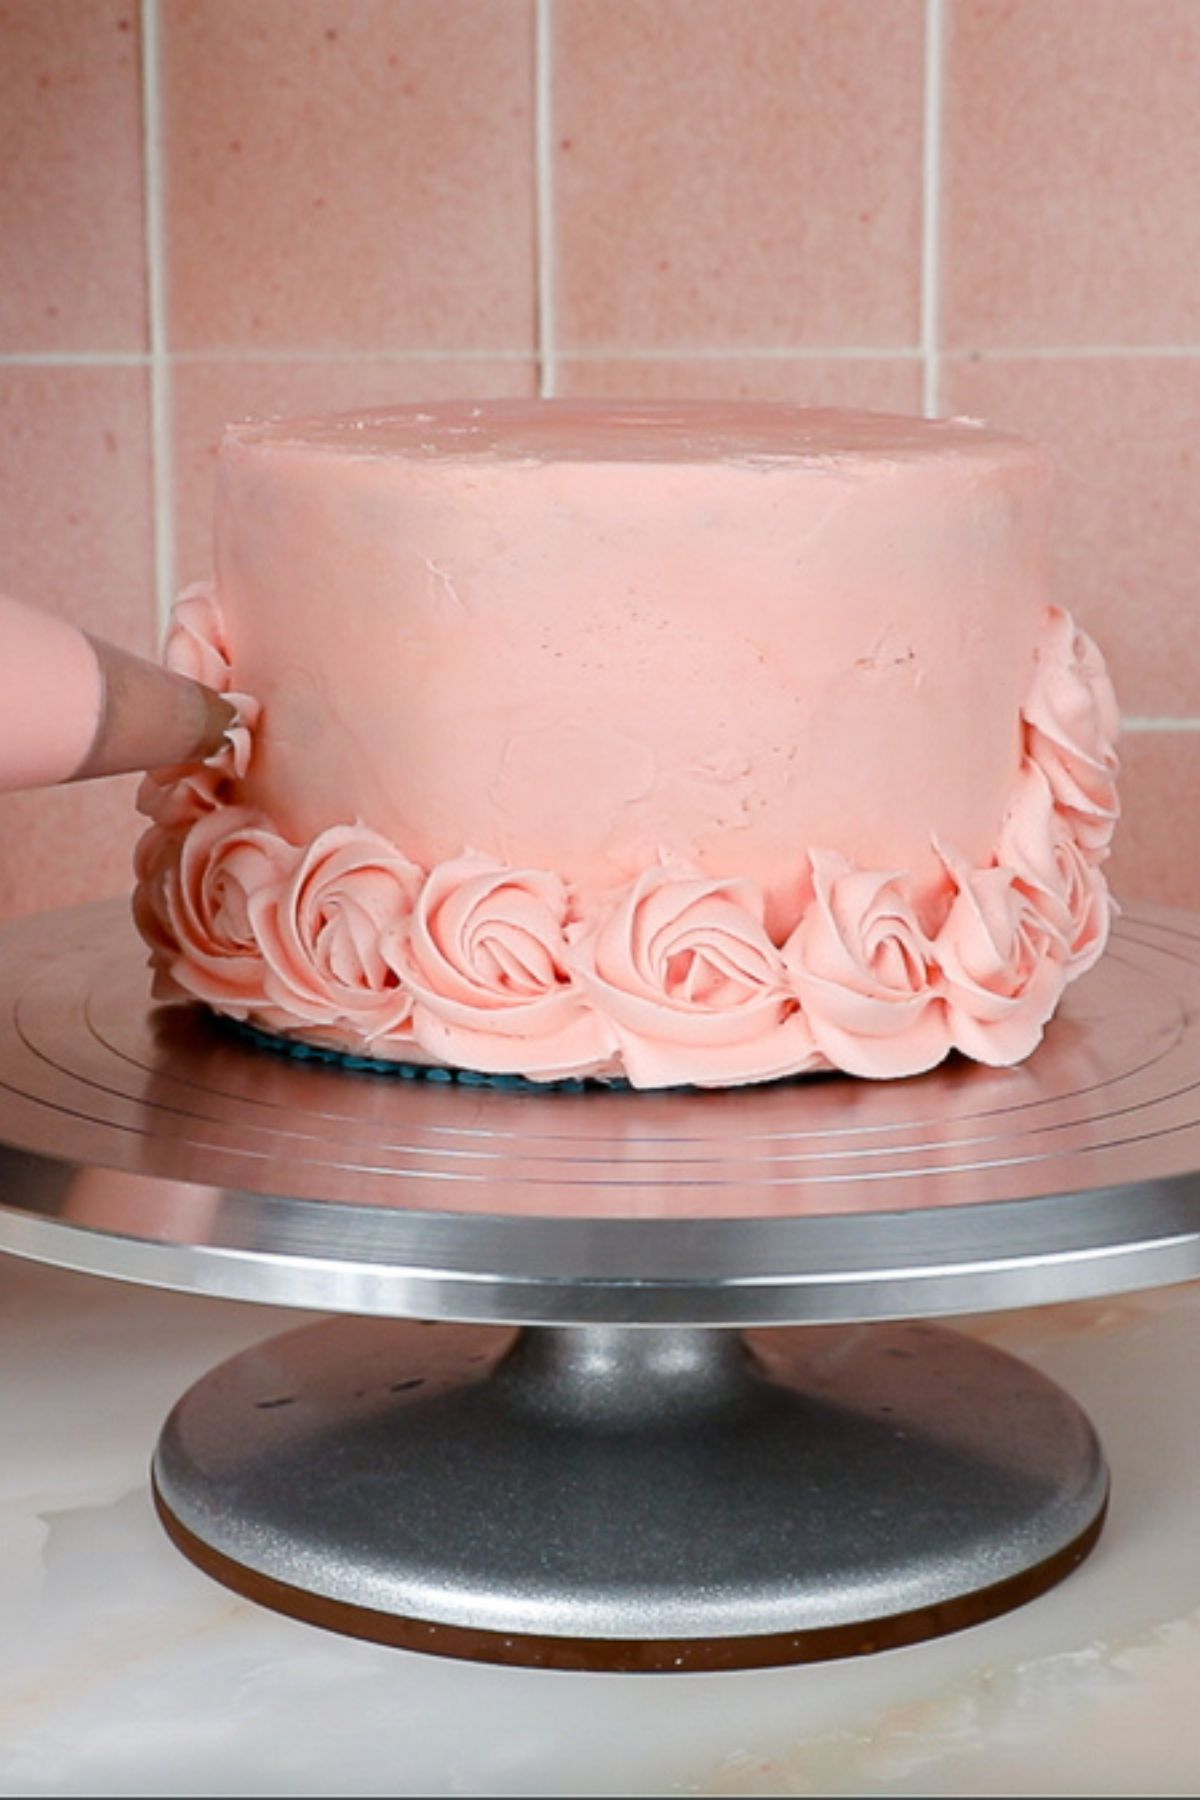
- Pipe Second Row or Rosettes: Continue piping the second row above the first. For the cleanest, fullest look, slightly offset each new row of rosettes instead of stacking them directly on top of the row below. Start each rosette in the new row in the gap between two rosettes from the row underneath. This staggered pattern helps fill in empty spaces and prevents vertical lines from forming between rows. It also creates a more natural, bakery-style rosette cake with fewer visible gaps.
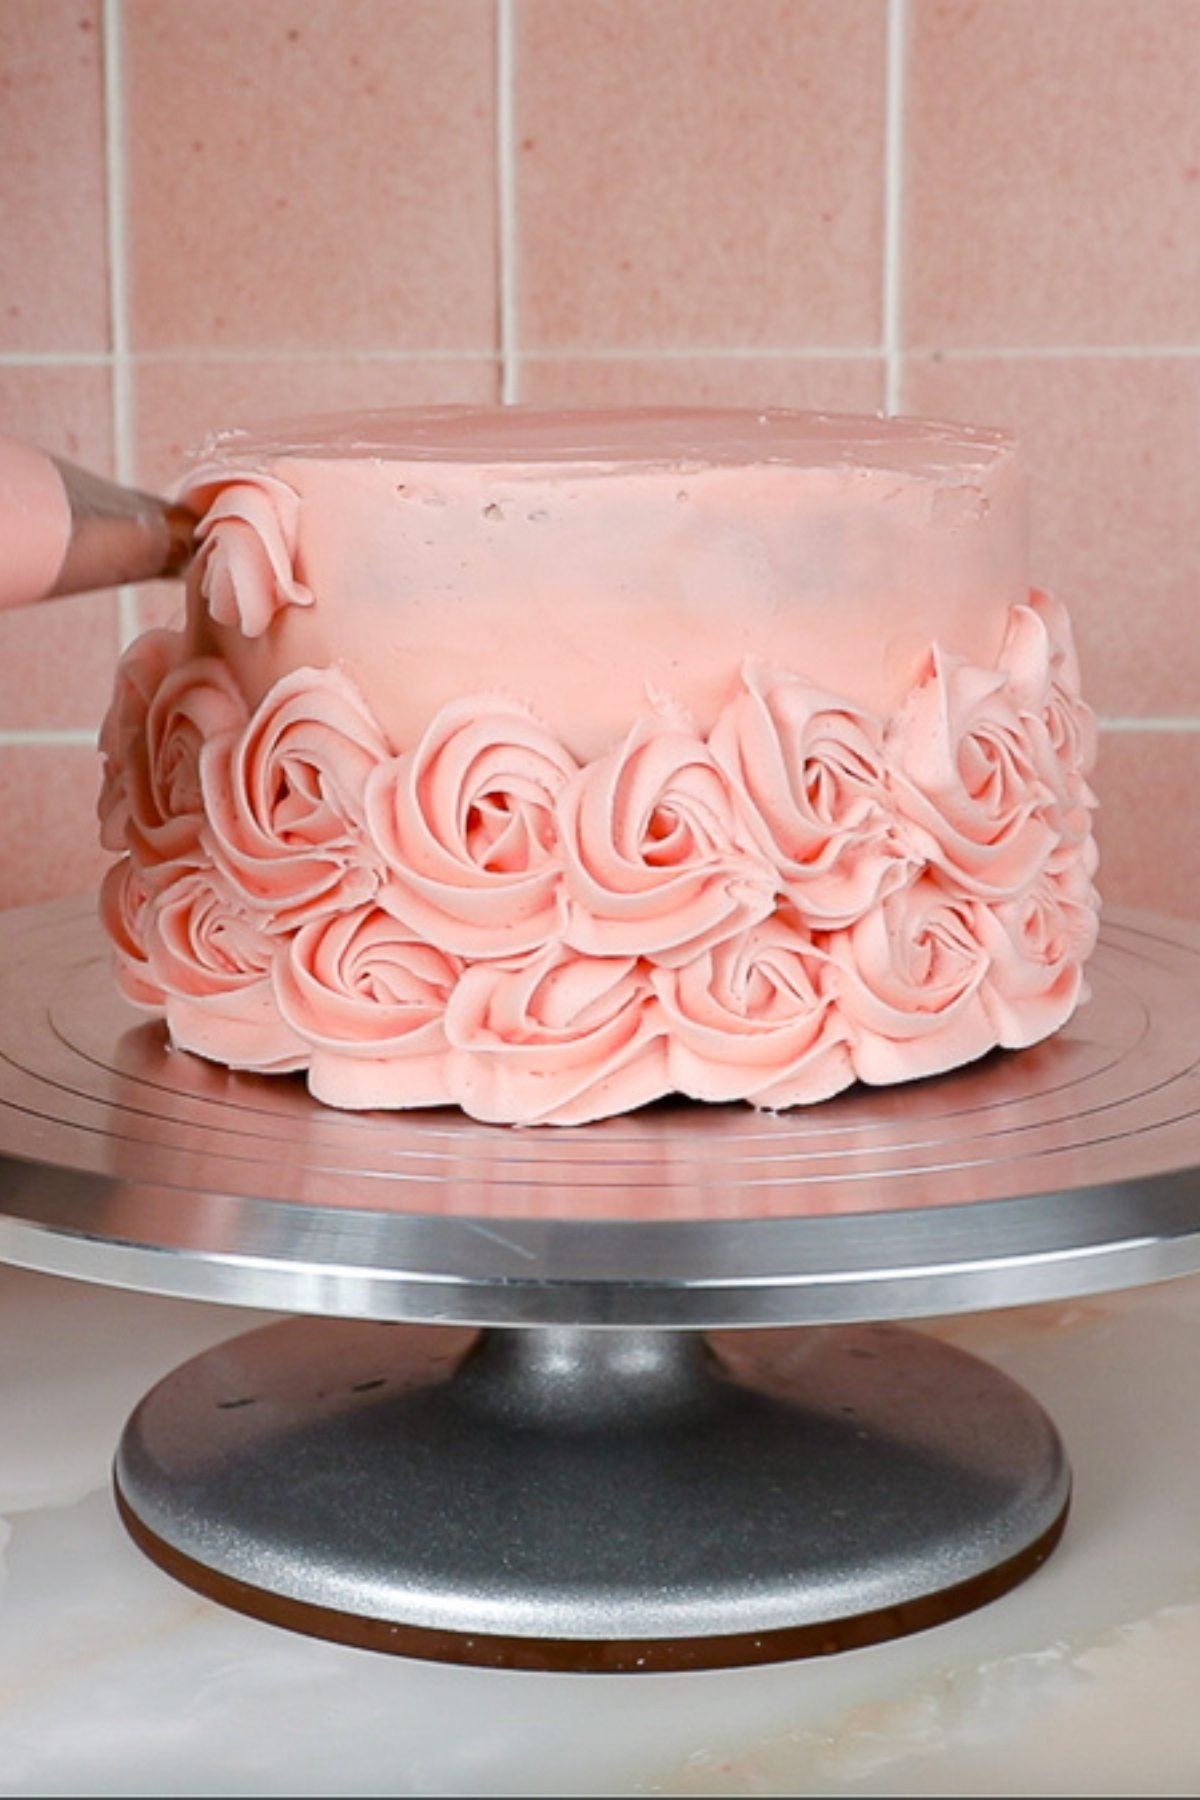
- Repeat: Continue piping each row this same way as you work upward, keeping the rosettes evenly spaced and slightly staggered from the row below.
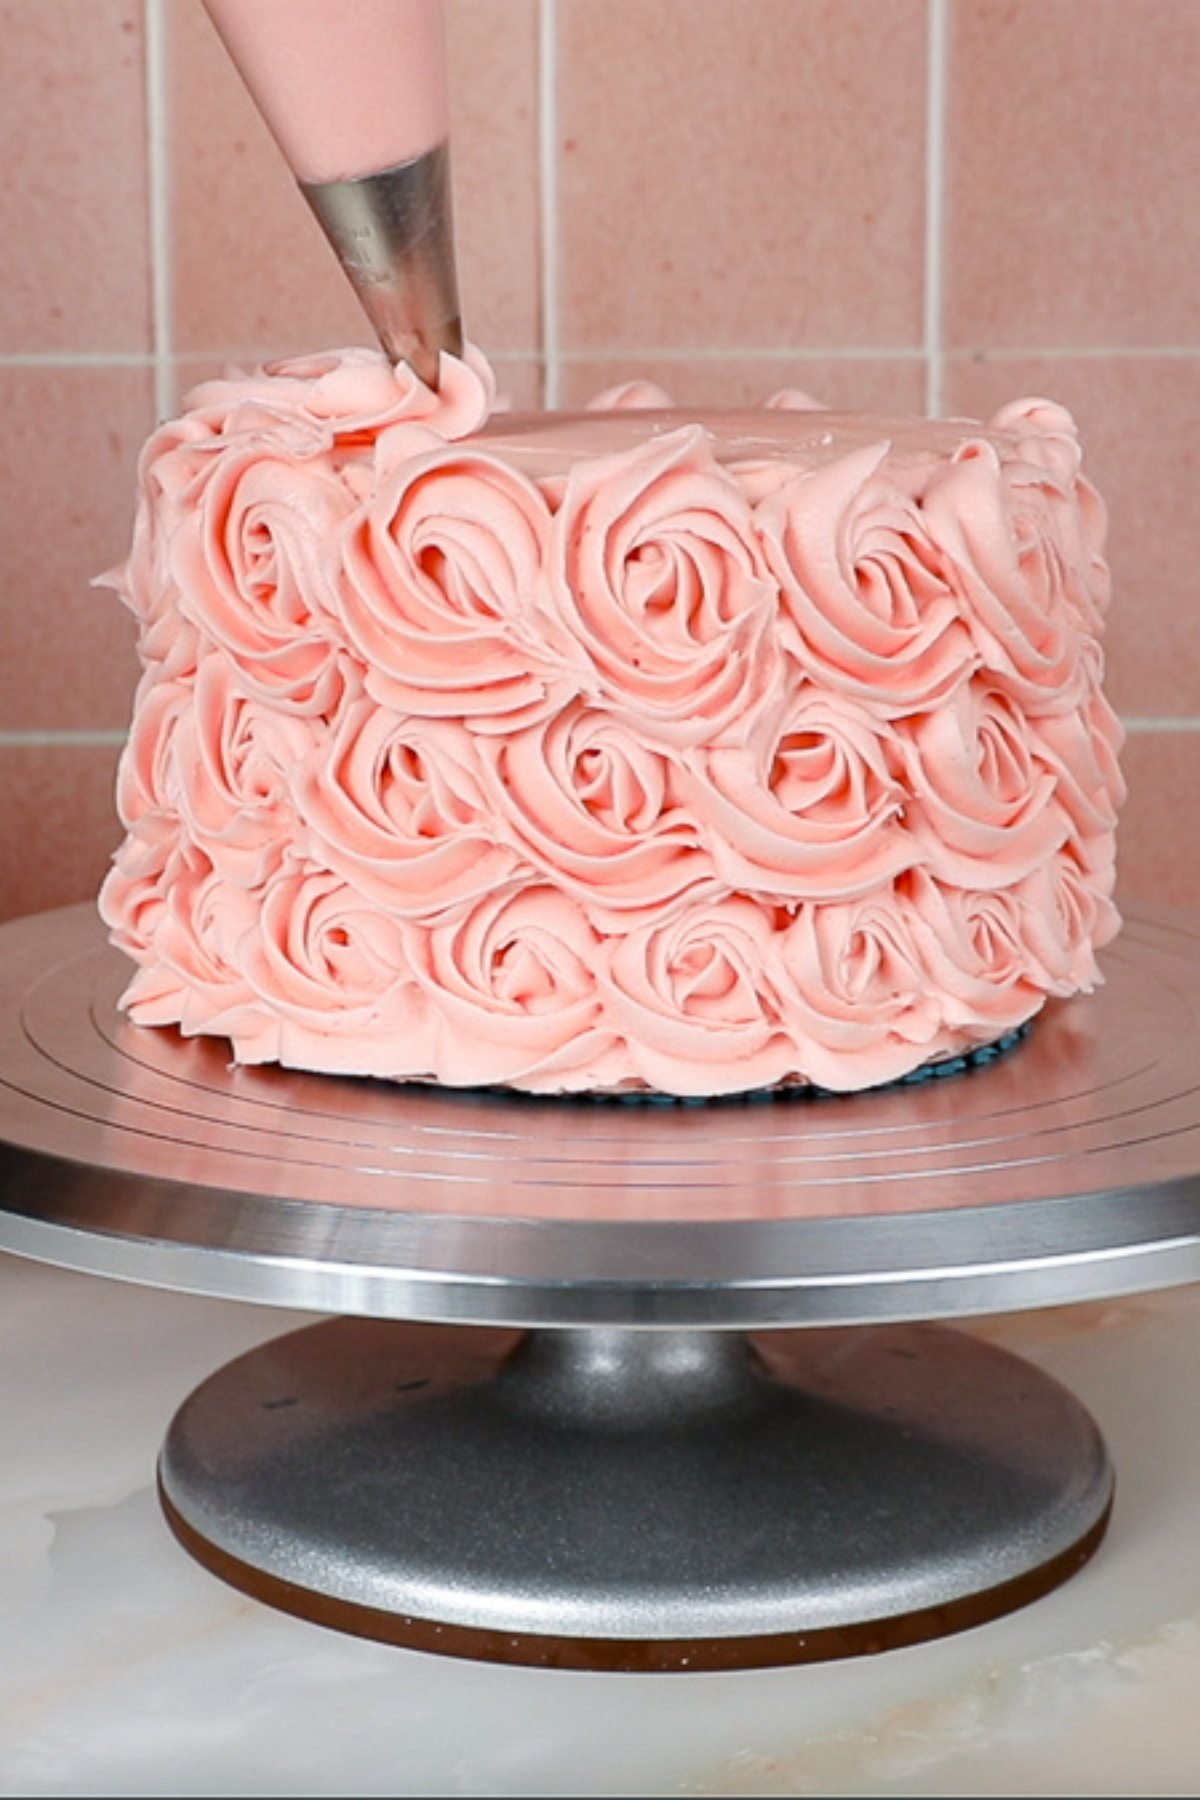
- Pipe Rosettes on Top of Cake: Once the sides of the cake are fully covered, move on to piping rosettes on the top. Again, place each rosette right next to the previous one so there are no gaps. As with the sides, keep your piping direction consistent for a uniform look. If needed, slightly overlap the tails of each rosette to hide seams and create a clean finish along the top surface. That’s it! Then chill, slice, and enjoy your cake!
Tips and Tricks
- Practice your rosettes first: If you have never piped rosettes before, practice on parchment paper or a silicone mat to get comfortable with the piping pressure and motion. You can also try different star tips and see which one you like best! When you’re done practicing, just scrape the rosettes right back into your bowl.
- Use a matching crumb coat color: While not required, crumb coating the cake with the same color frosting you plan to use for the rosettes can to help hide small gaps and make the finished rosette cake look fuller and more polished.
- If coloring your frosting, use gel food coloring: Gel food coloring creates bold, even buttercream colors without thinning the frosting, which helps your rosettes keep sharp ridges and clean definition.
- Do not overfill your piping bag: If the frosting gets too warm in our hands, the edges of the rosettes will start to look sloppy and droopy. Using a smaller amount of frosting and refilling the piping bag as necessary keeps the frosting at the right temperature and consistency, plus it is easier to control the piping.
- Rosettes work on more than just layer cakes: The same rosette piping technique works beautifully on sheet cakes, cupcakes, and cut-out sugar cookies, making this decorating method perfect for birthday cakes, party desserts, and individual treats.
FAQ
The most common piping tip for rosettes is the Wilton 1M, but really any type of open or closed star tip, or drop flower tip will work! Other common tips include:
Wilton 2D
Ateco 824
Ateco 34
You can also uses smaller star tips for mini layer cakes, cupcakes, or for alternate size rosettes for sheet cakes.
Buttercream frosting works best for this type of decorated cake. American buttercream, Italian meringue buttercream, Swiss meringue Buttercream all work.
Even ermine frosting or cream cheese frosting will work, provided they are not too soft. You can also pipe rosettes with chocolate ganache and whipped ganache frosting.
You want a medium consistency buttercream that is firm enough to hold it shape when piped and not spread, but soft enough that the edges remain smooth and pretty. Chilling the frosting for 15-20 minutes before piping and not overfilling the piping bag with frosting can help.
While homemade frosting works best for this type of cake, there are a few tips if you decide to use a store bought frosting instead:
Whip the pre-made frosting for a few minutes prior to piping. Start on high until it increases in size, about 2-3 minutes. Then, whip on the lowest speed for 3-5 minutes to help remove any air bubbles. Adding ¼ to ½ cup of powdered sugar while whipping the frosting will thicken it up to a piping consistency even more.
Chill the whipped frosting 15-20 minutes before piping to help firm it up to the correct consistency.
Using different shades of the same color frosting for each layer of rosettes will create a nice ombre effect on the cake. Using gel food coloring helps keep the colors vibrant without altering the consistency of the frosting.
If you make a mistake or the rosette does not look right, gently scrape it off with a spatula and re-pipe it right away. Fresh buttercream is much easier to correct than dried frosting.
Make Ahead and Storing
Like most buttercream cakes, they can made ahead and stored at room temperature for 1-2 days (provided there is no filling or garnishes that needs to be refrigerated) or in an extra large plastic cake container in a refrigerator for up to 5 days.
The cake can also be frozen up to a month. Defrost and let come to room temperature before serving.
More Cake Recipes
If you’re looking for more cake decorating techniques, try painting a cake with buttercream or making a fault-line cake!


WANT TO JOIN THE PARTY? Subscribe to my newsletter and follow on Tik Tok, Pinterest, Instagram, and Facebook for all the latest recipes!
How to Make a Rosette Cake
Equipment
- Gel Food Coloring optional
INGREDIENTS
- 1 Easy Devil's Food Cake or your favorite layer cake recipe, baked and cooled
- 6-8 cups Vanilla Buttercream Frosting or your favorite buttercream frosting
Instructions
- Bake cake layers according to instructions and let cool completely.
- If necessary, level cake layers with a serrate knife or cake leveler.
- Apply a bit of frosting on cake board of cake stand and place the add the bottom layer of cake.
- Add about ½ cup for frosting and smooth it out using an offset spatula or knife.
- Continue adding cake layers and frosting.
- Add a crumb coat of frosting and smooth it out using an offset spatula.
- Chill the cake in the refrigerator for 20-30 minutes, until the crumb coat is set.
Piping Rosettes on a Cake
- For perfectly even rosette layers, measure the sides of the cake using a ruler and divide by the number of rosette layers you'd like.
- Then make small markings in the frosting with a toothpick or knife at each interval, so that when you pipe you can keep the rosettes even.
- Add 1-2 cups for buttercream frosting to a piping bag fitted with the desired star tip.
- Starting at the bottom and working up, hold the piping bag at a 90 degree angle from the cake.
- To make your rosettes, apply a fair amount of pressure to the piping bag so a frosting star (from the start tip) starts to form onto the cake.
- Then, without lifting and while still adding pressure to the piping bag, slowly drag the piping bag and around the formed star in a circular motion.
- For classic rosette cakes going around once is common, but the more times you go around in a circle the larger the rosette will be.
- Slowly let up on the amount of pressure when ending the rosette.
- Make sure to pipe in the same direction and try to stop in the same spot for each rosette. This keeps the cake looking clean.
- Continue piping rosettes around the sides of the cake, slightly offsetting each new row of rosettes instead of stacking them directly on top of the row below. Refill bag with new frosting as needed.
- Once the sides of the cake are fully covered, move on to piping rosettes on the top. Again, place each rosette right next to the previous one so there are no gaps.
- Enjoy immediately or store cake in the refrigerator up to 5 days until ready to serve. Let the cake come to room temperature before serving and enjoy!
Notes
- This rosette cake decorating technique works with most cake and buttercream frosting recipes!
- I used about 2.5 batches of my American buttercream recipe for a 3-layer 6-inch cake, but the amount needed can vary depending on the frosting recipe, frosting technique, and size of your cake.
- If you've never piped rosettes, I recommend practicing on parchment or a silicone mat. You can also try different tips and see which one you like best!
- It can help to crumb coat with the same color as the rosettes, but it's not necessary. Just know you might see small spots of crumb coat between the rosettes, so plan accordingly.
- Gel food coloring keeps colors vibrant without altering the consistency of the frosting.

Sophia Assunta says
I hope you love this tutorial! Check out more user reviews (and pictures of readers’ rosette cakes!) on this Rosette Cake Tutorial Pin on Pinterest!