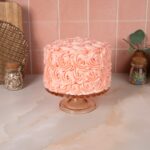
How to Make a Rosette Cake
This tutorial hows you how to make a rosette cake, which is a beautiful, elegant, and simple cake decorating technique using star piping tips.
Servings: 1 cake
Calories: 8835kcal
Cost: 20
Equipment
- Gel Food Coloring optional
Ingredients
- 1 Easy Devil's Food Cake or your favorite layer cake recipe, baked and cooled
- 6-8 cups Vanilla Buttercream Frosting or your favorite buttercream frosting
Instructions
- Bake cake layers according to instructions and let cool completely.
- If necessary, level cake layers with a serrate knife or cake leveler.
- Apply a bit of frosting on cake board of cake stand and place the add the bottom layer of cake.
- Add about ½ cup for frosting and smooth it out using an offset spatula or knife.
- Continue adding cake layers and frosting.
- Add a crumb coat of frosting and smooth it out using an offset spatula.
- Chill the cake in the refrigerator for 20-30 minutes, until the crumb coat is set.
Piping Rosettes on a Cake
- For perfectly even rosette layers, measure the sides of the cake using a ruler and divide by the number of rosette layers you’d like.
- Then make small markings in the frosting with a toothpick or knife at each interval, so that when you pipe you can keep the rosettes even.
- Add 1-2 cups for buttercream frosting to a piping bag fitted with the desired star tip.
- Starting at the bottom and working up, hold the piping bag at a 90 degree angle from the cake.
- To make your rosettes, apply a fair amount of pressure to the piping bag so a frosting star (from the start tip) starts to form onto the cake.
- Then, without lifting and while still adding pressure to the piping bag, slowly drag the piping bag and around the formed star in a circular motion.
- For classic rosette cakes going around once is common, but the more times you go around in a circle the larger the rosette will be.
- Slowly let up on the amount of pressure when ending the rosette.
- Make sure to pipe in the same direction and try to stop in the same spot for each rosette. This keeps the cake looking clean.
- Continue piping rosettes around the sides of the cake, slightly offsetting each new row of rosettes instead of stacking them directly on top of the row below. Refill bag with new frosting as needed.
- Once the sides of the cake are fully covered, move on to piping rosettes on the top. Again, place each rosette right next to the previous one so there are no gaps.
- Enjoy immediately or store cake in the refrigerator up to 5 days until ready to serve. Let the cake come to room temperature before serving and enjoy!
Notes
- This rosette cake decorating technique works with most cake and buttercream frosting recipes!
- I used about 2.5 batches of my American buttercream recipe for a 3-layer 6-inch cake, but the amount needed can vary depending on the frosting recipe, frosting technique, and size of your cake.
- If you’ve never piped rosettes, I recommend practicing on parchment or a silicone mat. You can also try different tips and see which one you like best!
- It can help to crumb coat with the same color as the rosettes, but it’s not necessary. Just know you might see small spots of crumb coat between the rosettes, so plan accordingly.
- Gel food coloring keeps colors vibrant without altering the consistency of the frosting.
Nutrition
Serving: 1cake | Calories: 8835kcal | Carbohydrates: 1428g | Protein: 48g | Fat: 330g | Saturated Fat: 69g | Polyunsaturated Fat: 136g | Monounsaturated Fat: 113g | Cholesterol: 18mg | Sodium: 5396mg | Potassium: 1304mg | Fiber: 7g | Sugar: 1170g | Vitamin A: 461IU | Vitamin C: 2mg | Calcium: 1194mg | Iron: 16mg
