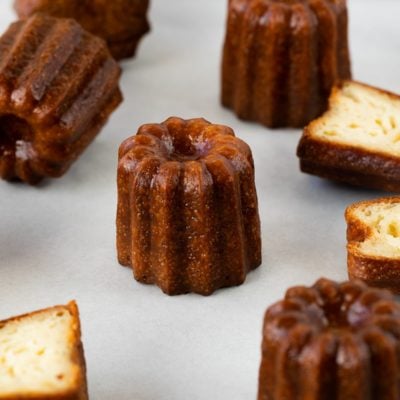
Also known Canneles de Bordeaux, this French Canele recipe is a delicious pastry with a vanilla custard filling and a sweet caramelized crust.
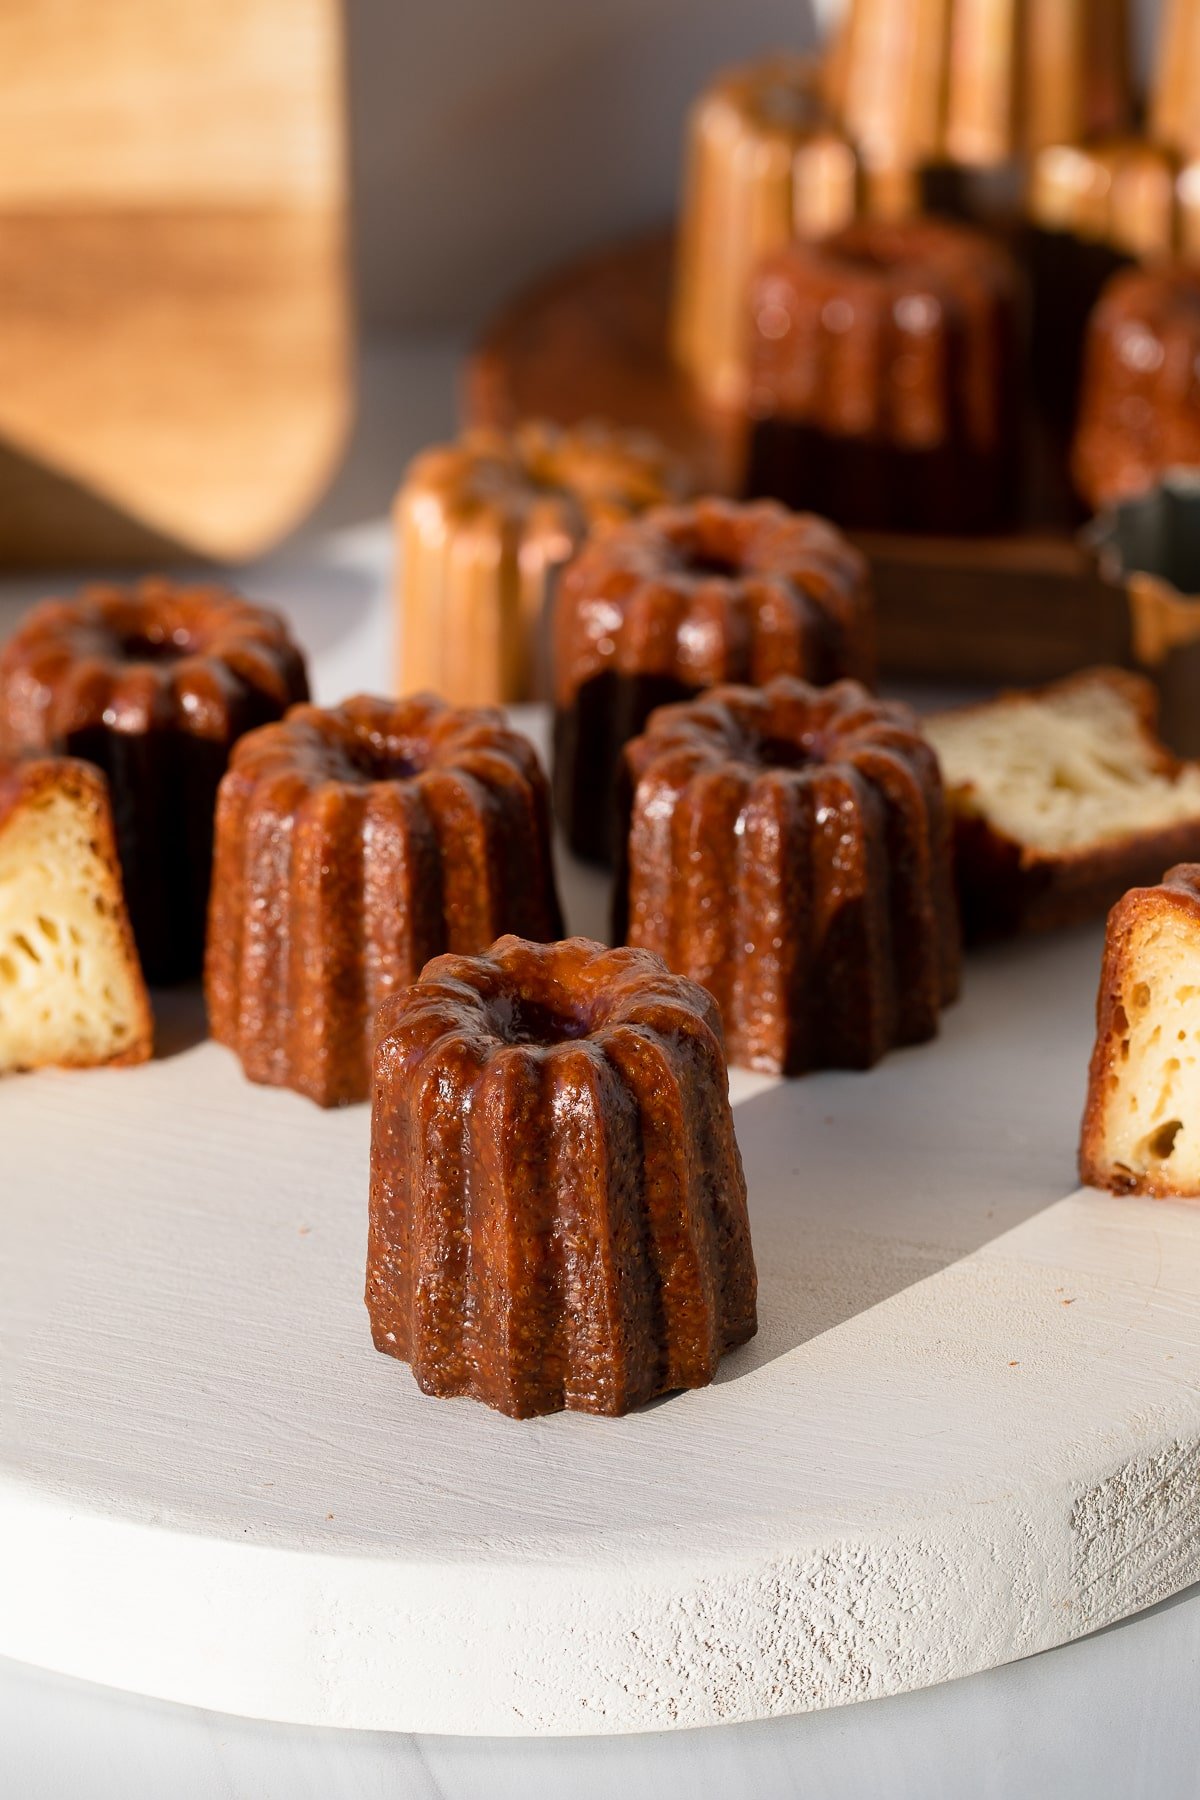
Canelé (pronounced can-nuh-lay) can be notoriously tricky to make. Much like French macarons they take a bit of practice, patience, and preparation to make the perfect canele.
Believed to have originated in the Bordeaux region of France, these treats go by a few different names – Canelés, French Canele, or Canneles de Bordeaux.
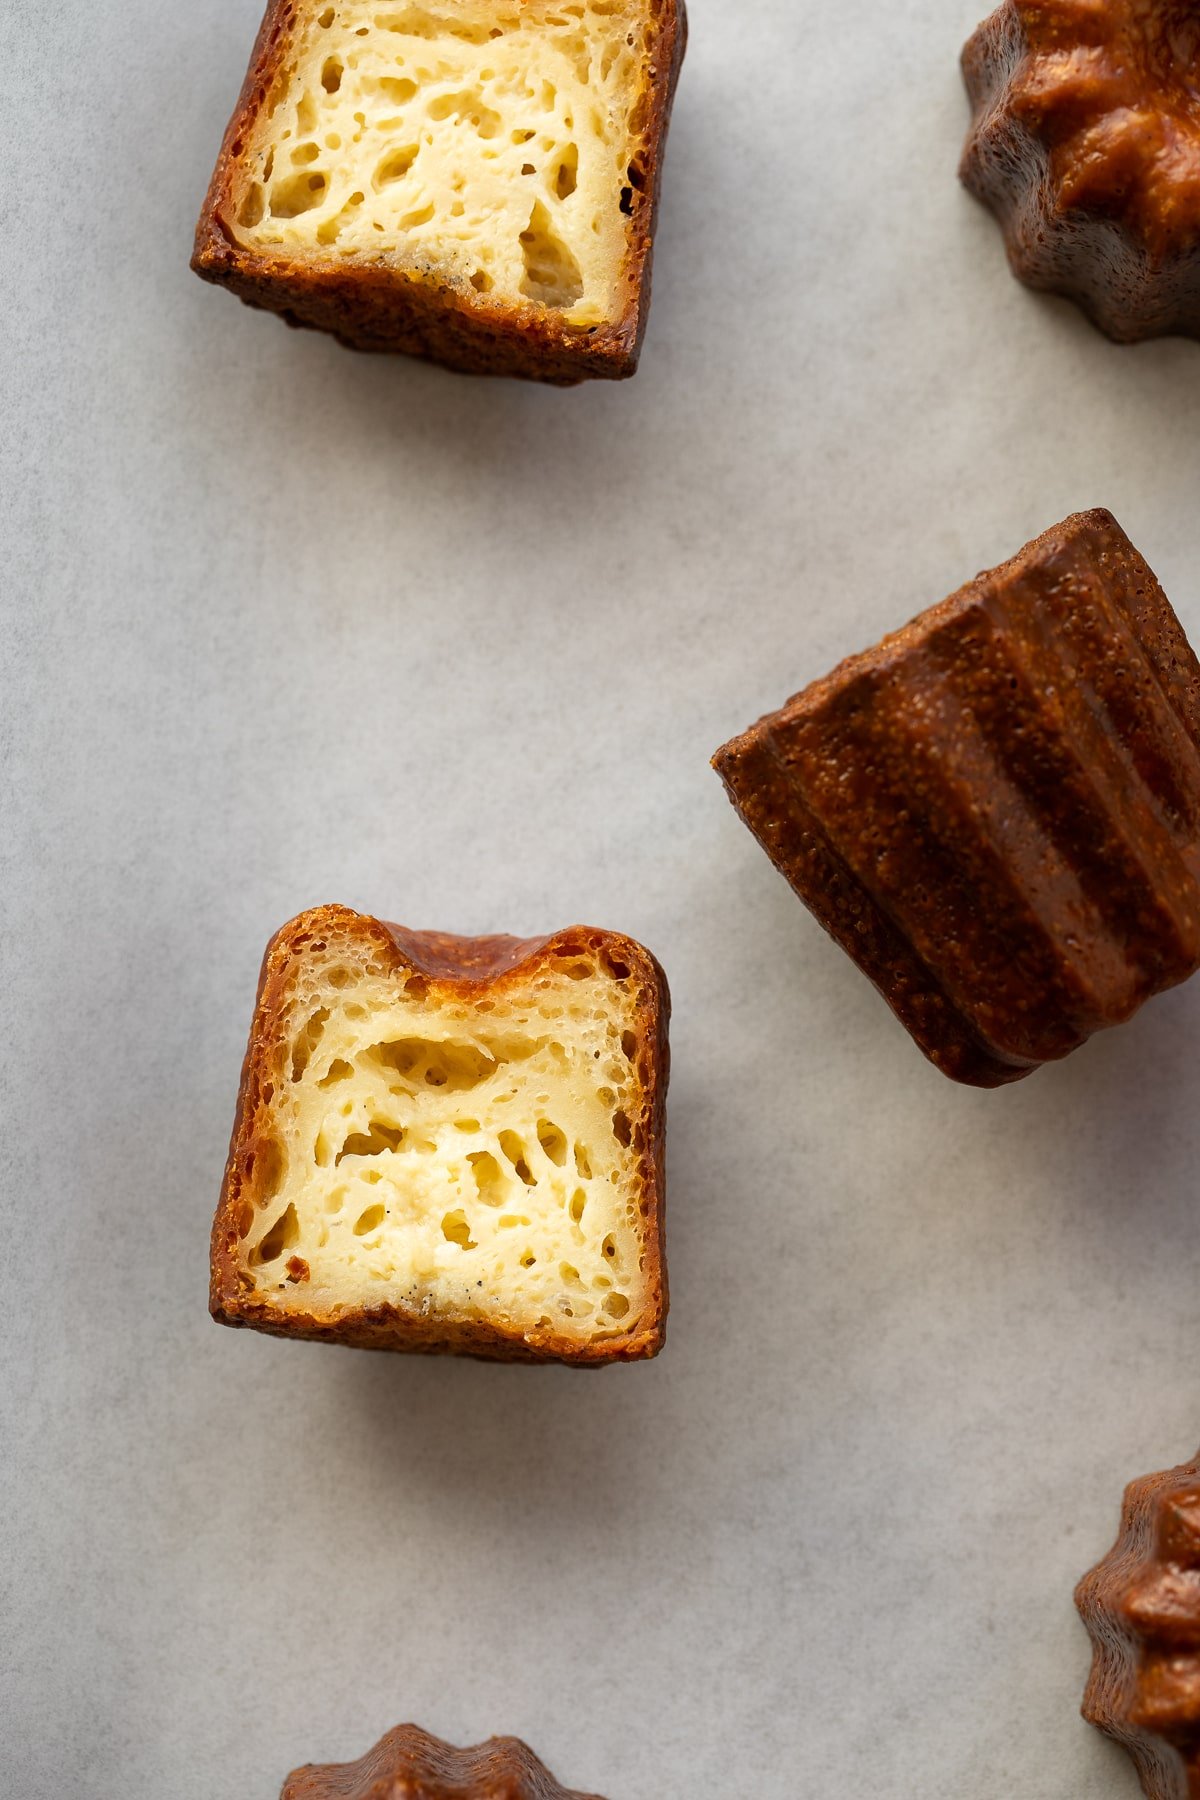
With a caramelized, crispy yet chewy outside and a sweet custard inside these pastries are truly special.
The signature flavor of these caneles is a vanilla and rum interior, and the beeswax that lines the canele molds giving it a caramelized honey like flavor without any actual honey in the recipe.
Seriously, they’re delicious. I make them every Christmas and they’re always a huge hit.
While they’re not hard, they do take some time and practice. So, this post is going to be long. If you’ve never made caneles before I highly recommend reading through the entire post before attempting the recipe. There are tons of tips and tricks that will be very helpful.
INGREDIENTS
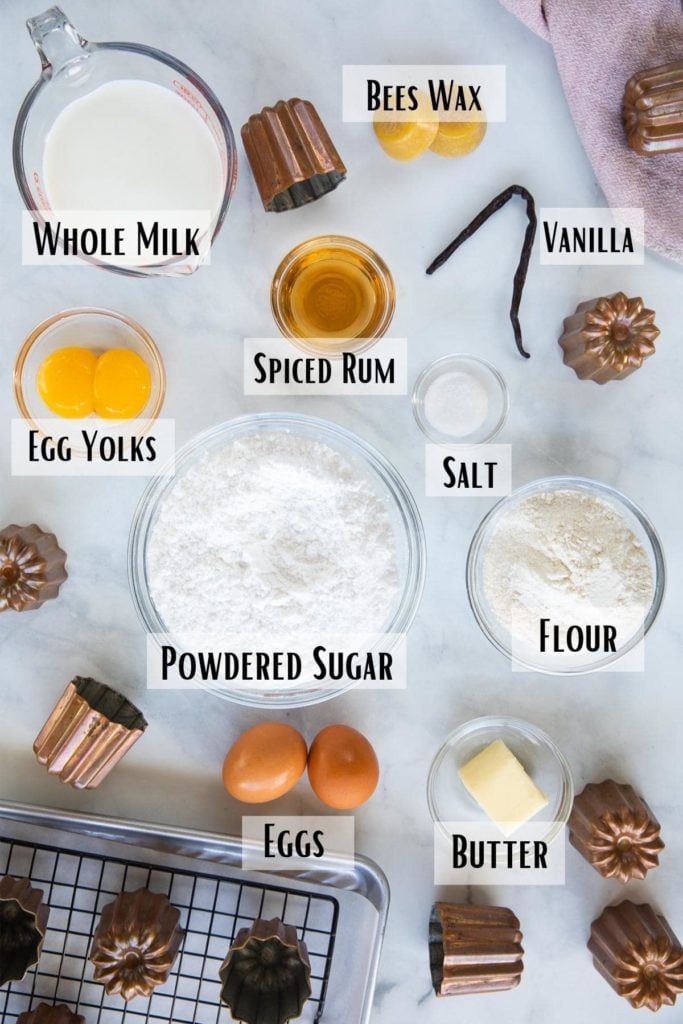
Edible BeesWax for Baking
Beeswax is a strange ingredient for a dessert, but historically this is what coats the canele molds in order to help give it that caramelized brown crust.
Nowadays, most use a mix of bees wax and butter. Some recipes don’t even use it at all.
But, I highly recommend using beeswax if you can get it. It give the caneles such a distinct and unique flavor.
That being said, be sure you’re using high-quality pure bees wax. There is a lot of beeswax being sold on Amazon that falsely states it’s pure but it is not. Which means, it’s not at all safe for eating.
Ways to tell beeswax is not pure:
- Has a very strong floral, chemical, or artificial smell
- Has trouble melting down
- States USDA Organic on the package (this Etsy seller is good and has a great explanation on why this is a red flag)
While the color and smell of bees wax can vary, it should smell very faintly of honey, not look artificial, and should melt easily.
If something looks or smells off with your wax, don’t use it in your food.
MoldS
Okay, let’s talk canele molds.
What gives authentic canele pastries their signature shape are the fluted copper molds they’re baked in. They typically come in three sizes – 1 ¼ inch, 1 ½ inch, and 2 inches.
Now, these copper molds can be quite pricey – typically $150-200 dollars for a set of 12.
Because of this, there are tons of silicone or metal cavity canele molds available at a much lower price point. De Beyer molds are the gold standard for silicone canele molds but there are many available on Amazon to fit any budget.
While not as authentic, these will still yield delicious French caneles! I’ve even heard of people making them in regular muffin tins with good results – no special molds needed.
The main difference is that it’s more difficult to get the signature crust in the silicone or metal molds. The silicone molds just aren’t going to yield that dark caramelized crust.
Will the pastries still be delicious without the copper molds? Absolutely! But, if you think you’re going to start making these a yearly tradition, I do recommend investing a set of copper molds. They’re really take your canelé game to the next level.
Seasoning copper molds
If you’ve just bough a set of new copper molds, be sure to season them before using. There should be instructions on your set of new molds, but it entails washing and drying them, coating them in neutral oil and/or beeswax, and then baking the molds for an about hour (typically at about 350℉).
Washing Copper Molds
Traditionally copper molds are not washed in between uses, just gently wiped down. The leftover wax can oxidize and turn blue or green which can be pretty gross, so I do tend to scrub them down with a cloth soaked in super hot water to remove all the wax after each use.
You can also place them in a 350 ℉ oven for about 5 minutes which will melt any remaining wax, making it easier to wipe clean.
HOW TO MAKE
Make batter (48 hours before baking)
Step 1: Heat milk, butter, and vanilla
If you’re using a whole vanilla bean (which I highly recommend) cut the vanilla bean in half, and scape the seeds out. If you’re using vanilla bean paste or vanilla extract, you add it with the rum later in the process.
Place the milk, butter, and whole vanilla bean and seeds in a medium sized saucepan over medium heat. Cook for about 3-5 minutes, stirring consistently and bring to boil. Watch carefully as the milk can overflow if cooked too high/fast.
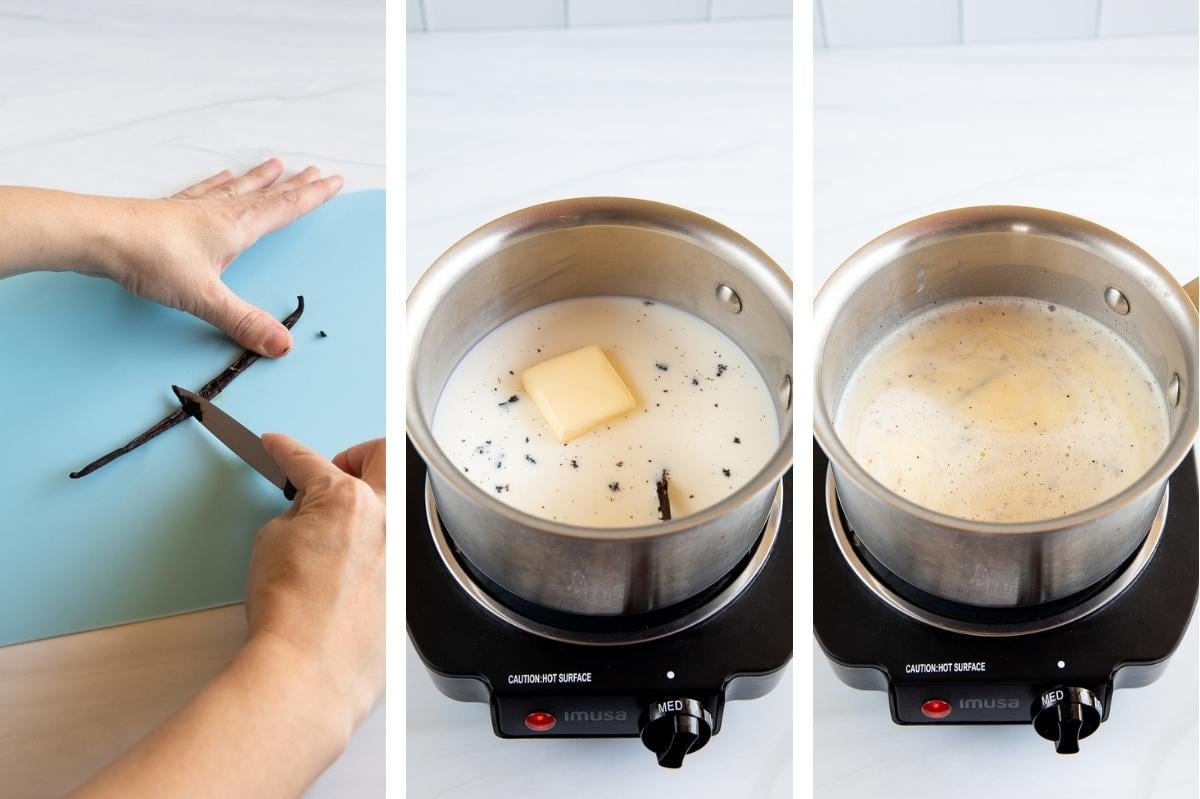
Once it reaches a boil (about 180-185℉) remove from heat and set aside to cool.
Step 2: Sift flour, powder sugar, salt and add Egg
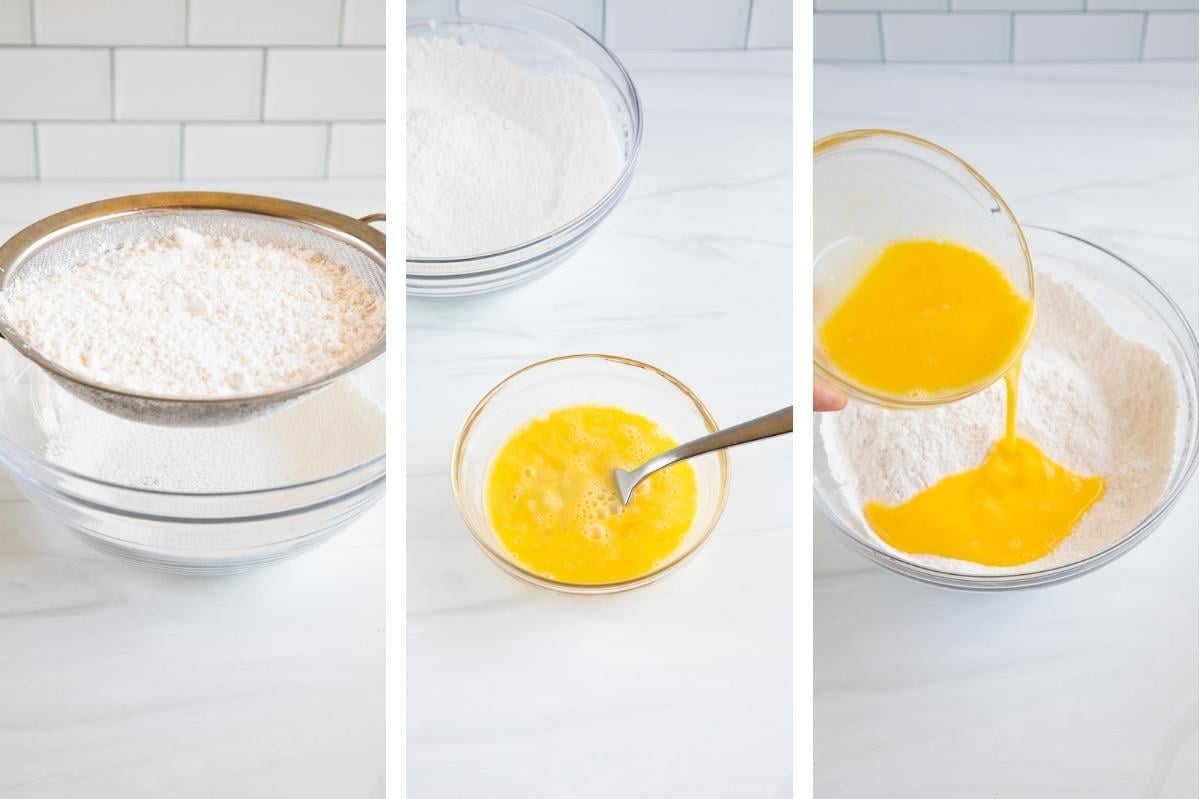
While the milk is cooling, measure the flour powdered sugar, salt and then sift together. Using a scale to weigh the ingredients can be very helpful to ensure the proper amount but it is not necessary. Just make sure you’re measuring your flour correctly using the spoon and swipe method.
Next, gently stir the eggs and egg yolks together. You’re trying to keep too much air from getting into the eggs so don’t beat too intensely.
Then, either strain or pour into the flour mixture. No need to mix it at this point. We’ll be mixing everything together in the next steps.
Step 3: Remove Vanilla Bean and Add Milk to Flour
Once the milk has cooled about 20 minutes (or 120 ℉ – you want it cool enough so it doesn’t cook the eggs), remove the vanilla bean (if using) and place in a large bowl. Do not discard the vanilla bean. We’ll be using the vanilla bean and bowl later.
Then, pour the milk mixture onto the flour and gently stir together. It will have visible lumps at this point, but that’s okay!
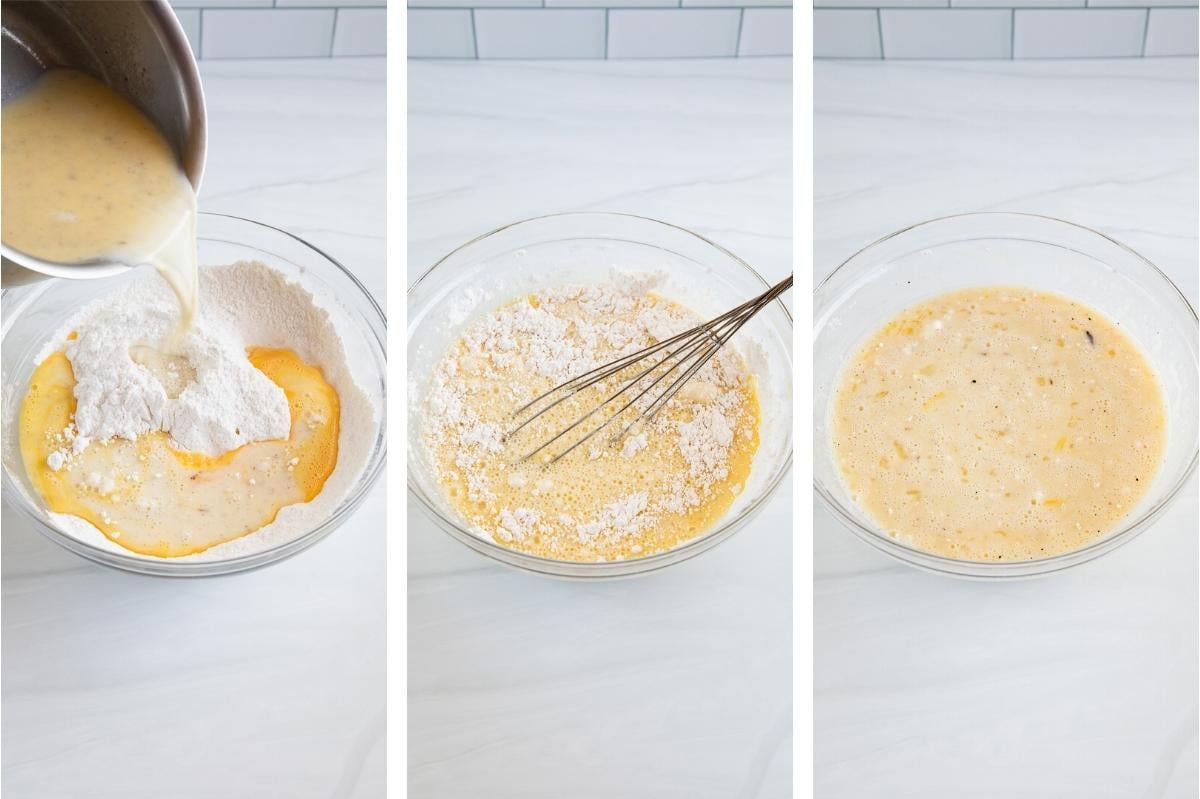
Step 4: Strain The Batter
Pour the batter over a fine mesh strainer into the large bowl you’ve put the vanilla bean into. At this point you can press any lumps out of the batter through the stainer so you get a nice, lump free batter.
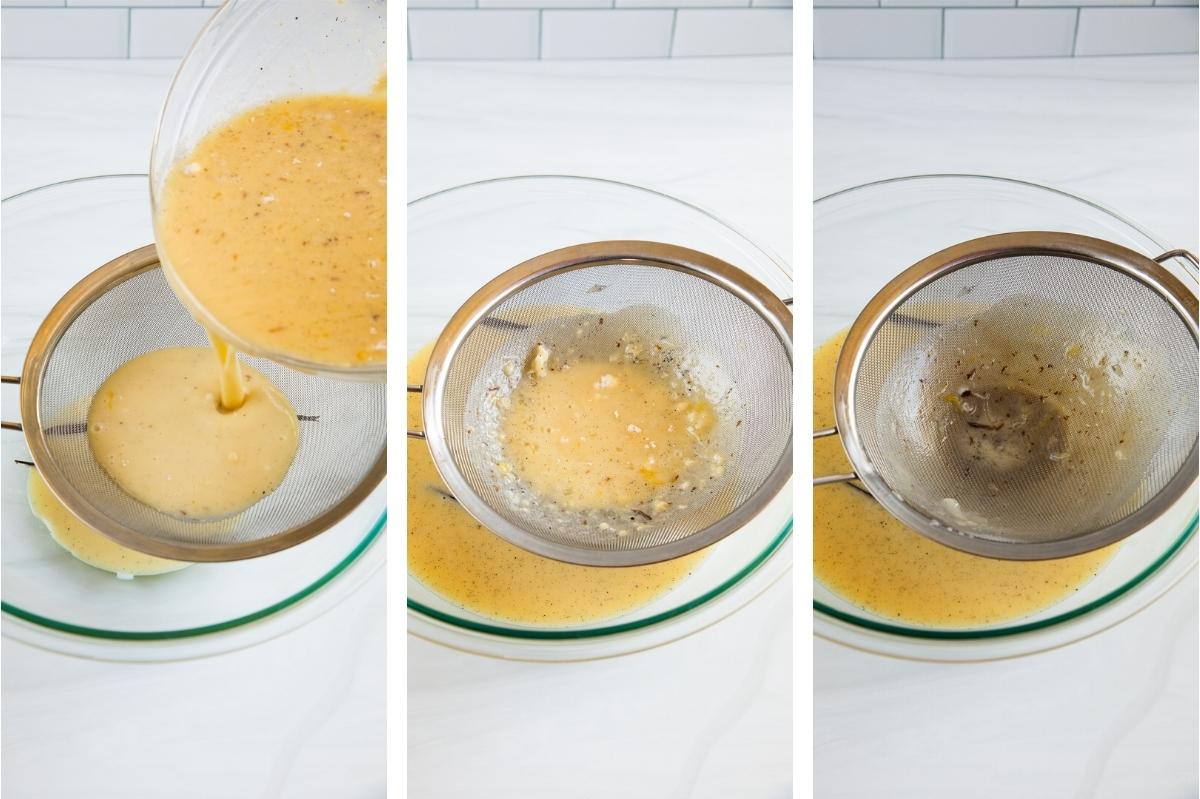
Step 5: Stir in Rum, Cover, and Let Rest
Stir in the rum and vanilla extract or vanilla bean paste if using. Cover the bowl with plastic wrap and place in the fridge for 2 days (a full 48 hours), stirring occasionally to break up the batter.
During this time it might get a small film on the top. This is fine and normal! Just re-stir to redistribute the batter.
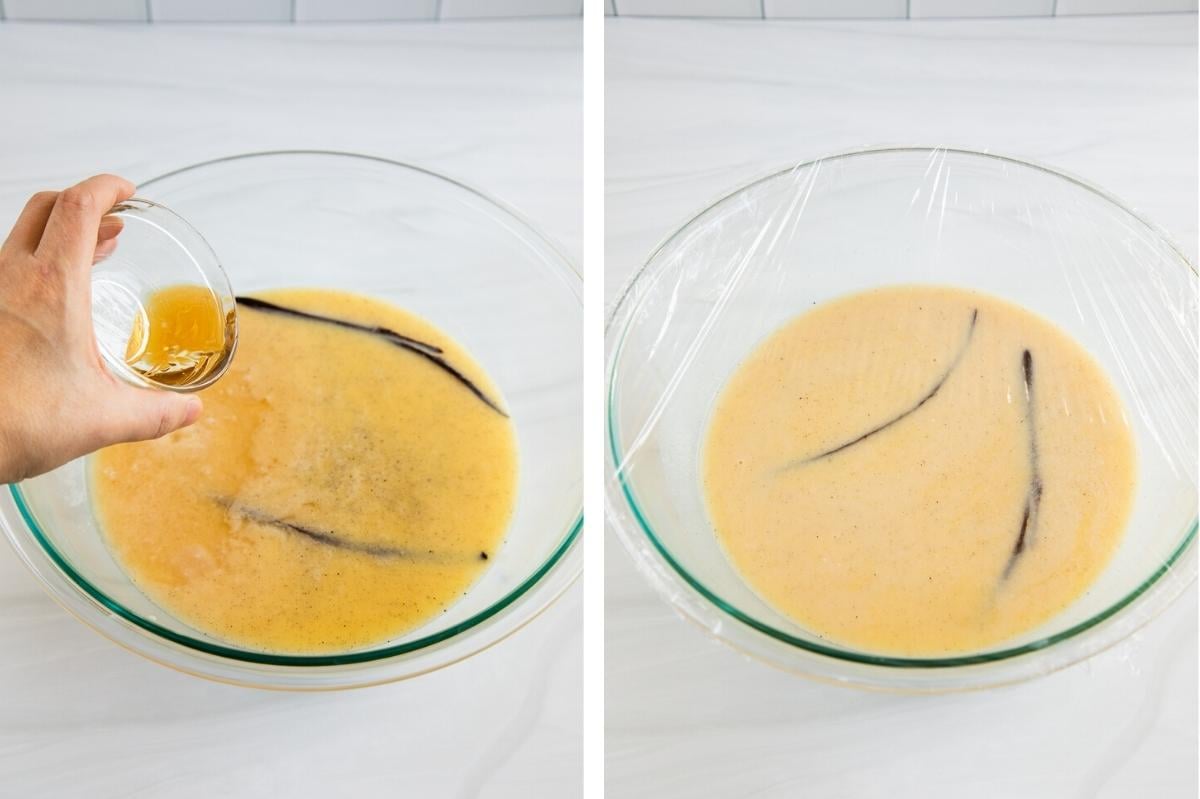
PREPARE MOLDs (1 Hour before baking)
Step 1: Warm Molds
If using coper molds, place on a baking sheet and put in the oven and set to 475℉ for a few minutes to warm up.
Warming the molds helps the beeswax mix coat the molds without getting too thick. If you don’t warm them it can form too thick of a coat of wax.
Step 2: Melt beeswax and butter
You can melt the wax on a stovetop over medium heat, in a baine marie, or in the microwave. I personally prefer melting the wax in a glass jar or reusable glass bowl in the microwave as it is easy to save any extra for next time you make caneles. It will also save a ton of time when cleaning up, as cleaning wax off of dishes and bowls is kind of a pain.
For the microwave, just heat for 10-20 second intervals until melted. Be careful if placing plastic wrap on top as boiling wax splashes can melt the plastic.
Once it’s melted, add the butter and stir until it is incorporated. If you need to you can put back in the microwave until it’s all melted.
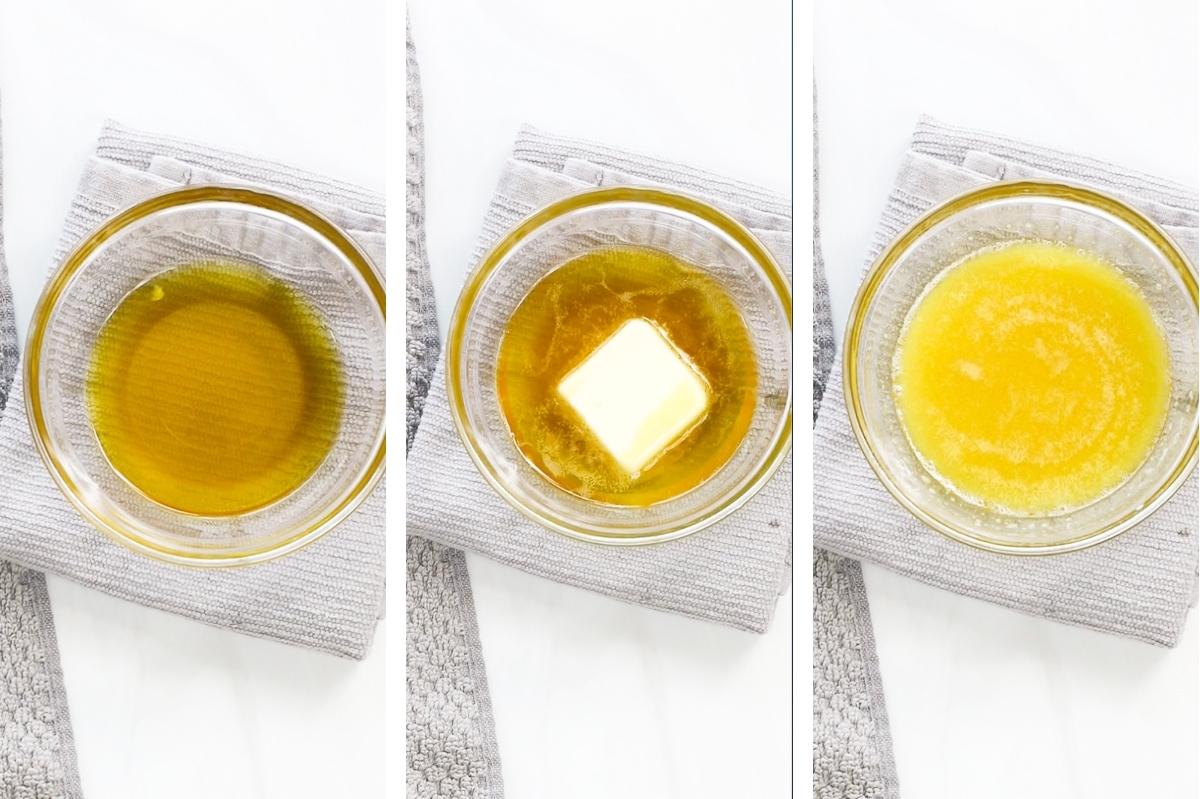
Step 3: Coat molds
Now, for the fun part, coating the molds. To prepare, line a baking sheet with parchment paper or aluminum foil and place a cooling rack on top.
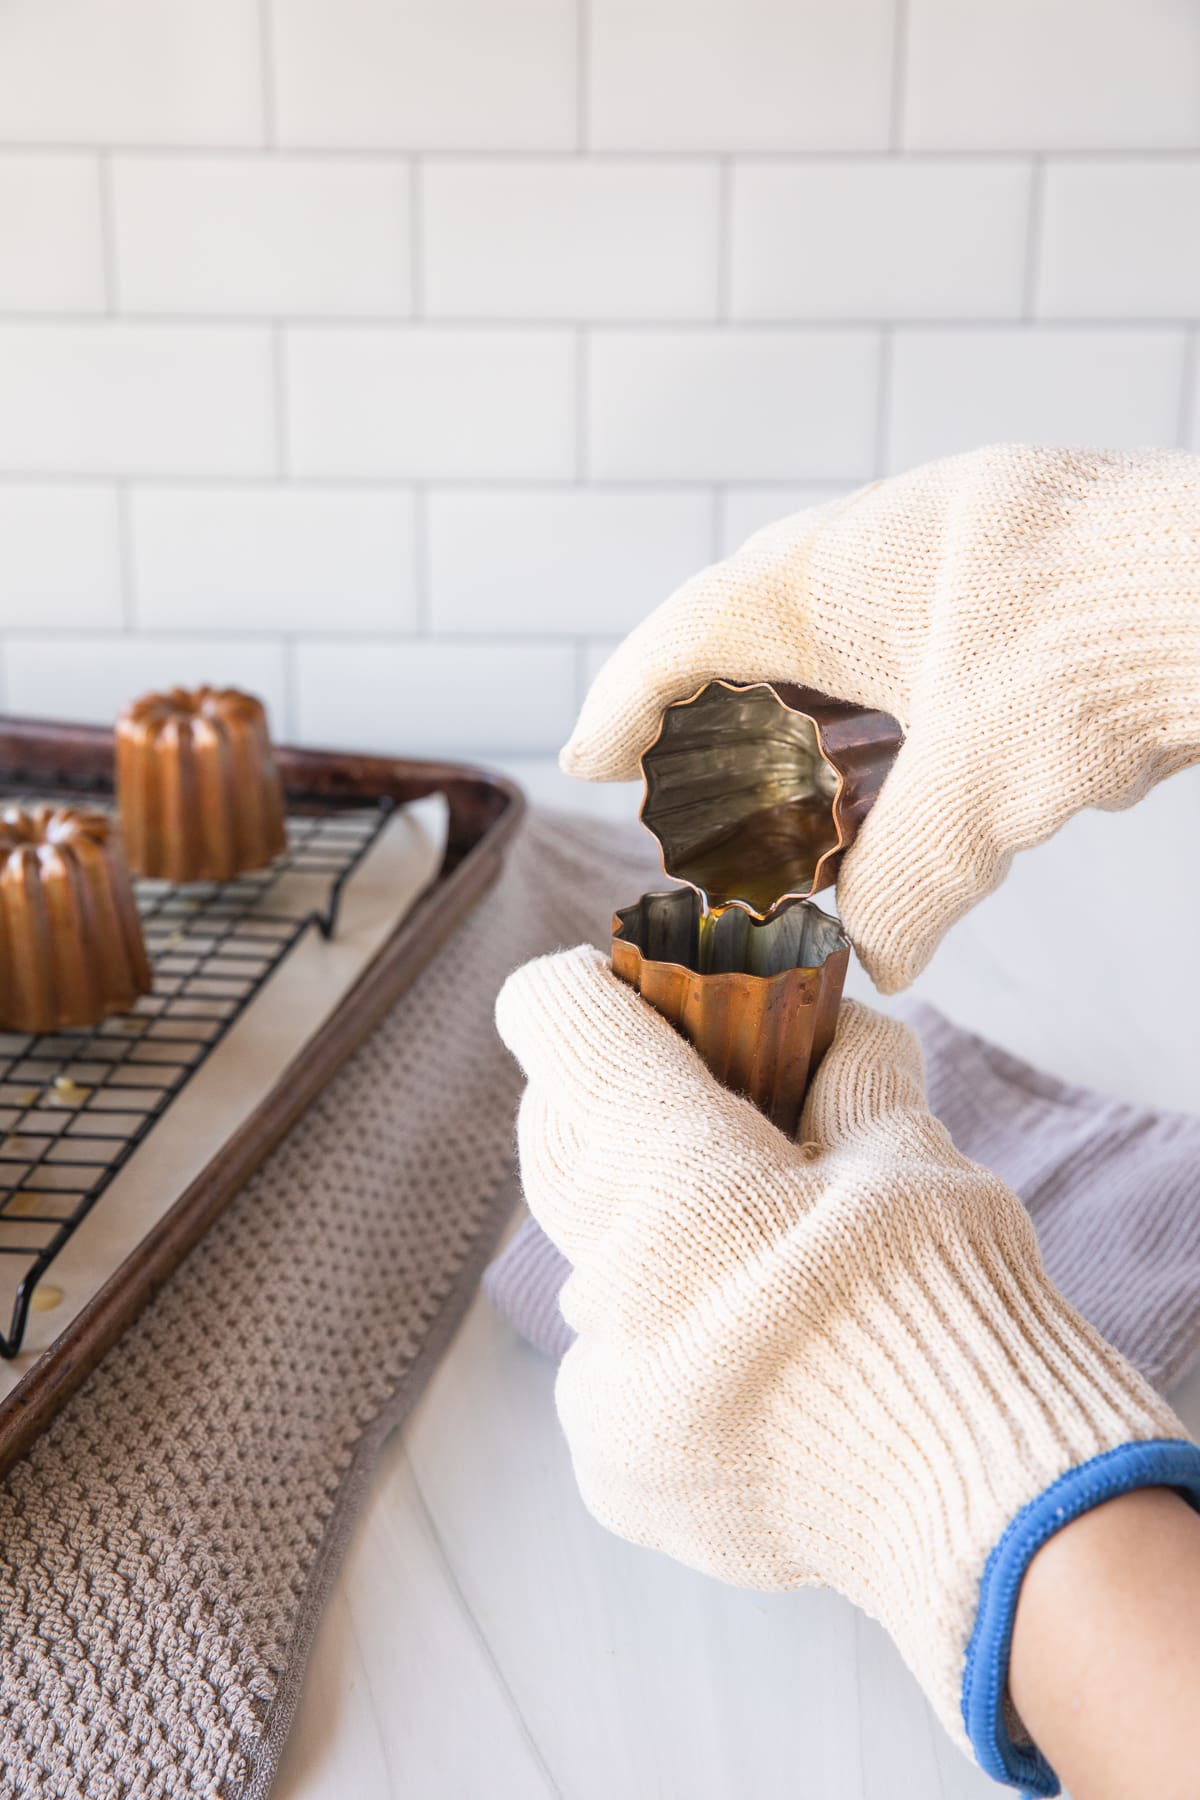
Take the canele molds out of the oven and using a pair of tongs or heat proof gloves, pour the hot wax into a canele mold and then immediately pour the hot wax from mold one into another mold (mold 2) place the first mold upside down on the wire rack.
Continue filling the molds with the wax and pouring into the next mold, making sure to put the coated mold upside down so any excess can drip out.
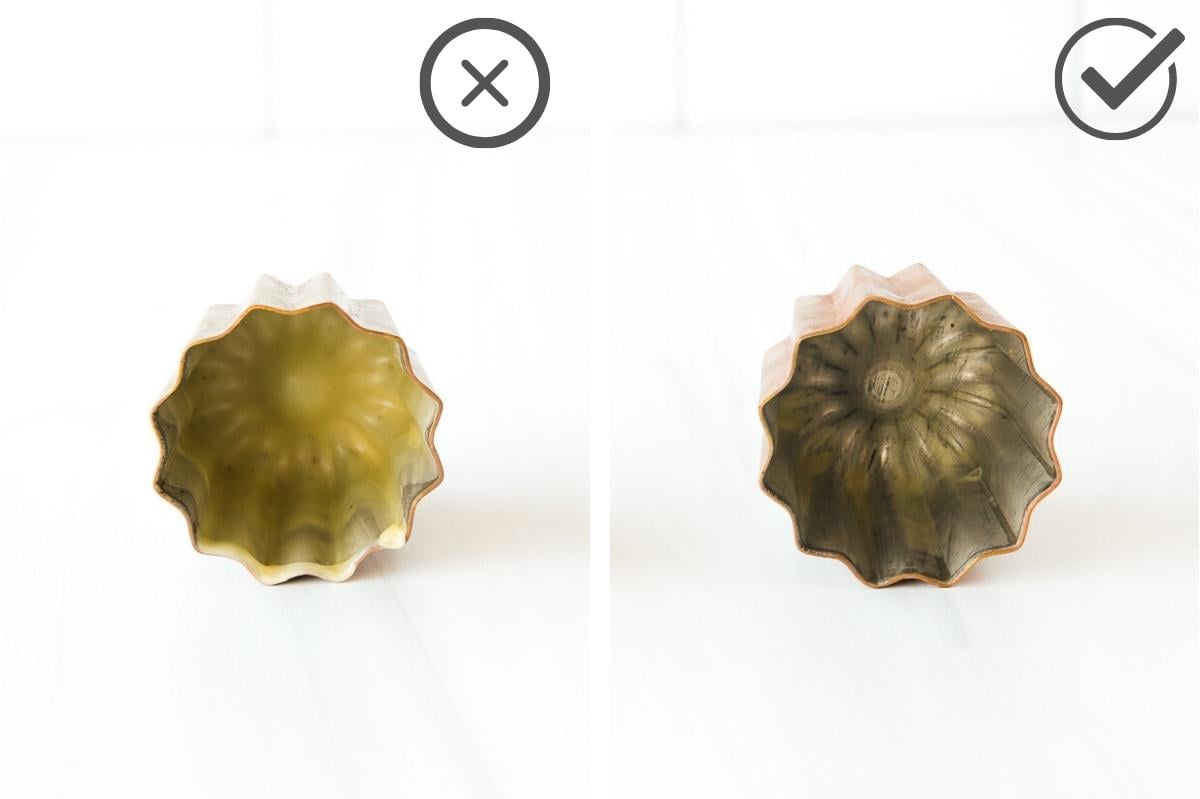
You’re trying to get a nice coating that is not too thick. If it’s too thick, you’ll get the ‘white butt’ or imperfect browning on the caneles.
You can see from the picture below you do not need a lot of wax. Too much wax will make the caneles hard to eat. You want a very thin coating. If you add too much wax, place the molds in the warm oven until it melts and pour out.
For silicone mold or cavity molds, simply use a pastry brush to brush insides of the molds with the wax mixture.
Step 4: Freeze Molds and Preheat Baking Sheet
Once all the molds have been coated in wax, place them in the freezer for at least 1 hour before baking.
Line another baking sheet with parchment or aluminum foil and place in the oven to preheat while the molds are in the freezer.
BAKING CANELES
Step 1: Stir batter
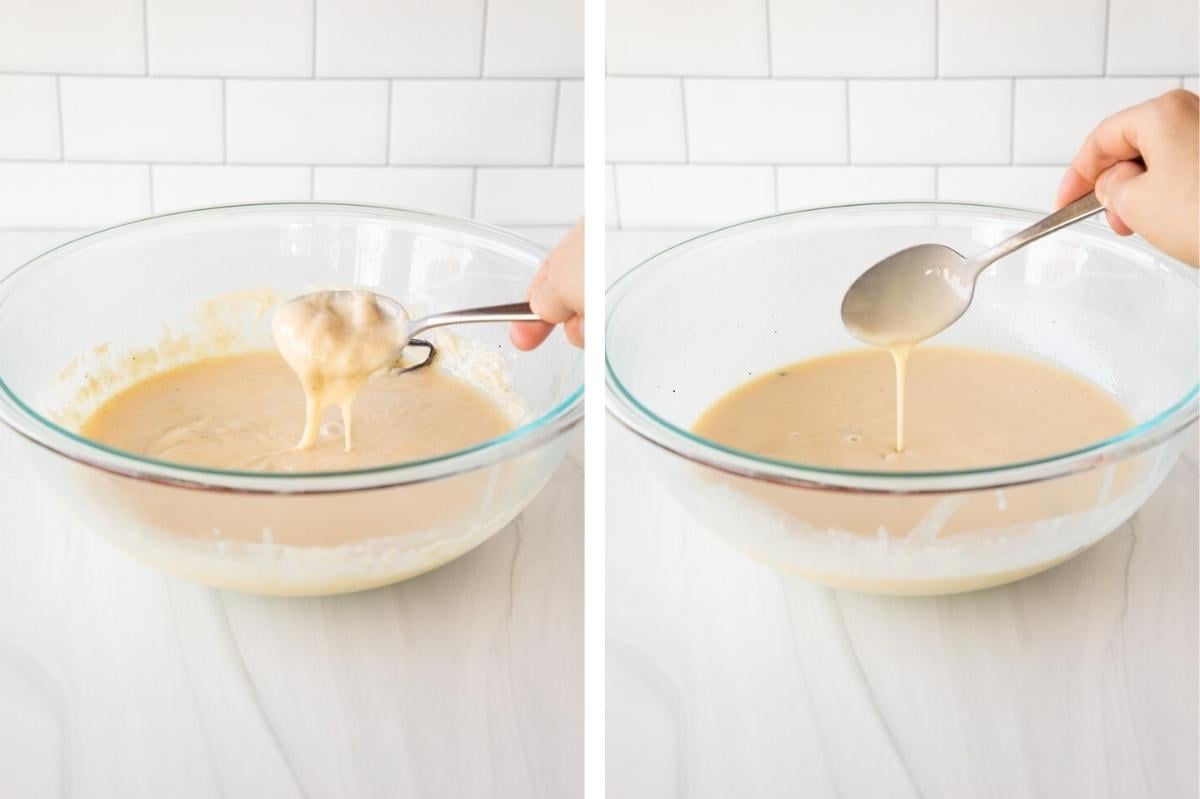
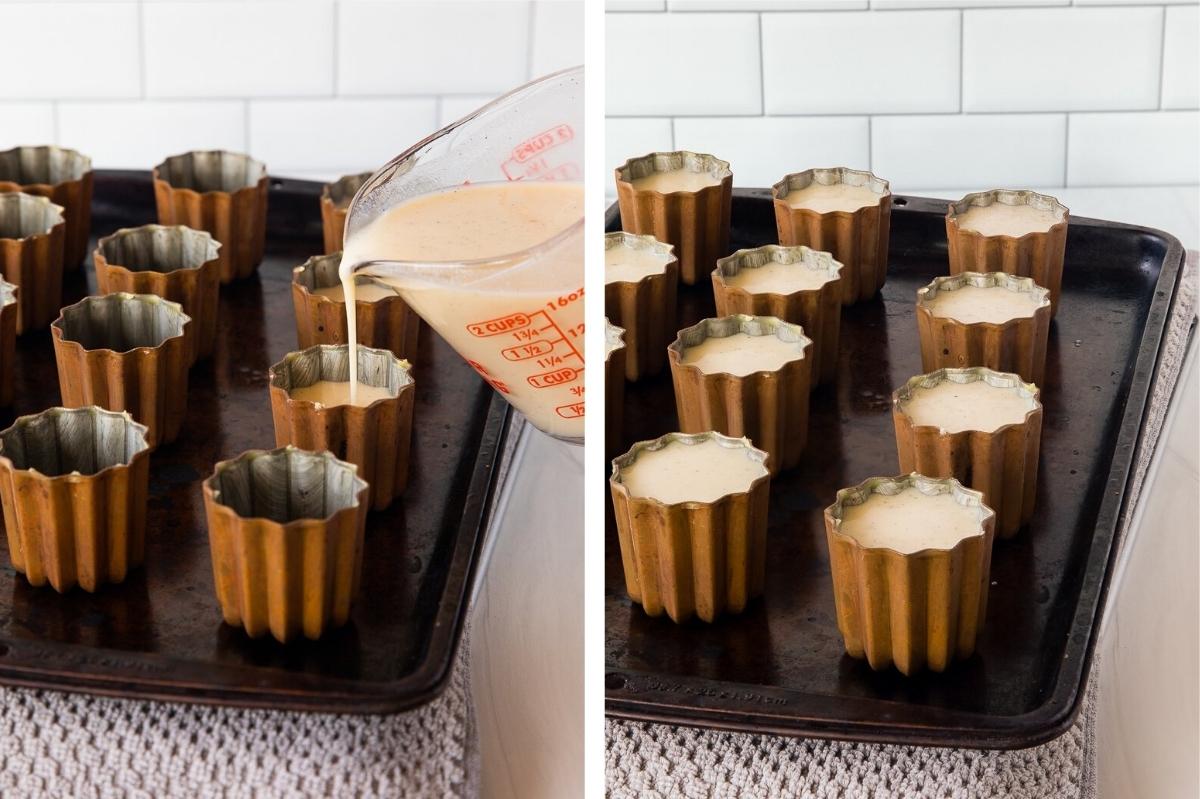
Take the rested batter out of the fridge and give it a good stir to make sure it’s thoroughly stirred. I personally prefer to put the batter in a pourable measuring cup, which makes it easier to fill the canele molds. You can also use a ladle to ladle it in.
Step 2: Fill Molds with Batter
Remove the molds from the freezer and fill each mold to about ¼ inch from the top as they will expand while baking.
Step 3: Place Caneles on preheated baking sheet
Remove the preheated baking sheet from the oven and place the canele molds directly on the hot sheet, about 1-2 inches apart, making sure they’re equally spaced.
Carefully place the baking sheet back in the middle rack of the oven.
Step 4: Turn Down Heat at Bake
Immediately turn down the heat to 450 ℉ and bake for 15 minutes, turning the baking sheet half way through.
After 15 minutes, turn down the heat again to 350 degrees and bake for another 45-60 minutes, turning the pan each 15 minutes. The time can vary depending on the size of your molds, so start checking after 45 minutes.
See Troubleshooting if the caneles rise too far out of the molds while baking.
Step 5: Remove from molds and let cool
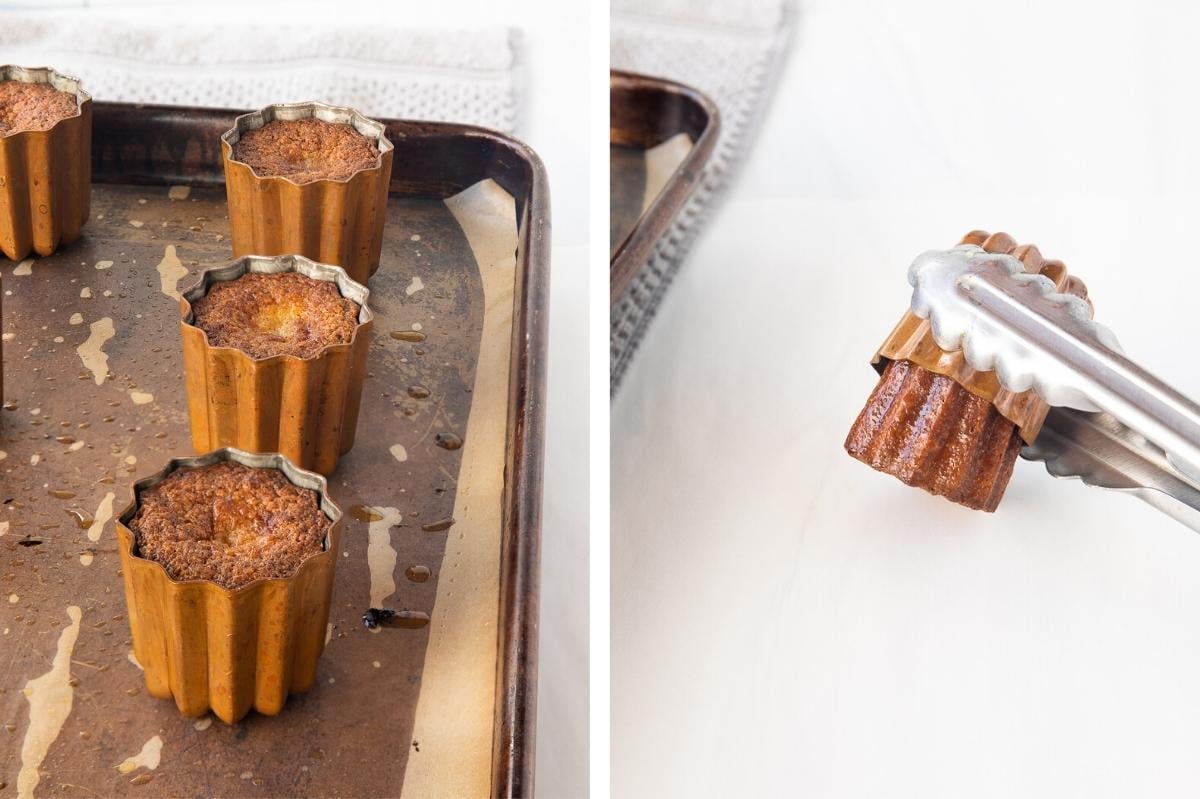
When the caneles are done, immediately remove from the mold and let cool.
I tend to check the caneles one at a time to see if they’re done. The canele should easily slide out of the mold. If it’s a bit stuck, just run a knife along the sides.
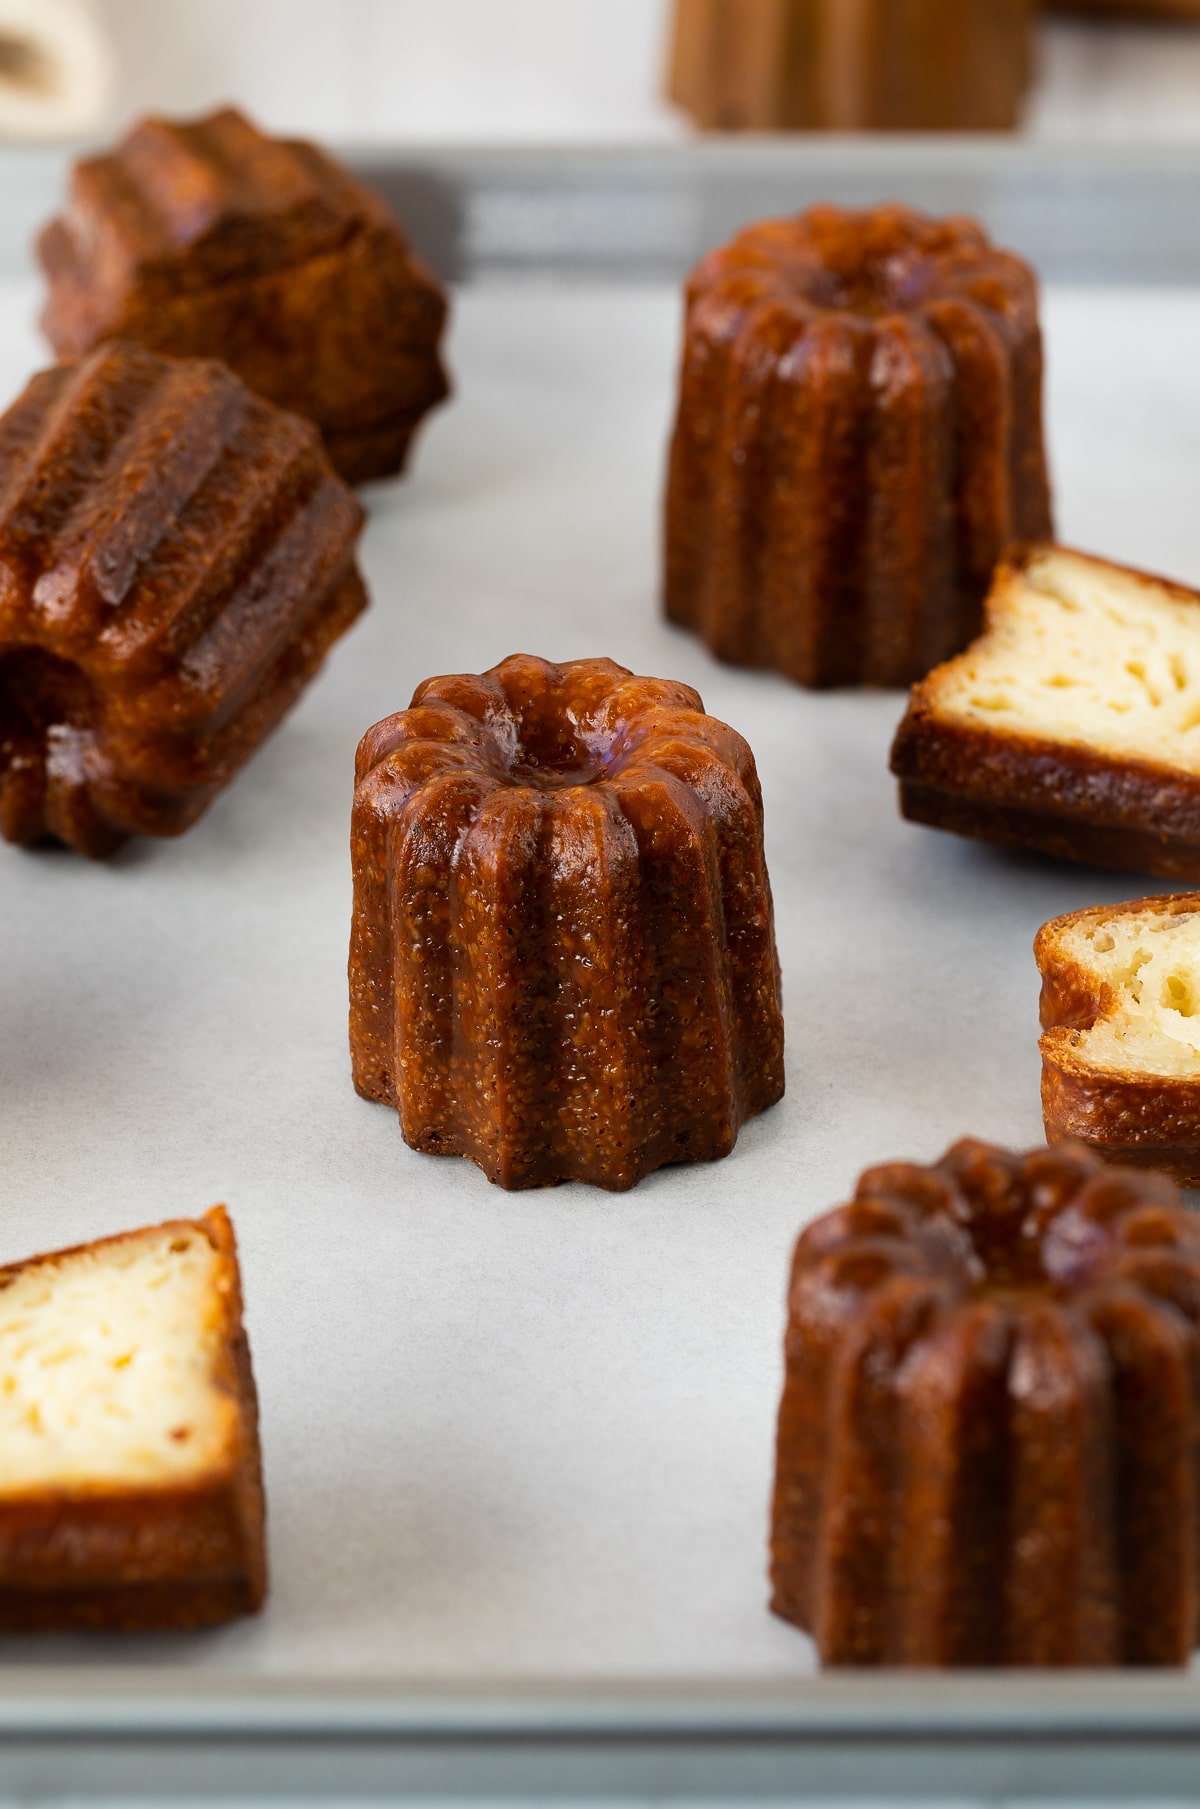
If, after I’ve removed it from the mold, the canele is perfectly browned and crisp, let it cool on a wire rack.
If the caneles are still golden or have the ‘white tip’ (see troubleshooting section), place back in the mold and bake/check at 5 minutes intervals until they’re done.
Let cool 1-2 hours at room temperate. These are best the day they’re made and will stay crisp about 6- 8 hours.
TROUBLESHOOTING
Light colored exterior
Two main reason:
- Using silicone molds
- Undercooked caneles
Unfortunately, if using silicone molds you might not ever be able to get that dark caramelized crust.
If using copper molds, bake another 5 or 10 minutes or until they come out caramelized as shown below. Each canele is only 5-10 minutes of additional baking.

And don’t worry! Even bakeries in France sell golden colored caneles. They’re still delicious!
Burnt Caneles
This is also another common phenomena with caneles. I say, if they’re burnt, that means they’re overcooked. Typically because they were cooked at a too high temperature for too long.
I don’t personally like them this way but there are some chefs that swear this is how they should be. So, bake until your desired caramelized-ness and check for doneness one canele at a time.
White Tip/White Butt
The white tip or white butt does not affect taste at all! Even the most skilled canele baker will sometimes have a white tip on the caneles.
The reasons:
- Too much wax in your molds
- Underbaked
Fix: try coating a little less wax next time, or baking for another 5 minutes. Also, sometimes the wax pools at the bottom of the mold after you’ve coated it. You can use a knife to get rid of that tiny spot of wax before adding the batter, and this can help getting rid of the white tip.
Caneles that puff up and out of the mold during baking
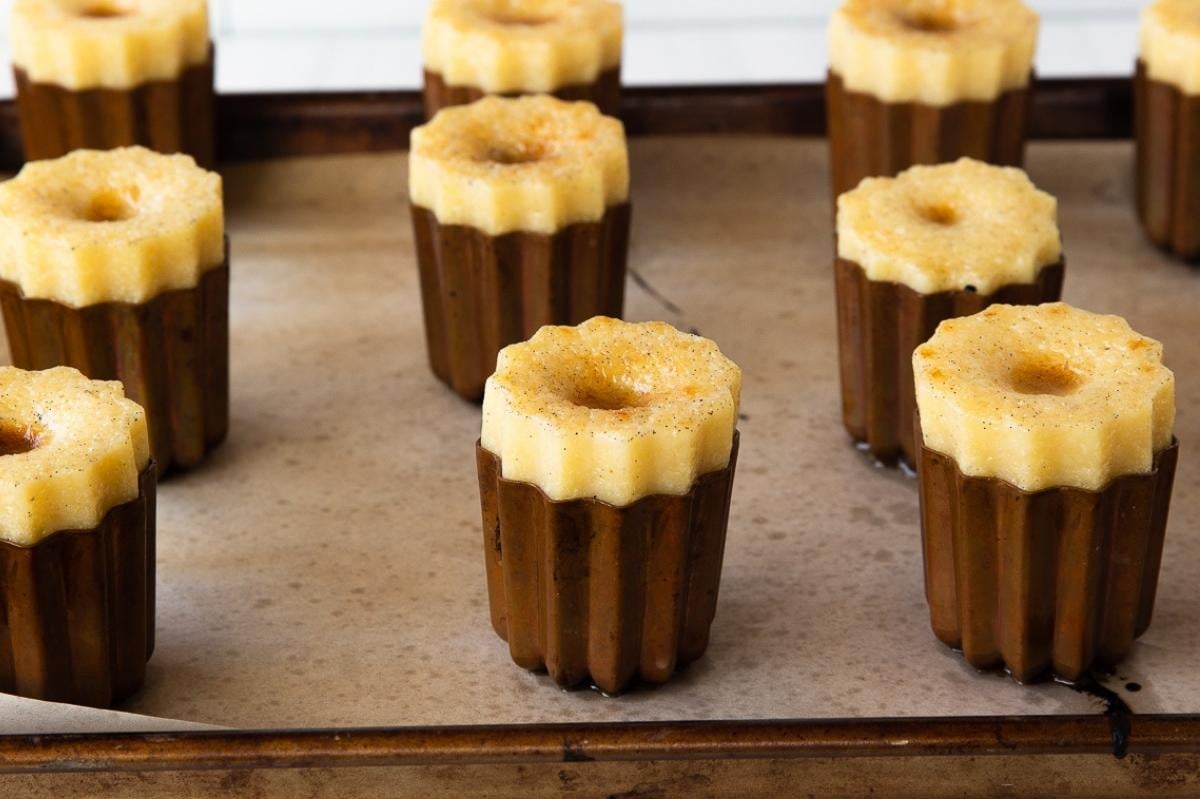
This is super common and does not mean there is a problem! Here are the main reasons:
- Batter wasn’t rested enough
- Too much air in batter
Thankfully, there is a super easy fix to this – just take the caneles out of the oven and let them deflate. After a few minutes they should settle back down and/or can you push them back inside the mold using tongs or a fork. I normally do this one or two times during baking.
Be sure to stop your kitchen timer so you know how long they still need to bake.
Tips for Perfect Caneles
- Silicone molds or metal cavity molds are a much more economical way to make caneles, as using authentic Copper Molds can be expensive. But, it can be difficult to get the signature browning on the silicone molds (although the caneles will still be delicious!).
- Make sure you’re using real beeswax. There are a lot of fake beeswax out there, I recommend Etsy sellers like this or this seller on Amazon. See section on edible beeswax for more information.
- While not required, a scale and digital thermometer can really help with with making perfect caneles. If you’re not using a scale, be sure to use the spoon and swipe method for measuring the flour of swipe method of spooning the flour into the measure cups and swiping the excess off the top with a knife.
- Do not to add too much wax to the canele mold or they’ll never brown and you’ll get a mouthful of wax when eating them. A little goes a long way as far as beeswax goes so just remember, less is more.
- While baking, the batter puffing up out of the molds is fine. When it happens, take the caneles out of the oven and let it settle back down into the mold. See troubleshoot for more information on this.
- Check caneles for done-ness one at a time. I’ve found they can all reach perfect brownness at different times.
- This recipe makes 12 – two inch caneles. The amount of caneles you get from the recipe will vary depending on the size of your molds.
- Baking times can also vary depending on the size of your molds, so start checking if they’re done after 45 minutes. Or, as little as 30 minutes if using mini canele molds.
Storing Caneles
Caneles are the best on the day you make them. They’ll only stay crisp for about 6-8 hours.
They will last 3-5 days in the fridge and will still taste delicious, but unfortunately they’ll never get that chewy, slightly crunchy coating back after the first day. You can reheat them at a 425 ℉ oven for 3-5 minutes to warm them up. Let cool before eating.
So, that’s it! Perfect, professional French Caneles fit for a real French Patisserie!
There are definitely easier canele recipes out there that do not require resting the batter or using beeswax. And while they’re still tasty, they don’t compare to the perfection of an authentic Canele!
Looking for more French Pastry recipes? Check these out!
WANT TO JOIN THE PARTY? Subscribe to my newsletter and follow on Tik Tok, Pinterest, Instagram, and Facebook for all the latest recipes!
French Caneles (Cannelé de Bordeaux)
Equipment
- Canele Molds
- Tongs and/or heat proof gloves
- Baking Sheet
- Aluminum Foil/Parchment Paper
- Glass Bowl/Jar or Saucepan
INGREDIENTS
- 2 cups whole milk 500g
- 3.5 tablespoons unsalted butter 50g
- 1 vanilla bean or 1 tablespoon extract or paste
- 3/4 cup +1 tablespoon all purpose-flour 100g
- 2 cups unsifted powdered sugar 250g
- 1 teaspoon sea salt or 3/4 tsp table salt
- 2 large whole eggs
- 2 large egg yolks
- 1/4 cup spiced rum
- 1 oz beeswax see notes on beeswax
- 1 oz butter salted or unsalted
Instructions
MAKING THE BATTER (2 days prior to baking)
- If you’re using a whole vanilla bean cut the vanilla bean in half, and scape the seeds out.
- Place the milk, butter, and whole vanilla bean and seeds in a medium sized saucepan over medium heat.
- Cook for about 3-5 minutes, stirring consistency and bring to boil. Watch carefully as the milk can overflow if cooked too high/fast.
- Once it reaches a boil (about 180-185℉), immediately remove from heat and set aside to cool about 20 minutes.
- While the milk is cooling, sift together flour, powdered sugar, salt.
- Gently mix the eggs and egg yolks together. You’re trying keep too much air from getting into the eggs so don’t beat too intensely. Then, strain or pour into the flour mixture (no need to mix together at this point).
- Once the milk has cooled, (to be exact you want it less than 120℉ so it’s cool enough that it doesn’t cook the eggs), remove the vanilla bean and place in a large bowl. Do not discard the vanilla bean. We’ll be using the vanilla bean and bowl later.
- Pour milk mixture onto the flour/egg mix and gently stir together. It will have visible lumps at this point.
- Pour the batter over a fine mesh strainer into the large bowl you’ve put the vanilla bean into. Press any lumps out of the batter through the stainer so you get a nice, lump free batter.
- Stir in the rum and vanilla extract or vanilla bean paste if using.
- Cover the bowl with plastic wrap and place in the fridge for 2 days (a full 48 hours), stirring occasionally to break up the batter. During this time it might get a small film on the top. This is fine and normal. Just stir to redistribute the batter.
PREPARE MOLDS (1 hour before baking)
- If using copper or metal molds, place the canele molds on a parchment or aluminum foil lined baking sheet. Place the baking sheet in the oven and set to 475℉. This will warm up the molds which helps the beeswax mix stay on the molds but not get too thick.
- Melt your beeswax in a glass jar or bowl in the microwave or in a pan on a stove top. See notes and post for tips on melting beeswax.
- While the wax is melting, line a baking sheet with parchment paper or aluminum foil and place a cooling rack on top.
- Once the wax has melted, add the butter and stir until it is incorporated. If you need to, you can continue heating in the microwave or on the stovetop until it’s all melted.
- Remove canele molds out from oven and using a pair of tongs or a heat proof gloves and pour the hot wax into the canele mold, filling all the way up and rotation around if necessary until it coats the entire inside.
- Immediately pour the hot wax from the first mold into the next mold and place the first mold upside down onto the prepared baking sheet we've lined with parchment and a cooling rack This allows the wax to drip off the canele mold so it doesn’t have too much wax inside.
- Moving quickly so the molds stay warm, continue filling the molds with the wax and pouring into them next mold, while setting the coated molds upside down on the wire rack. If the wax coating is too thick, place molds back in the oven until it melts and pour out the extra into the original container of wax.
- If using silicone or cavity molds – use a pastry brush to brush the wax into the mold.
- Once all the molds have been coated in wax, place them in the freeze for at least 1 hour before baking.
- While the molds are in the freezer, line another baking sheet with parchment or aluminum foil and place in the oven to preheat.
BAKING CANELES
- When ready to bake, take the rested batter out of the fridge and give it a good stir to make sure it’s thoroughly mixed.
- Remove the molds from the freezer and using a pourable measure cup or ladle, fill each mold with batter up to about ¼ inch from the top as they will expand while baking.
- Remove the preheated baking sheet from the oven and place the canele molds directly on the hot sheet, about 1-2 inches apart, making sure they’re equally spaced.
- Carefully place the baking sheet back in the middle rack of the oven.
- Immediately turn down the heat to 450℉ and bake for 15 minutes, turning the baking sheet half way through.
- After 15 minutes, turn down the heat again to 350℉ and bake for another 45-60 minutes, turning the pan each 15 minutes.
- If/when the caneles rise far up out of the canele mold, remove from oven and let the settle back into the molds. They should settle down in a minute or two and you can use tongs to help them back into the mold. Be sure to stop the timer so you keep an accurate record of how long they need to bake.
- Baking time can vary depending on the size of your molds, so start checking if they're done after 45 minutes by removing the canele from a mold. They should slide right out when tipped upside down.
- If the caneles are still golden or have the ‘white tip’ (see troubleshooting section), place back in the mold and bake/check at 5 minutes intervals until they’re done. I recommend checking one canele at a time as they all can be done at different times.
- When done, immediately remove from mold and let cool on a wire rack 1-2 hours at room temperate.
- These are best the day they’re made and will stay crisp about 6-8 hours.
Video
Notes
- If you’ve never made caneles, I recommend reading through the entire post and recipe before making them. While they’re actually quite simple, there are a number of steps so having an idea of what the full recipe entails will be helpful.
- Silicone molds or metal cavity molds are a much more economical way to make caneles as using authentic copper molds can be expensive. But, it can be difficult to get the signature browning on the silicone molds (although the caneles will still be delicious!). I’ve even heard of people making them in muffin tins.
- Make sure you’re using real beeswax. There are a lot of fake beeswax out there, I recommend Etsy sellers like this or this seller on Amazon. See section on edible beeswax for more information.
- While not required, a scale and digital thermometer can really help with with making perfect caneles. If you’re not using a scale, be sure to use the spoon and swipe method for measuring the flour of swipe method of spooning the flour into the measure cups and swiping the excess off the top with a knife.
- Do not to add too much wax to the canele mold or they’ll never brown and you’ll get a mouthful of wax when eating them.
- While baking, the batter puffing up out of the molds is fine. When it happens, take the caneles out of the oven and let it settle back down into the mold. See troubleshoot for more information on this.
- Check caneles for done-ness one at a time. I’ve found they can all reach perfect brownness at different times.
- This recipe makes 12 – two inch caneles. The amount of caneles you get the recipe will vary depending on the size of your molds.
- Baking times can also vary depending on the size of your molds, so start checking if they’re done after 45 minutes (30 minutes for mini caneles).
- These caneles are best the day you make them and will stay crisp 6-8 hours. They will last 3-5 days in the fridge.




Amanda mason says
I’ve only made the Italian traditional Breton but these look good! I’m going to make these over the summer!
Moop Brown says
Just looking at this recipe has my mouth watering. It looks really tasty and like the perfect texture as well
Deborah says
This French Canele Recipe sounds simply amazing and when I get my hands on some molds I will be trying this . Thanks to your precise recipe I am pretty sure I can make these . Thanks for his amazing recipe .
Ann says
These little guys look picture perfect! Just like you bought them at a bakery! Hope mine turn out looking the same!
Kayla DiMaggio says
This french canele recipe was so delicious! I was so thankful for the helpful notes! It really helped guide me!
Mikayla says
First, you are correct that using the bees wax if you can find it makes these extra good. I loved the texture and flavor combination. These will be perfect to make for a special gathering.
Colleen says
Caneles are so absolutely delicious and I never see them in the bakeries. Thanks to your super detailed and thorough instructions and tips, I may just be confident enough to try making them. Thanks for this post!
Devan says
I always found Caneles to be a little intimidating but you’ve really helped by adding a wealth of information and tips to this recipe. I also had no idea they sometimes contain beeswax – super cool! Thank you for all your hard work and gorgeous photos!
Laurie says
Beautiful! So glad I found this! Your instructions are so clear. Much appreciated. Laurie Hurst
C says
Thank you for your wonderful, thorough recipe. I think I will now be brave enough to try to make caneles in a copper molds with beeswax!👍👍👍 no more silicone molds for me!