Master how to blind bake pie crust! Blind baking and parbaking pie crust prevents a soggy crust, leaving you with a crisp, flaky pie crust every time!

This blind baking tutorial helps you achieve a perfectly crisp and flaky crust for your favorite pie. And while it seems like an extra step, it's actually super simple!! Seriously if you're making homemade pie crust, blind baking is the way to go!
The technique involves pre-baking your pie crust before adding the filling, ensuring a crisp and delicious base for any pie.
The great thing about blind baking is that it can be used on any pie or quiche, whether the recipe calls for it or not. First, let's talk about the difference between par-baking and blind baking.
- Blind Baking: this is a technique for fully baking a pie crust before adding the filling. This is mainly for fresh fruit pies, and any pie that will not be baked again after adding the filling.
- Par-Baking: Also known as partially baked, this technique partially bakes the pie crust, perfect for pies and quiches where a filling will be added and then baked again.
Ingredients and Tools
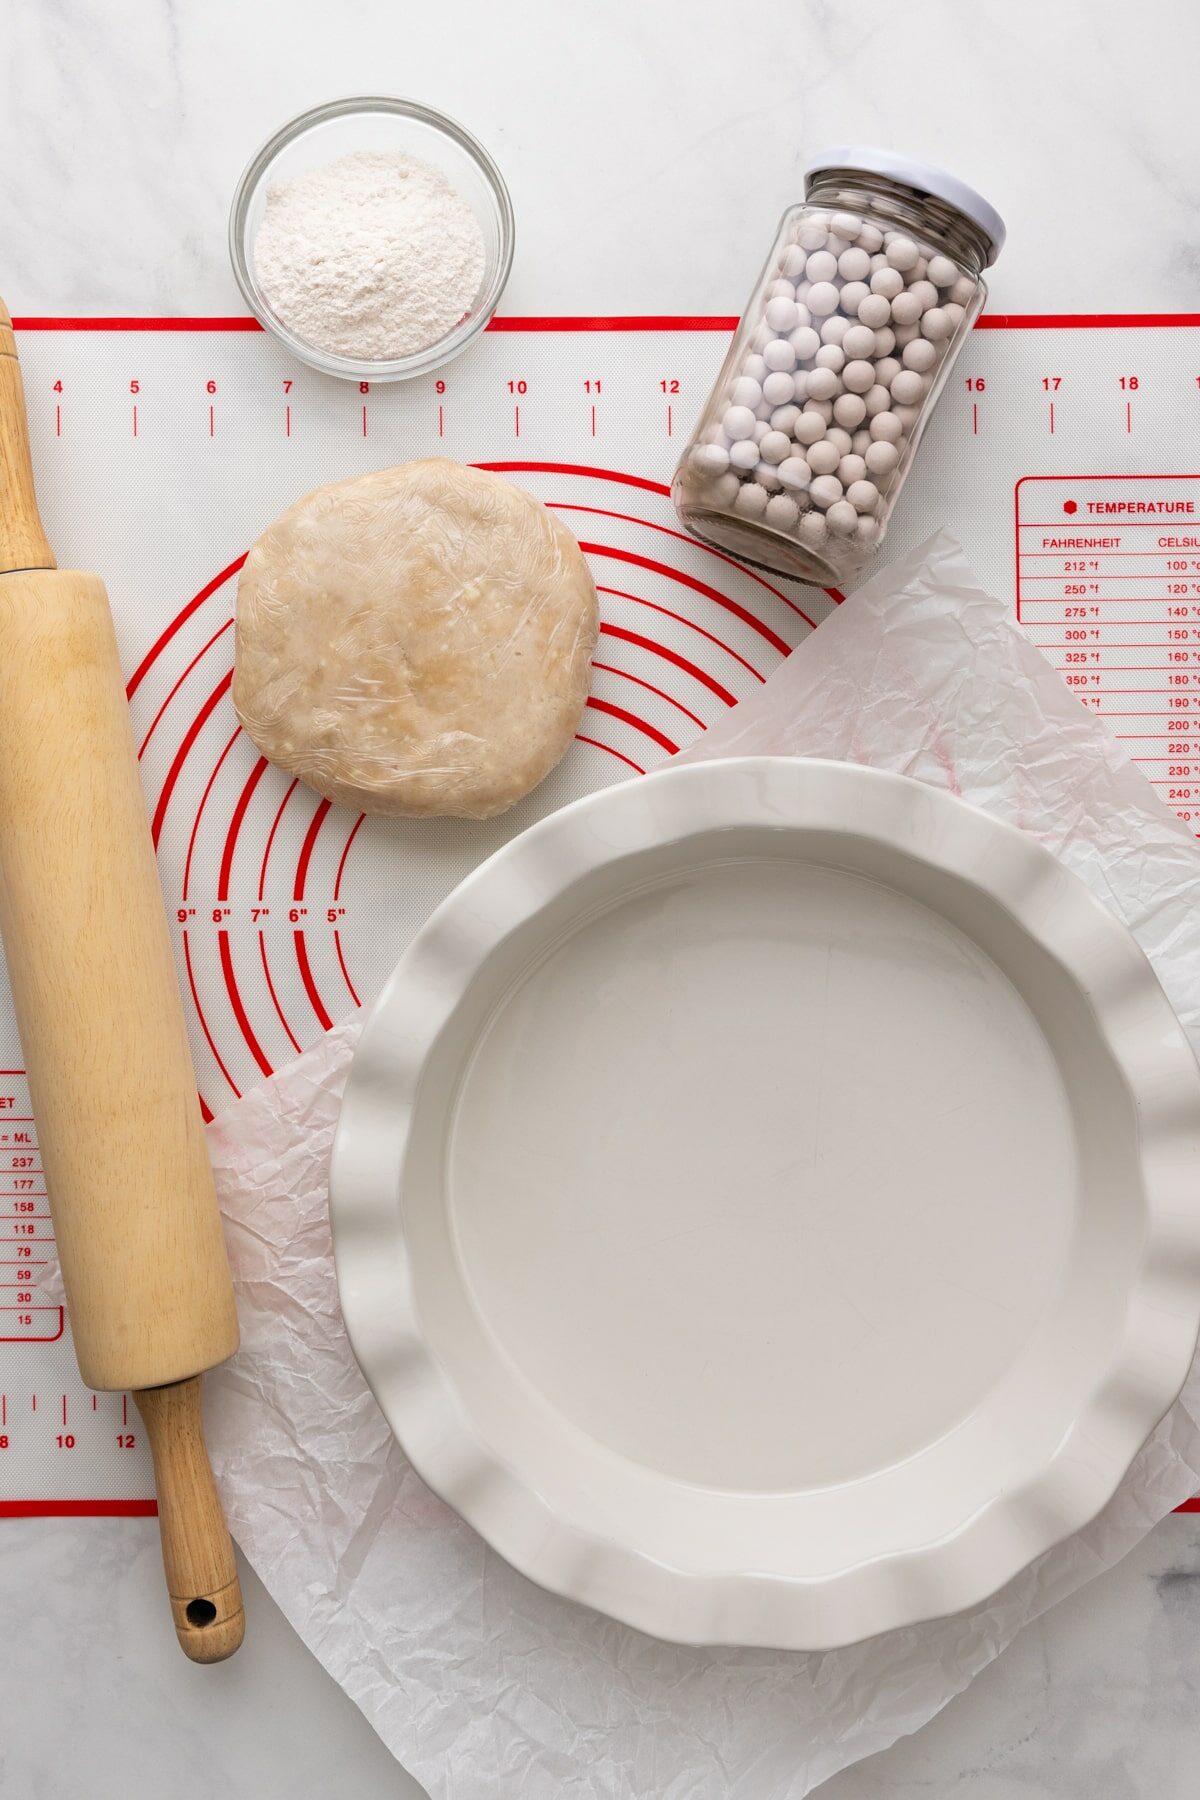
- Pie crust: On prepared and chilled pie crust. You can also blind bake pre-made refrigerated or frozen pie crusts.
- Pie weights: These can be ceramic pie weights, dried beans, dried rice, or even sugar to weigh down the crust.
- Parchment paper: A large sheet to line the pie crust before adding the weights.
- Rolling pin: If using homemade pie dough.
- Aluminum Foil or Pie Shields: For protecting the crust from overbaking.
How to Make
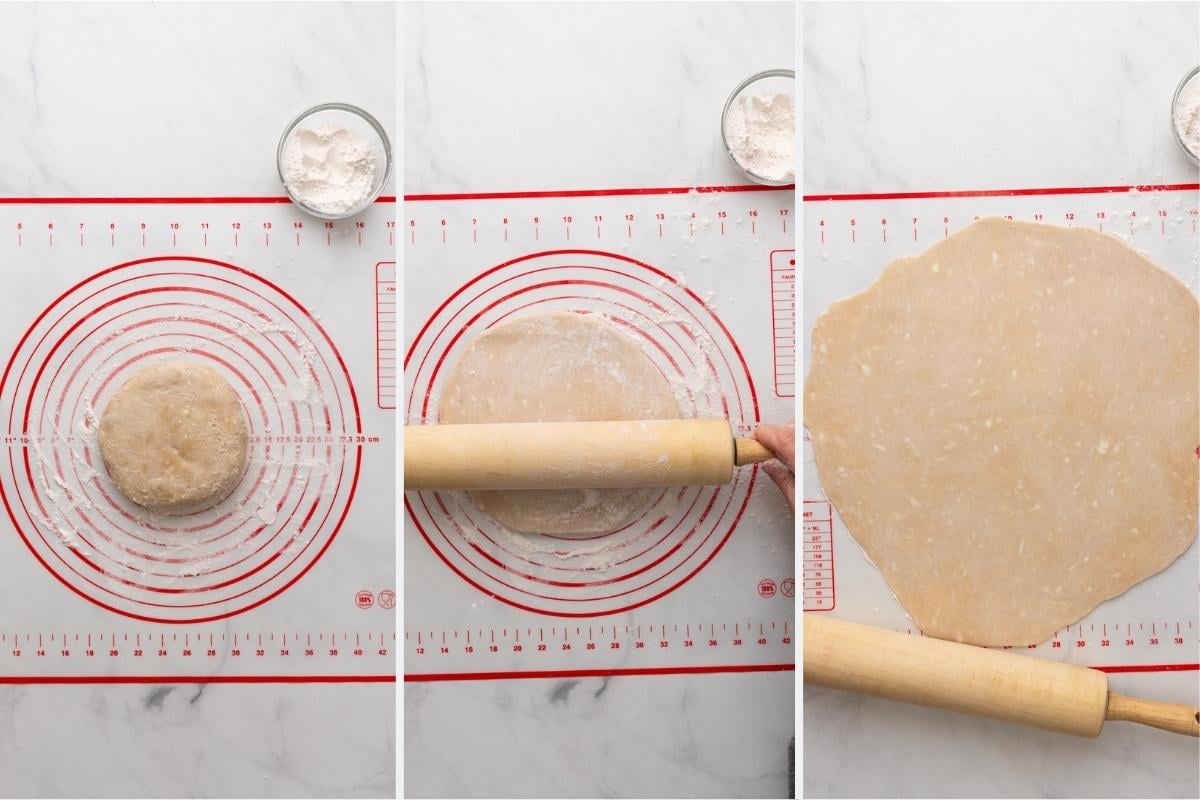
Step 1: Roll Out Dough
If using homemade pie dough, lightly flour on a silicone baking mat, large piece of parchment paper, or clean counter. Then roll out your dough to a circle that is about 2-3 inches larger than your pie dish. For a 9 inch pie pan, you'll want about a 12 inch circle of dough that is about 1/8 inch thick.
Step 2: Place in Pan/Chill
Pick Up: My favorite method of getting your pie crust to your pan is the rolling pin method, or flouring your rolling pin and gently rolling the pie crust over the pin. Pick up the dough/rolling pin and line it up with the pie pan. Then, gently unroll the dough into the pie pan.
Press: Gently press the dough into the pie pan, making sure not to stretch out the dough. Stretching the dough can cause it to shrink when in the oven, so if you need more dough in certain places we'll add it later after we trim the edges. Don't try to stretch it out to fit the pan.
Trim: Cut off any excess pie crust that is hanging over the edges of the pan to make it even. At this point use you can use any scraps to fill in any uneven edges or pieces of the pie crust.
Crimp: If desired, you can fold the excess pie dough under the edges and do a decorative edge, or crimp the crust using a fork or your fingers. There are many fun methods for decorating pie crust.
Chill: Add the pie crust into the refrigerator and chill for at least 30 minutes, or up to two days. While the pie dough is chilling, pre-heat the oven to 425℉.

Step 3: Add Pie Weights
Add Parchment: Remove from the refrigerator and add a large piece of parchment paper over the pie crust.
Fill with Weights: Add in the pie weights on top of the parchment paper, making sure they have filled the entire bottom of the pie shell, including into the sides so they don't puff up.

Step 4: Bake
Add to Baking Sheet: Optional, but helpful for getting in an out of the oven is to add the prepared pie crust onto a baking sheet.
Bake: Place the crust in the pre-heated oven bake for 14-16 minutes.
Remove Weights: Remove the pie shell from the oven and remove the pie weights and parchment by pulling the edges of the paper into the center and lifting directly up.
Score/Dock Crust: Docking or scoring a pie crust is the process of pressing a fork multiple times into the bottom of the crust. This is optional, but can help prevent the pie crust from puffing up as it continues to cook.
Lower Heat and Continue Cooking: Turn down the heat to 350℉ and place the pie crust back in the oven and continue to bake as shown below. If any point the edges start to get too brown, you can cover with aluminum foil or a pie shield.
- Par-baked Crust (partially baked): 7-8 minutes
- Blind Baked Crust (fully baked): 15- 18 minutes
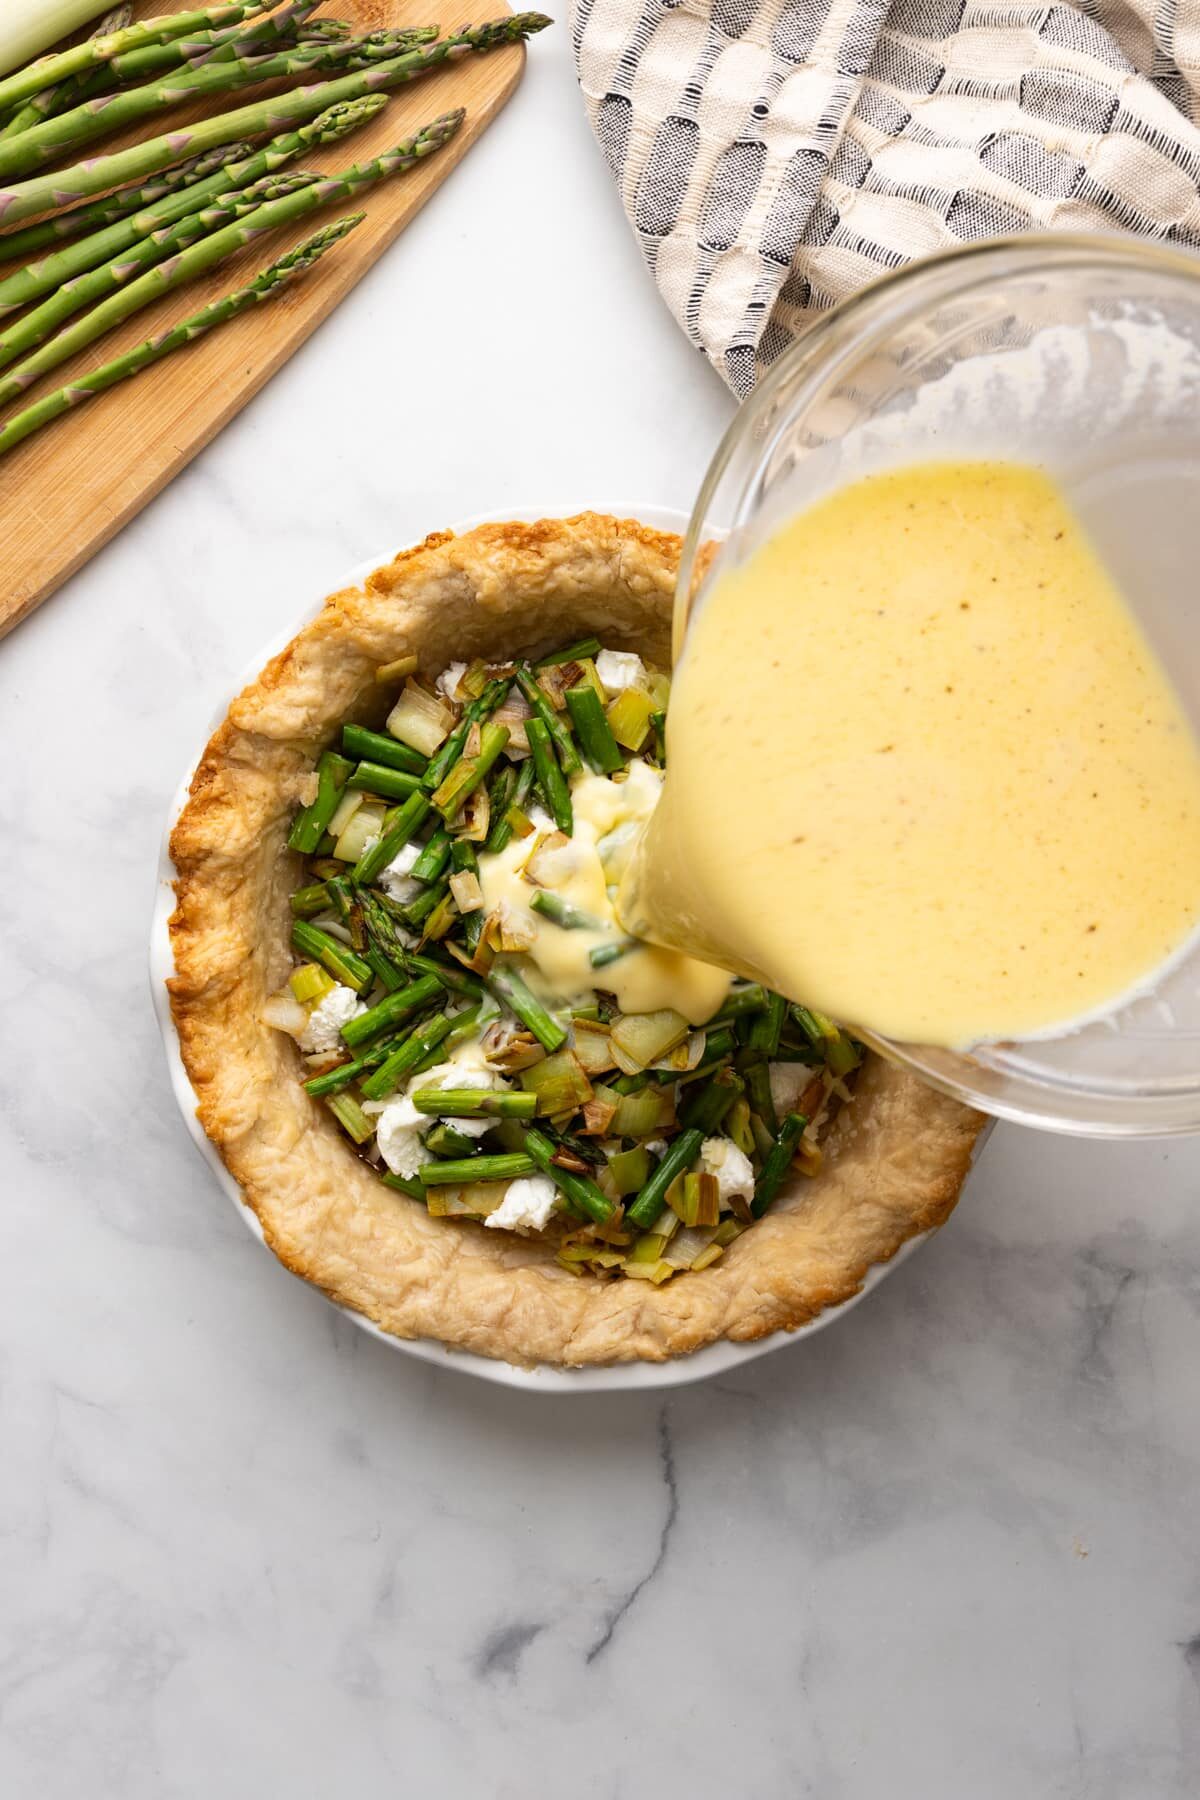
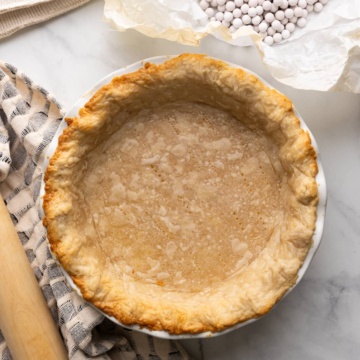
Remove: Once the crust is browned, remove from the oven and let cool (or follow the directions of your particular pie recipe, some like you to fill the crust while warm). The pie crust can be tightly covered and stored for up to three days in the refrigerator before using.

FAQ
You want it about 2-3 inches larger than the diameter of the pie pan (more or less for deep dish or aluminum pans). And, it should be about 1/8th in thick.
This is super simple to fix, just prick with a fork and it will settle back down.
The pie crust will shrink if it hasn't been chilled before baking, or if it was stretched out when adding to the pan. It's important to press the pie dough into the pan, adding more dough f necessary. Never try to stretch the pie crust to fit the pan. Also, adding more pie crust around the edges, and doing decorative crusts is a great way to keep the dough from shrinking when baking.
Storing and Making Ahead
The fully or partially baked pie crust can be made 1-2 days ahead of time and stored tightly covered in the refrigerator until ready to use.
How to Blind Bake Pie Crust
Equipment
- pie weights ceramic, dried beans, etc
- Rolling Pin if using homemade pie dough
INGREDIENTS
- 1 pie dough chilled
- flour for rolling
Instructions
- On a lightly floured surface, roll out your chilled pie dough dough into a 1/8 inch thick and 12 inch round circle. If using refrigerator pie crust, skip this step.
- Carefully place the rolled out pie crust over the pie pan. An easy way to do this is drape over the rolling pin, move the rolling pin over the pie dish, and unroll the crust over the dish.
- Gently press the pie dough into the pie pan, making sure not to stretch out the dough as that can cause it to shrink in the oven.
- Cut off any excess pie crust that is hanging over the edges of the pie pan. At this point use you can use any scraps to fill in any uneven edges or pieces of the pie crust.
- If desired, fold the excess pie dough under the edges and do a decorative edge, or crimp the crust using a fork or your fingers.
- Chill the crust in the refrigerator for at least 30 minutes, or up to two days.
- While the crust is chilling, or when ready do bake, pre-heat the 425℉.
- Remove from the refrigerator and add a large piece of parchment paper over the pie crust.
- Add the pie weights on top of the parchment paper, making sure they have filled the entire bottom of the pie shell and sides/corners of the crust.
- Optional, but helpful for getting in an out of the oven is to add the prepared pie crust onto a baking sheet.
- Place the crust in the pre-heated oven bake for 14-16 minutes.
- Remove the pie shell from the oven and remove the pie weights and parchment by pulling the edges of the paper into the center and lifting directly up.
- To further prevent the pie dough from rising up while baking, is to gently score or prick the bottom of the crust a few times with a fork.
- Turn down the oven temperature to 350℉. and place the pie crust back in the oven.
- Continue to bake 7-8 minutes for a parbaked crust (until just lightly golden) and 15-18 minutes for a blind baked or fully baked crust (should be golden brown and fully cooked).
- Watch closely, and if the edges brown too much cover just the edges with aluminum foil or a pie shield.
- Once done, remove from the oven and let cool completely before using (or follow the instructions for your particular pie recipe). Enjoy!


Leave a Reply