This tutorial shows you how to make beautiful and delicious candied strawberries! With a sweet and crunchy candy coating, these strawberries are a treat the whole family will enjoy!
This recipe is just one of many fresh ideas you'll find in my collection of strawberry recipes for spring.
Aren't these candy coated strawberries so pretty? Plus, they're super easy to make and really delicious. That's probably why they've been making the rounds on TikTok and Youtube.
Also known as Tanghulu, this type of candies strawberries originated in Asia and is a common street food in that area.
Why You'll Love Them:
- Easy: Candied strawberries are surprisingly easy to make at home! You only need a few ingredients and minimal cooking skills. They are a fun activity to do with friends or family, and the end result is a delicious and impressive homemade treat.
- Fun: Who doesn't love fresh strawberries?! And, by adding a sweet and crunchy coating on top, this is such a fun treat to both make and eat.
- Customizable: not only can you candy strawberries, you can also make candy coated grapes, and other fruit and berries. Or, sprinkle nuts or other candy on top of the candy coating while it still wet. You can also add extracts and flavors to the candy coating! Check out the Fun Variations section for more ideas!
Ingredients
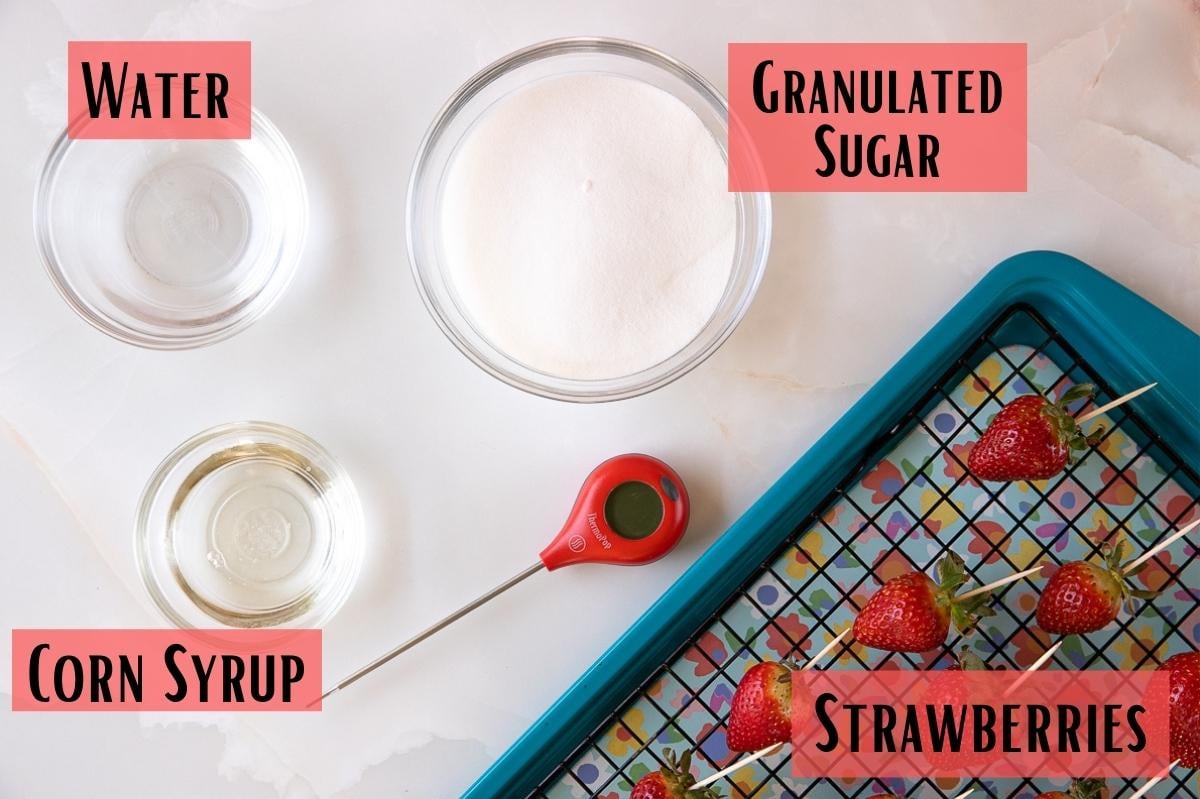
- Strawberries: Fresh Strawberries are the way to go in this recipe! But, you can also use other fruits like peeled orange slices, grapes, and other berries.
- Corn Syrup (optional): This is optional but helps prevent the sugar granules from crystalizing. Basically, it makes the coating more stable and less like to get grainy. Check out the FAQ Section of this post for tips on how to make the candy coated strawberries without corn syrup.
- Candy or Food Thermometer (optional): A candy thermometer is also optional, but really helpful for getting the correct temperature of candy coating. I do have a full tips section if you don't have under the FAQ Section of this post.
HOW TO MAKE
Step 1: Prep
Wash and Dry Fruit: First, wash and dry the strawberries or other fruit very well. You want them to be very dry as any moisture can affect the candy coating, and also make them get softer faster once they’ve hardened.
Add Toothpick: Once the berries are dry, insert a toothpick into the end with the stem. You can also use a a long skewer if you're making Tanghulu or a strawberry bouquet. Then, gently push up the stems of the berries towards the toothpick or skewer, so they don’t get in the candy coating.
Step 2: Make Sugar Syrup
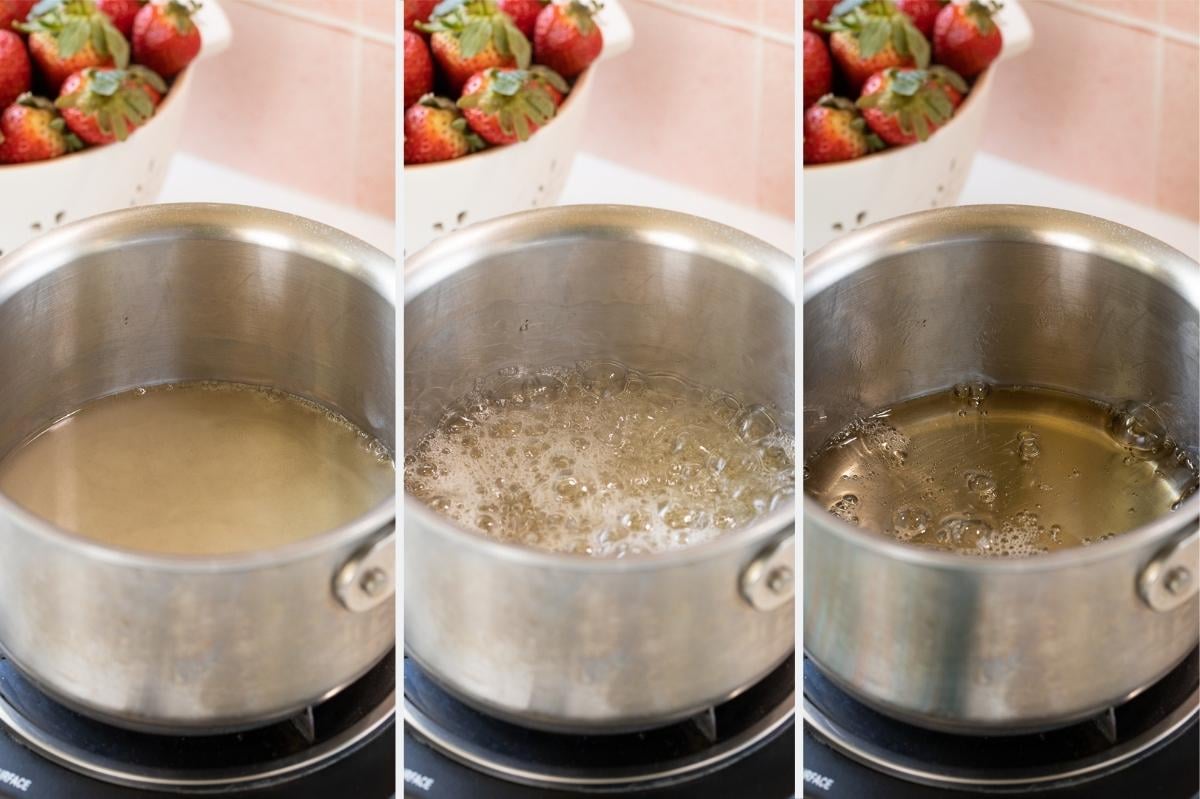
Heat Water, Sugar, Corn Syrup: In a medium saucepan add the water, sugar, and corn syrup. Stir mixture to combine and then turn on the heat to medium high and bring a boil.
Simmer: Once the mixture boils, turn the heat to medium and simmer until the sugar syrup reaches 300-310℉ on a candy thermometer. At first it will bubble up, but as the mixture continues to cook the bubbles will subside and the sugar syrup will start to caramelize and turn a golden yellow. Do not stir the mixture while it cooks.
Tun Off Heat: Once the sugar hits the 300-310℉ turn off the heat. If you don't have a candy thermometer, see the FAQ section below on how to tell when the sugar syrup is done without one.
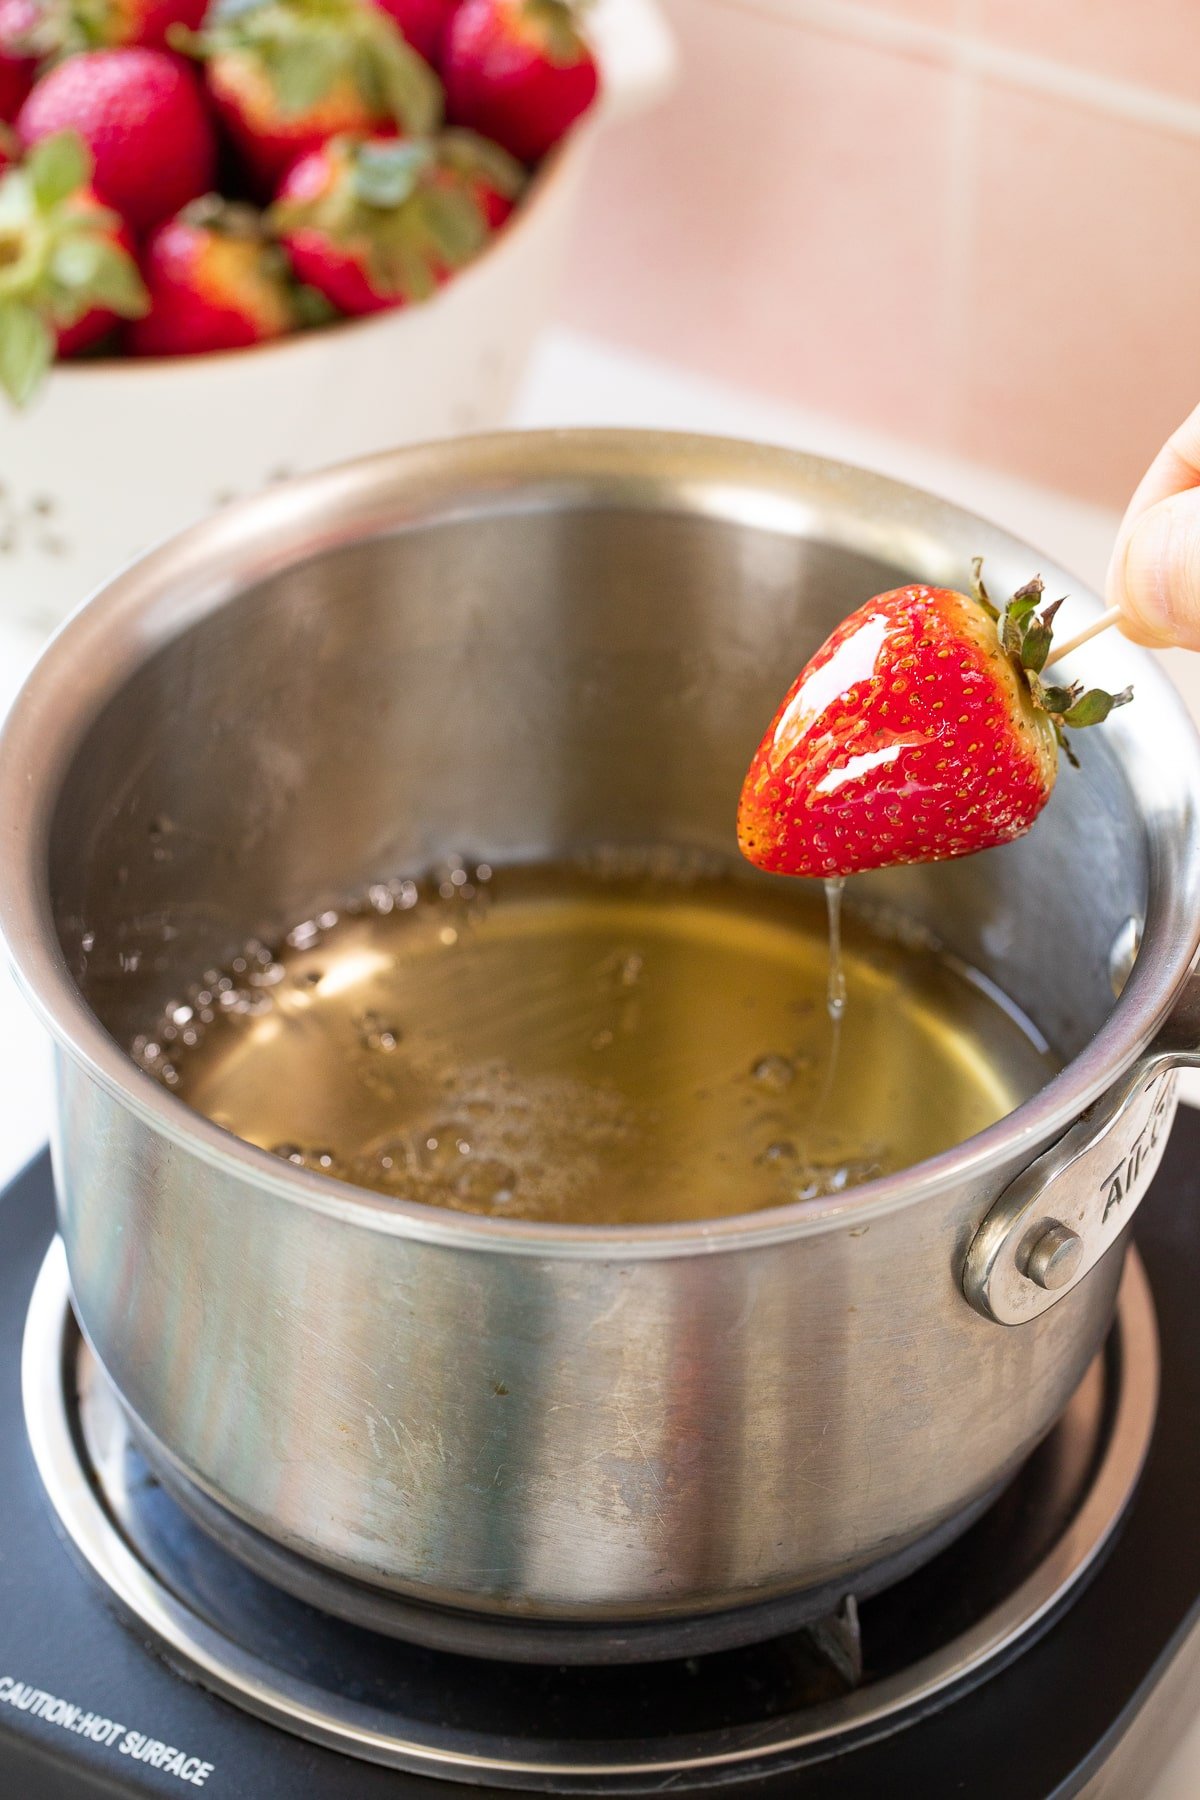
Step 3: Dipping the Strawberries
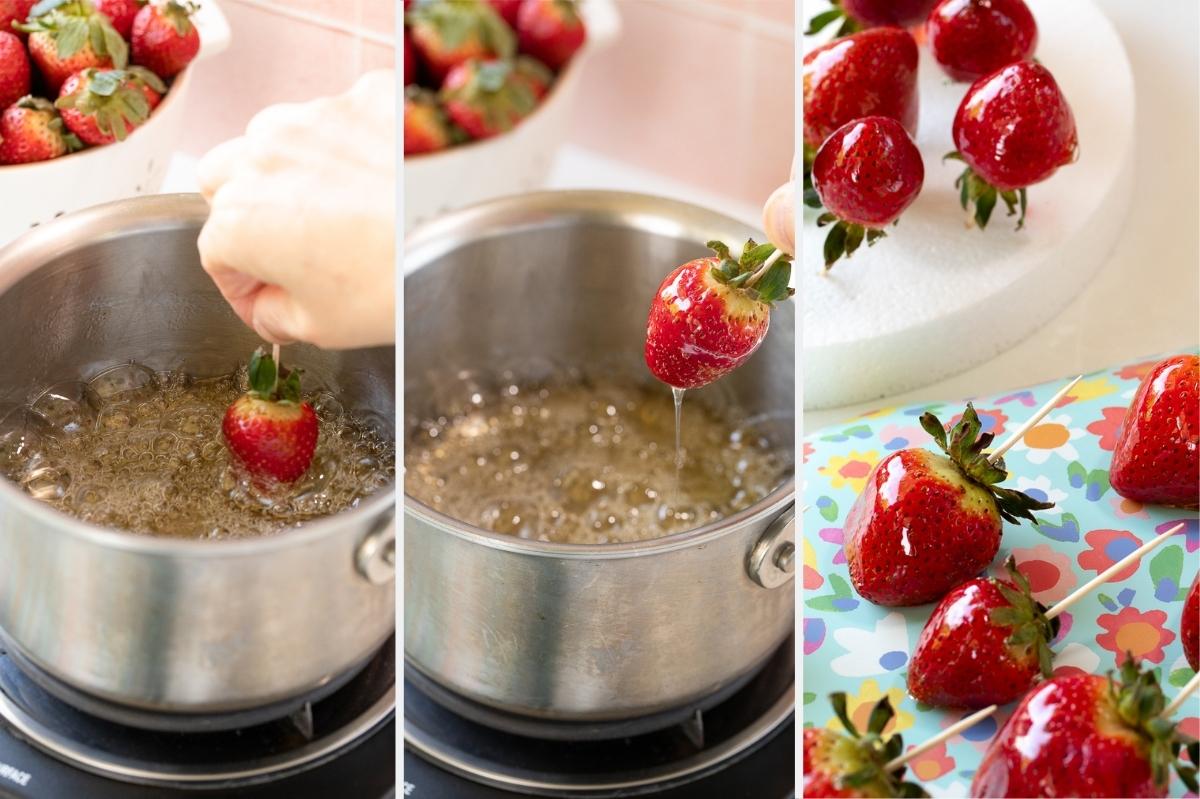
Dip Berries: Once the sugar syrup is done, immediately dip the prepared strawberries one at a time into the syrup, holding onto the toothpick or skewer as a handle. Gently shake to remove or incorporate any excess syrup.
Let Dry: Immediately place the candy coated fruit on a piece of parchment paper. You can also stick the toothpick on a styrofoam board as shown. Let the candy coating on the strawberries fully cool and harden. It will only take a few minutes.
Pro Tip: If the syrup gets too thick while dipping the strawberries, turn the heat back on medium/medium low to get it back to a liquid.
Step 4: Enjoy Immediately!
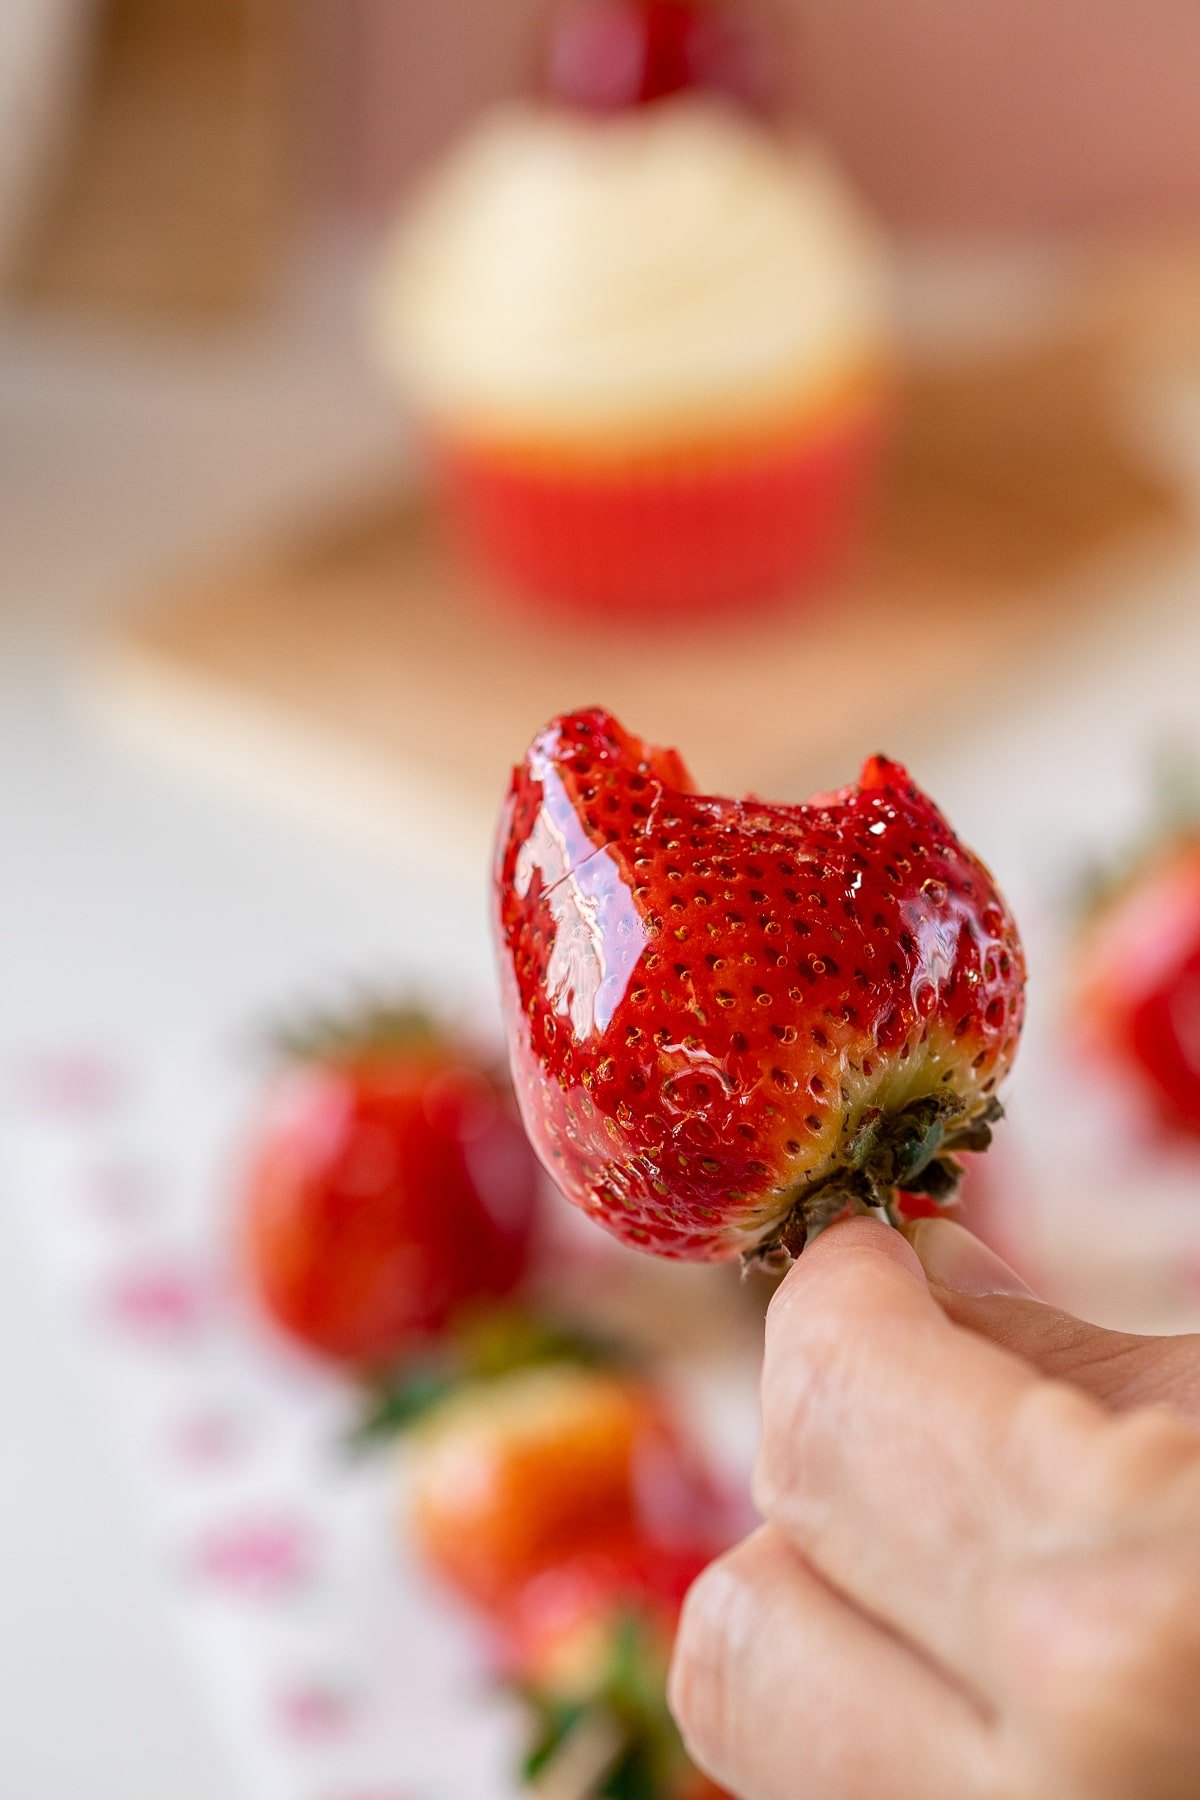
Because of the heat of the sugar syrup, these candied strawberries start to weep strawberry juice and get soft pretty soon after making. Since these don't last long, they're the perfect treat to make and enjoy right away!
Fun Variations
- Nerd Strawberries: Sometimes called crack strawberries, these are super simple! Just dip the coated berries in nerd candies, or a mix or nerd candies and the sugar in pixie sticks. Then, let harden as normal and enjoy!
- Candied Strawberry Bouquet: this is so cute and such a fun idea! Simply use a long bamboo skewer instead of a toothpick. Let the strawberries dry on the skewer, and then bunch multiple candied strawberries skewers up like a bouquet of roses. So cute!
- Flavored Candy Coating: Try adding candy flavors to the coating! These are oil based flavorings specially meant for hard candies. Mix in a few drops to the sugar syrup right before dipping the berries.
- Candied Strawberry Slices: Rather than candy the whole strawberry, you can coat slices of strawberries and then lay them to dry on parchment paper.
- Jolly Rancher Strawberries: While I haven't personally tried this, people on Tiktok have had success melting Jolly Rancher candies in the microwave and dipping in the strawberries.
Tips for perfect candy coated strawberries
- Wash, dry, and and prep the berries with toothpicks prior to heating the sugar syrup. This makes the dipping process go fast.
- A candy thermometer and corn syrup is really helpful to ensure the candy coating comes out crunchy and delicious rather than soft and grainy. But, check out the above sections on making the strawberries without them.
- You can add candy flavors and extracts to the candy coating just stir into the sugar syrup right before dipping the strawberries.
- These strawberries cool and harden fast (less than 10 minutes) and are best right after they harden. They'll start to weep strawberry juice and the shell with soften up within an hour.
Frequently Asked Questions (FAQ)
Typically it is because the sugar syrup candy coating was not heated to the right temperature. A candy thermometer can really help to ensure you get them exactly right. If you don't have one, check out the FAQ section for tips and tricks on how to make them without a thermometer.
Corn syrup is great at helping prevent the crystallization of sugar, which is why it's often added to the sugar syrup candy coating. If you don't use corn syrup, any undissolved grains of sugar can cause the entire mixture to seize up. Basically it's a safe guard to ensure that your candy coating doesn't get grainy and if you have it on hand, I do recommend adding it.
Does this mean you need it? Nope! If you want to omit the corn syrup, here are a few tips to make sure all the sugar has dissolved:
Wash down the sides of the pan with a pastry brush dipped in water to ensure every sugary crystal is dissolved.
Put the lid on the sauce pan for a minute or two and the steam with help dissolve the sugar crystals.
And, be sure not to stir the sugar mixture while it's boiling. This can also lead to grainy candy coating.
While I highly recommend using a candy or food thermometer (they're one of my favorite kitchen tools – super cheap and so great for making marshmallows, homemade caramel sauce, and for testing if meat is done!) you can always test to see if it's at the correct using the cold water test.
To do this, fill a glass or bowl with cold water. When the syrup starts to turn a slight golden yellow test it by dropping a small spoonful of the sugar syrup into the water. If the sugar syrup is still pliable when you take it out of the water, the sugar syrup needs more time.
Once the tested ball of syrup come out of the water hard enough to crack it's ready. This is called the hard crack stage of candy making and correspond with about 300-310℉ you're looking for on the candy thermometer.
Storing and Making Ahead
Similar to s’mores dip or French canelé , enjoy this strawberry recipe immediately or soon after making. The strawberries do not store well and I do not recommend freezing them or making ahead of time. They will start to weep strawberry juice pretty quickly, and the candy coating will start to go soft.
And just like this homemade strawberry milk recipe, this is a great way to use strawberries that are not perfectly ripe. Both under or overripe strawberries taste really delicious with this candy coating.
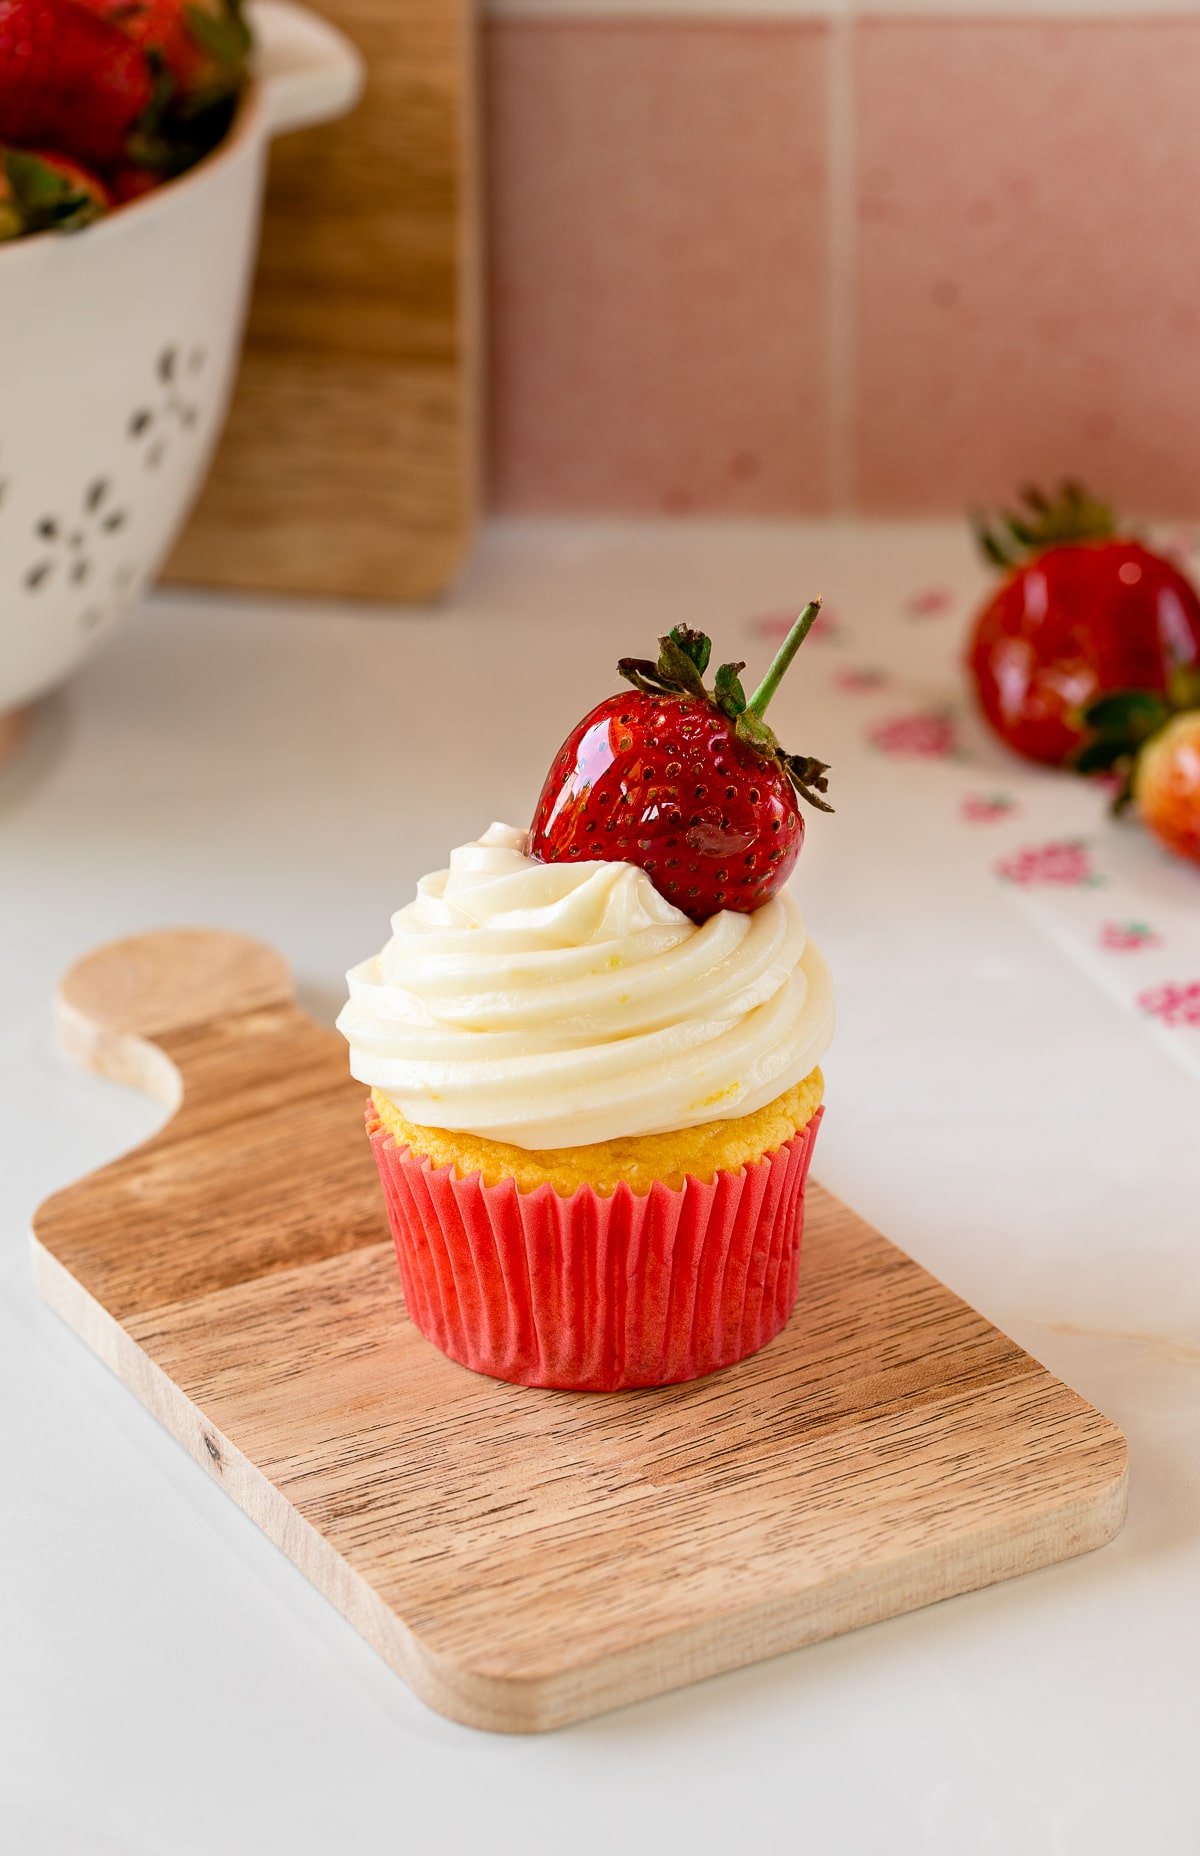
I had some leftover frosting from this lemon cream cheese frosting recipe and decided to add the strawberries to some cupcakes. But again, it's best to eat these strawberries immediately after making.
Looking for more fresh fruit recipes? Check these out!
- Pink and White Chocolate Covered Strawberries
- Chocolate Covered Oranges
- Watermelon Pizza
- Mini Fruit Tarts
WANT TO JOIN THE PARTY? Subscribe to my newsletter and follow on Tik Tok, Pinterest, Instagram, and Facebook for all the latest recipes!

Candied Strawberries
Equipment
- Toothpicks or Skewers
- Parchment or Silicone baking mat
- Medium Saucepan
INGREDIENTS
- 2 cups Granulated Sugar
- ½ cup Water
- ⅓ cup Corn Syrup optional
- Fresh Strawberries
Instructions
- Put toothpicks or skewers in the stem end of the strawberries. Lightly pull the stems back toward the toothpick so they don't get into the sugar syrup. Set aside.
- In a medium saucepan add the water, sugar, and corn syrup. Stir mixture to combine and then turn on the heat to medium high and bring a boil.
- Once the mixture boils, turn the heat to medium and simmer until the sugar syrup reaches 300℉ on a candy thermometer, about 5-10 minutes. Do not stir the mixture during this time. Once the sugar syrup hits 300℉ on a candy thermometer turn off the heat.
- Working quickly, dip the strawberries one at a time into the syrup, holding onto the previously inserted toothpick or skewer as a handle.
- Gently shake to remove or incorporate any excess syrup and immediately place the strawberry on a piece of parchment parchment paper or a silicone baking mat. If the sugar syrup starts to thicken before you've covered all the berries, turn the heat back on low to re-melt.
- Allow the strawberries to fully cool and the candy coating to harden. It will only take a few minutes.
- Once the candy coated strawberries have cooled, enjoy! These will start to get very soft within an hour of making so they are best enjoyed immediately.
Notes
- Wash, dry, and and prep the berries with toothpicks prior to heating the sugar syrup. This makes the dipping process go fast.
- A candy thermometer and corn syrup is really helpful to ensure the candy coating comes out crunchy and delicious rather than soft and/or grainy. But, you can make the strawberries without them. Check out the full blog post for details.
- You can add oil based candy flavors to the candy coating just stir into the sugar syrup right before dipping the strawberries.
- These strawberries cool and harden fast (less than 10 minutes) and are best right after they harden. They'll start to weep strawberry juice and the shell will soften up within an hour.
- One batch of sugar syrup will typically cover 1-2 pounds fresh strawberries but can vary depending on the size of the berries.


Sam says
These were easy to make with wonderful instructions. Thank you! Our family loved it!
Sam Wheatcroft says
These were easy to make with wonderful instructions. Thank you! Our family loved it!
Tina says
How can I bloom gelatin without using a microwave?
Sophia says
Hi, this recipe doesn’t call for gelatin, but in general blooming gelatin is done with it just sitting out, but when turning the bloomed gelatin into a liquid it can be done on a stovetop or in a microwave, just make sure to watch it closely because if it overcooks it can loose its gelatin setting abilities.
Jamie says
I love how clear and shiny the candy layer is on these strawberries! Perfect for a sweet treat!
Kathleen says
What a great way to enjoy underripe strawberries. Adds the sweetness they are usually lacking. Can’t wait to try this recipe out.
Heather says
These are so pretty! What a fun treat for summer!
Tayler says
I absolutely love these! They’re easy to make and look great on cupcakes and cakes!
Michelle says
Love the detailed instructions on how to make these candied strawberries! Will have to give this a try soon!