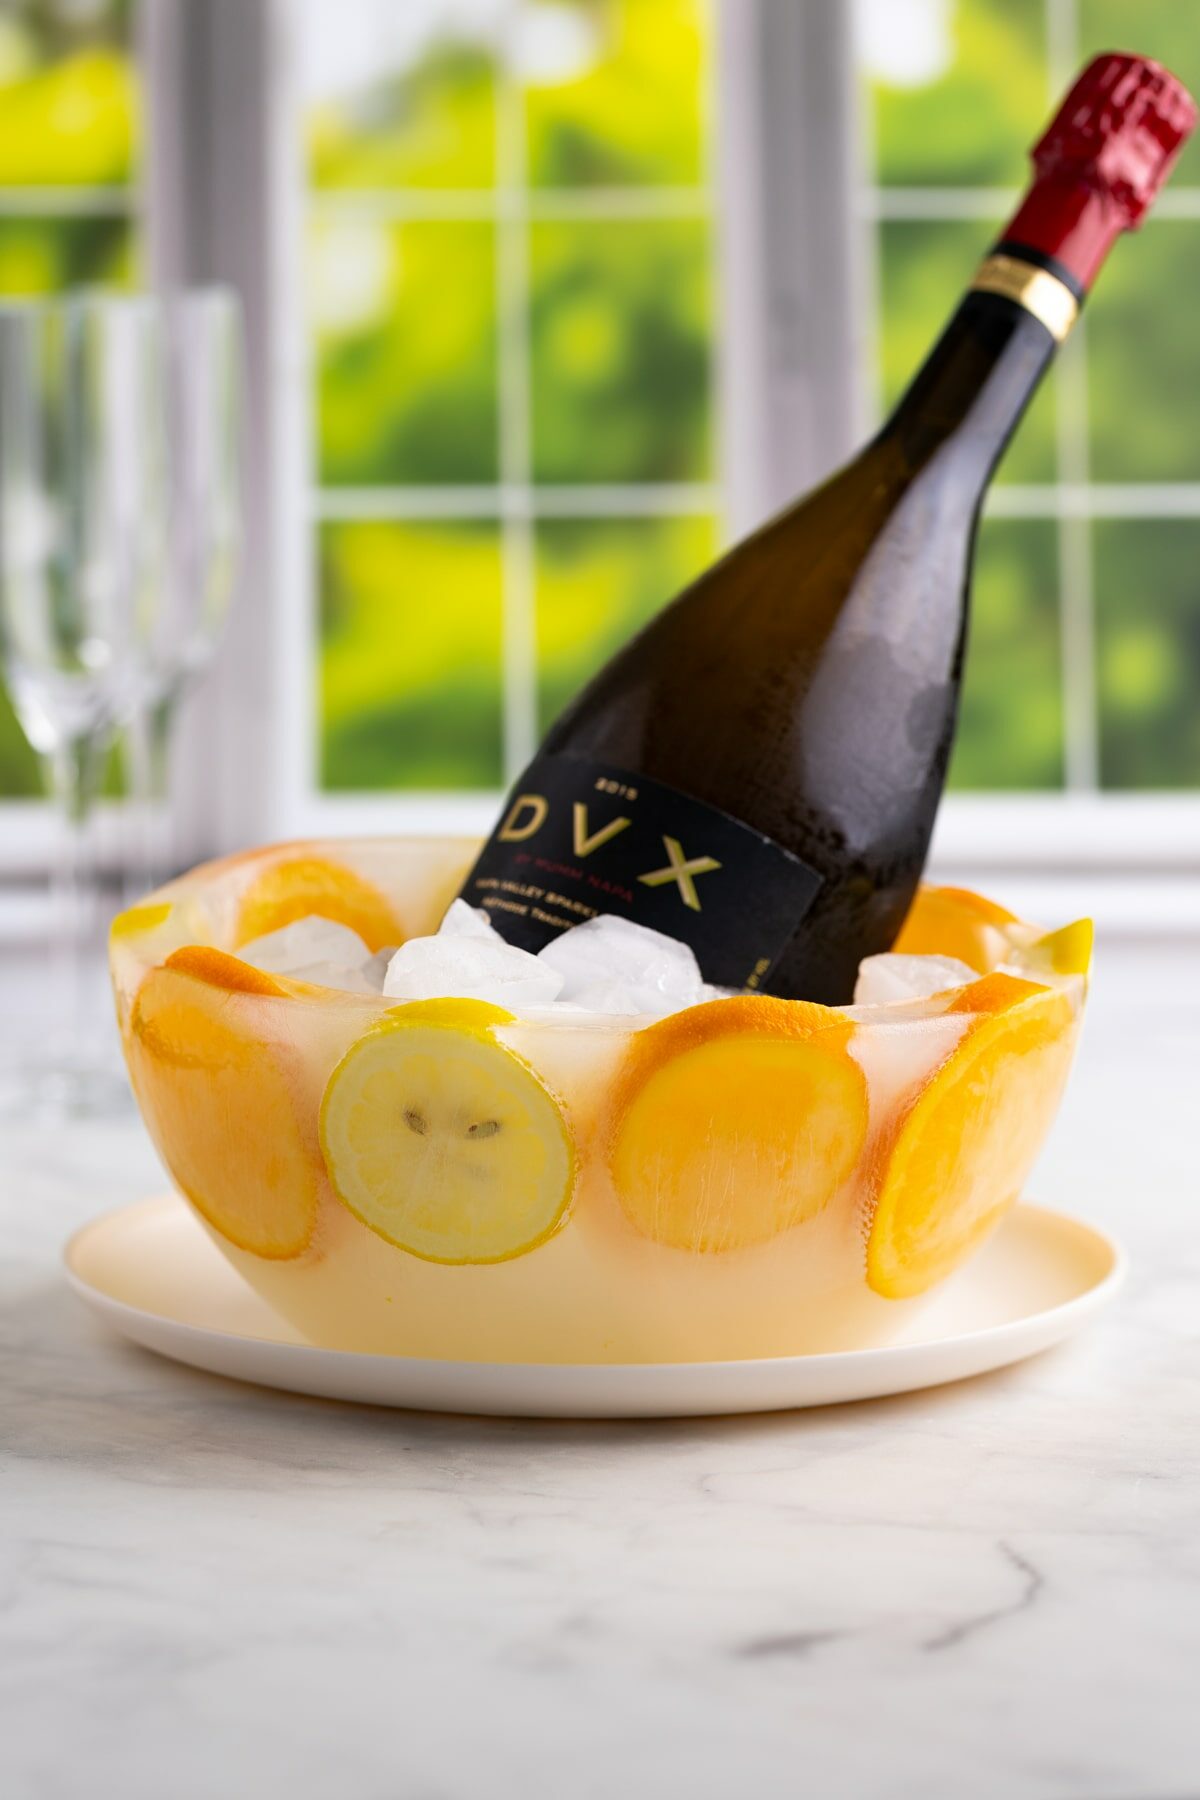
These DIY ice bowls are so fun to make and such a great addition to any party, perfect for serving drinks or cold food!
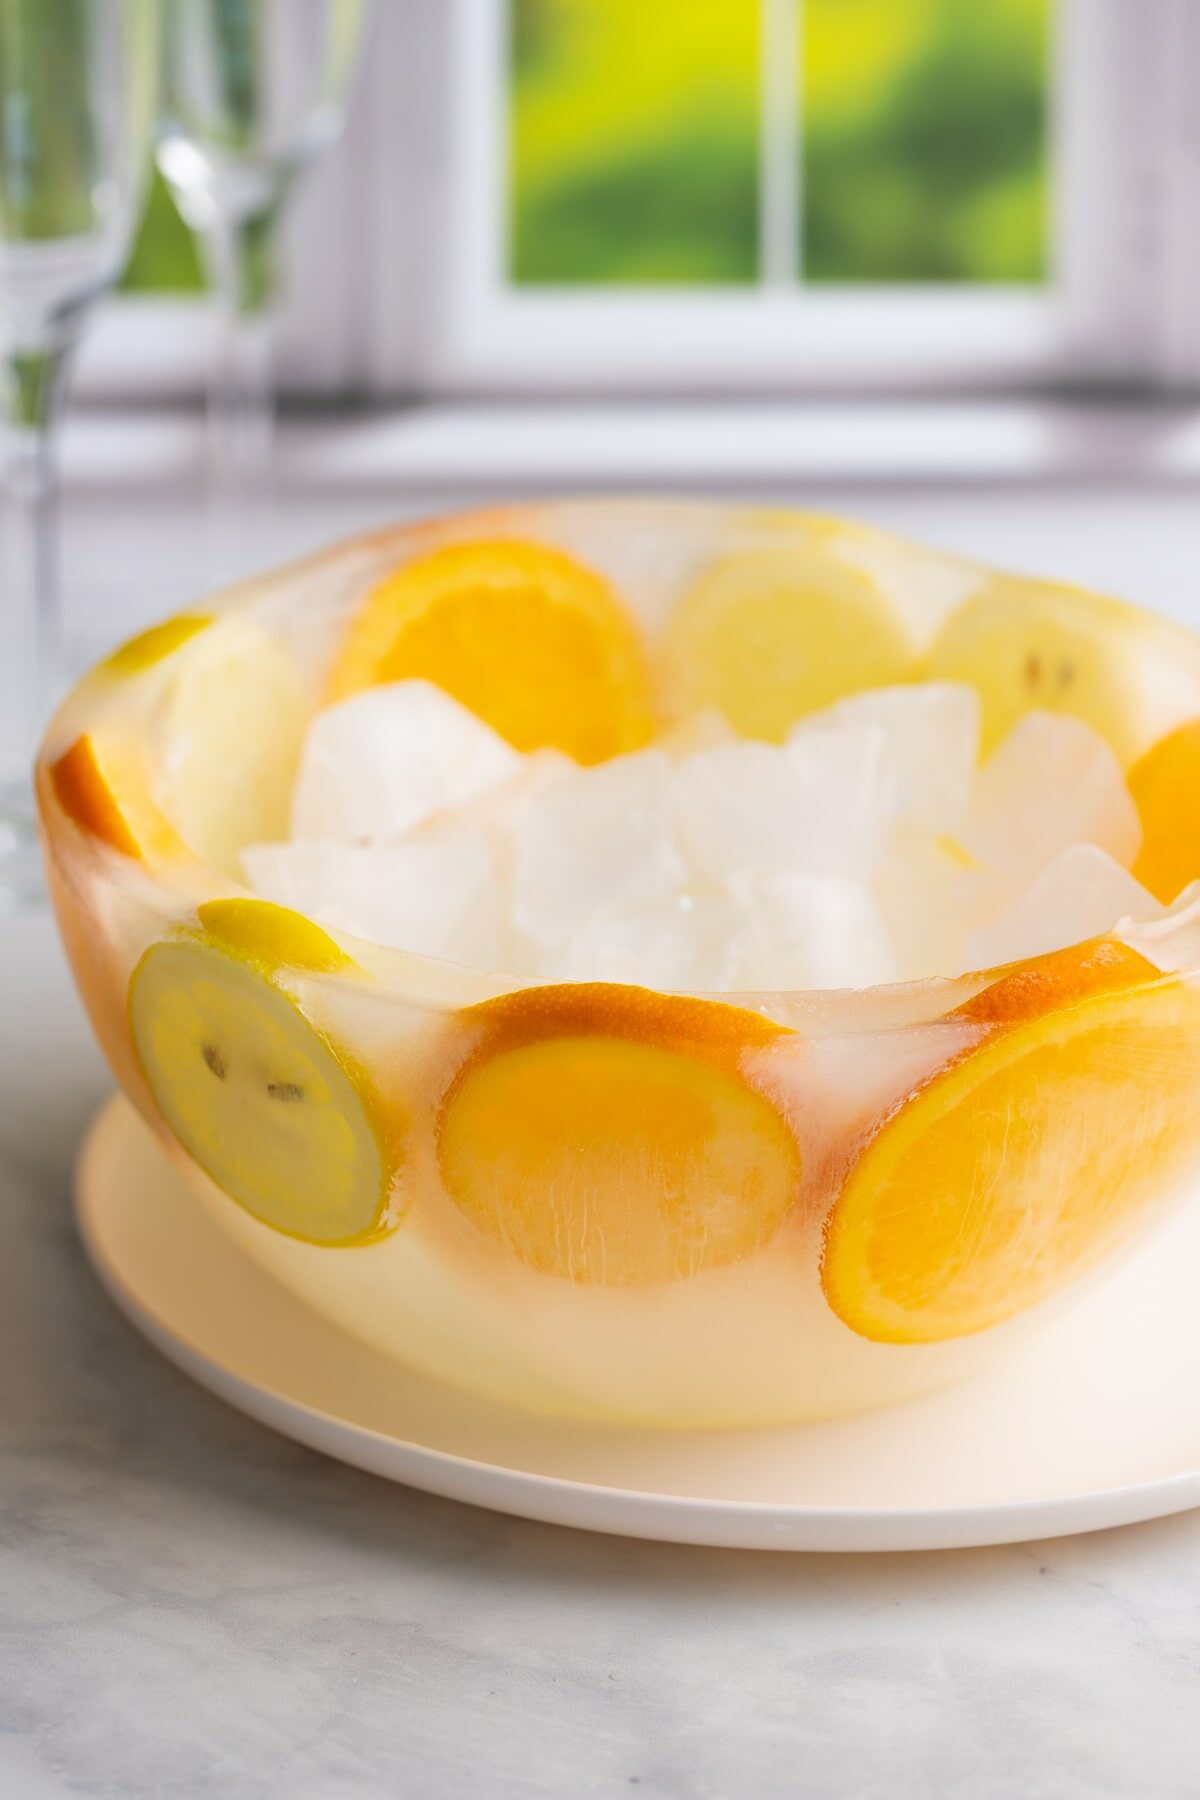
These DIY Ice Bowls are so fun simple to make and they're super versatile. They’re great for spring brunches, summer BBQs, or holidays like Christmas and Thanksgiving.
Plus, you can add whatever you want for any party theme! Flowers for spring? Sliced lemon and oranges for summer? Cranberries for Christmas? They all make a beautiful homemade ice bowl for chilling drinks or appetizers.
Tools

- Nesting Bowls: Nesting bowls work well but you can use two different bowls as long as you can get at least 1/2-1 inch space in between the bowls. Also, make sure they are freezer-safe such as metal or tempered glass.
- Ice/Weights: For weighing down the second bowl.
- Decorations (optional) Flowers, fruits, and herbs are super common. However, you can use whatever you like! Just make sure that if you are using the bowls for food, everything that you add to the ice is edible or food grade.
How to Make
Step 1: Assemble
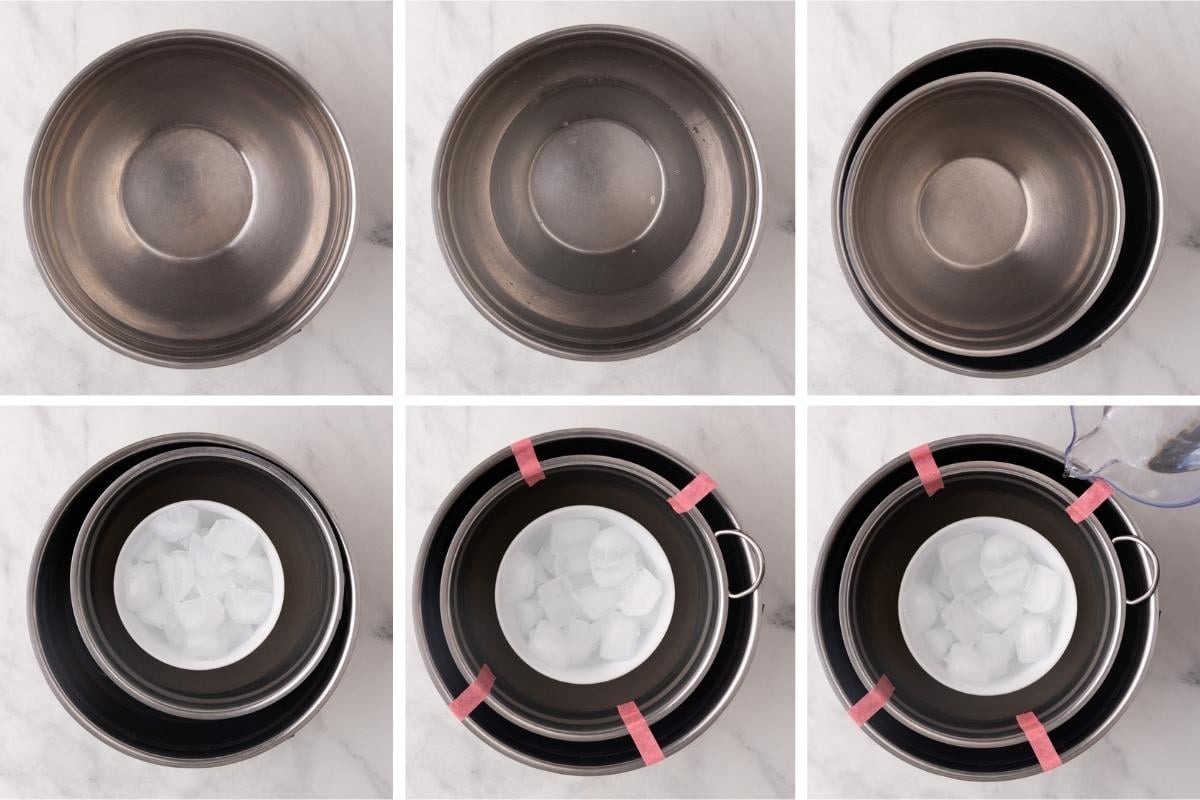
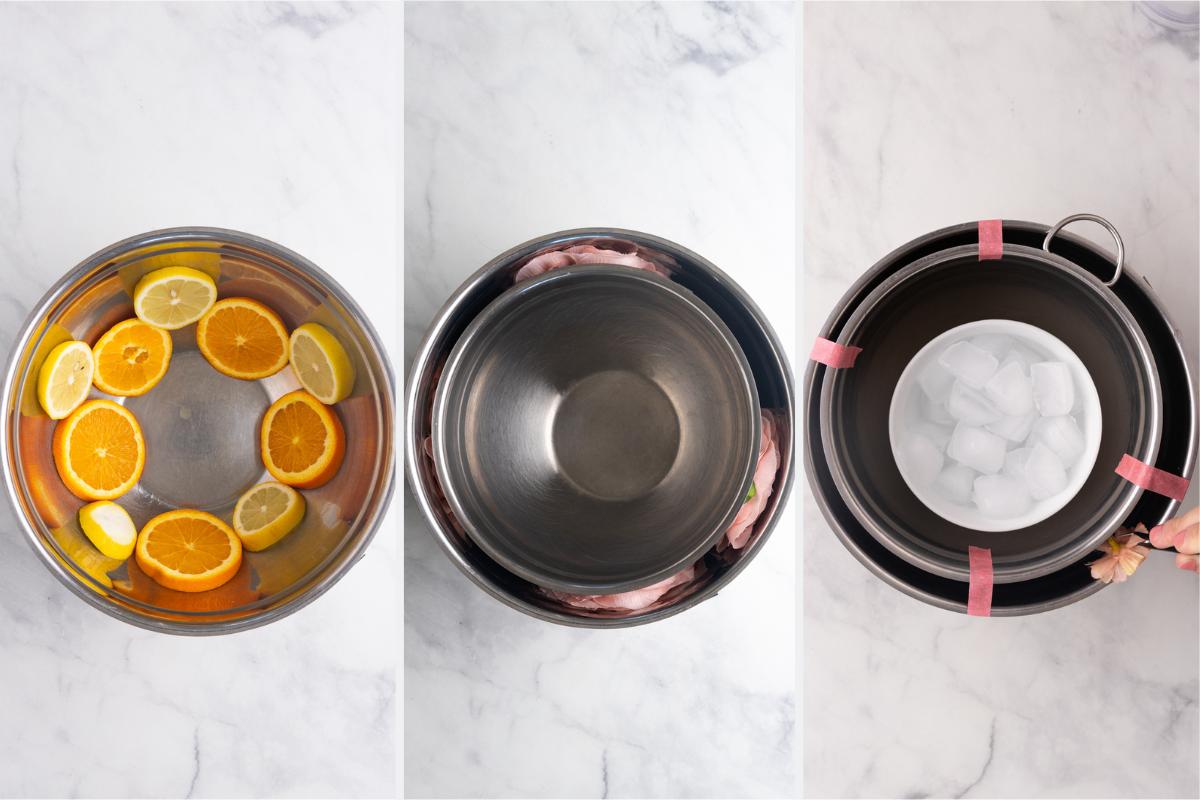
Add Water/Bowl: Fill the larger of the nesting bowls about 1/4-1/3 full of water. Then add the second bowl and weigh it down with additional ice or freezer-safe weights (a heavy bowl, more ice, etc.)
Tape: Then, tape the smaller bowl into place using craft tape. You want it to be evenly spaced in the middle of the larger bowl.
Add more water: Add water to the space between the two bowls until it is about 1/2 to 1 inch from the top. Do not fill all the way to the top as the water will expand when frozen and become difficult to remove.
Adding Decorations: If you are adding decorations, place them along the bottom and sides of the larger bowl before adding anything else in step 1. This method works great for fruit. Alternatively, you can add them after you have taped the second bowl in place, but before filling in the rest of the water. Push them into place with a knife or long skewers. This works well with larger flowers and plants.
Step 2: Freeze
Carefully place the bowls into the freezer. If needed, you can put it on a small baking sheet to keep it level. Freeze for at least 12 hours or overnight.
Step 3: Unmold and Enjoy!
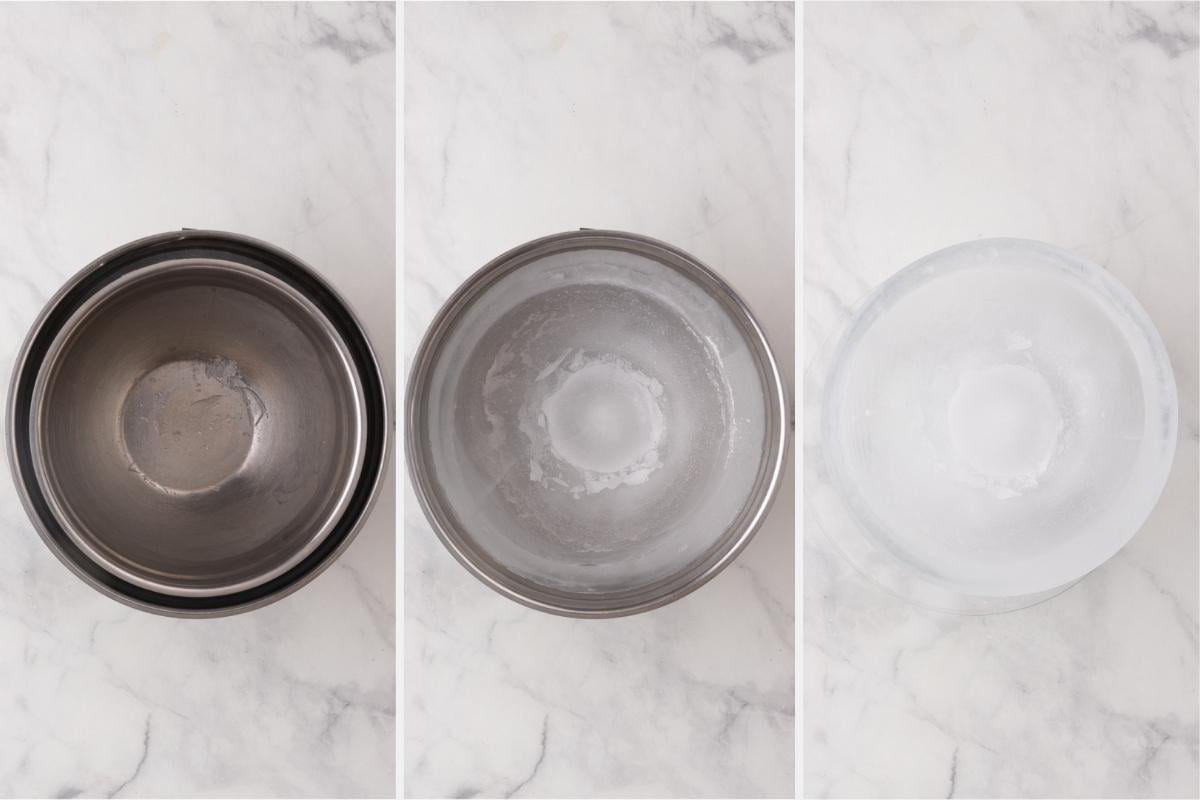
Remove the bowls from the freezer and let them warm up to room temperature for 15-20 minutes. This should loosen the ice from the bowls and allow it to easily slide out. This is better than running warm water over the bowls, which can cause the whole thing to crack!
Gently flip the whole thing over, and the ice bowl should slide out. At this point, you can either place it back in the freezer until you are ready to serve, or immediately fill it with ice and drinks or food to enjoy!
tips and Tricks
- You can add flowers or fruit either before adding any water, or after taping the second bowl into place and adding water, then moving the decorations where you want them using a knife or long skewers. Both methods work fine!
- If used for drinks, any type of decorations will work. If you are using it for food such as shrimp cocktail, make sure that all flowers or decorations are edible and/or food grade.
- Do not overfill the water. You want to fill up to 1/2-1 inch from the top of the bowl as the water will expand when frozen and can crack glass or plastic bowls if filled too much. Overfilling can also cause the bowl to become difficult to remove.
- Shocking the ice bowls by running them under hot water can cause it to crack, making it unusable. Instead, leave the bowls out for 15-20 minutes at room temperature. Since this allows it to adjust the temperature gradually, it won’t crack!
- When serving, make sure to place the ice bowl on a large plate or serving platter. Empty any excess water as it melts. Adding a towel beneath the bowl can help to catch any excess water as well.
Decorating
There are so many fun ways to jazz up these ice bowls! Just make sure if you are using these bowls for food everything you add to them is food grade or edible.
- Flowers: Both fresh and fake flowers are a beautiful addition and are really common.
- Sliced Produce: Lemons, limes, oranges, cucumbers, cranberries, or other types of fruits and vegetables are so cute in these bowls.
- Herbs: Rosemary, Dill, and other herbs are a fun addition.
- Foliage: Leaves, branches, and other types of foliage all look great in these ice bowls.
- Other Decorations: The sky’s the limit for adding decorations to these bowls. Toys like plastic spiders are great for Halloween, as are colorful ribbon or glitter. Really anything that will fit between the sides of the bowls and not dissolve in water will work great!
WANT TO JOIN THE PARTY? Subscribe to my newsletter and follow on Tik Tok, Pinterest, Instagram, and Facebook for all the latest recipes!

DIY Ice Bowl
Equipment
- Nesting Bowls
- Craft Tape
INGREDIENTS
- Water
- Ice/Weights
- (Optional) Sliced Fruit, Flowers, Foliage, Etc.
Instructions
- Make space in your freezer for a large bowl. Fill the larger of the nesting bowls about 1/4-1/3 full of water.
- Add the second bowl and weigh it down with additional ice or freezer-safe weights (a heavy bowl, more ice, etc.)
- Tape the smaller bowl into place using craft tape. You want it to be evenly spaced in the middle of the bowl.
- Add water to the space between the two bowls, filling until it is about 1/2-1 inch from the top, allowing for the water to expand while freezing.
- If adding decorations, you can place them along the bottom and sides of the larger bowl before adding anything else (this works especially well for fruit slices). Or, you can add them after you've added the second bowl. Just place the fruits or flowers in between the sides of the two bowls before filling with more water (works well with larger flowers or plants).
- Carefully place the bowls into the freezer. If needed, you can put it on a small baking sheet to keep it level. Freeze at least 12 hours or overnight.
- Remove from the freezer and let the bowls warm up at room temperature for about 15-20 minutes. This should be enough to loosen the ice from the bowls.
- Gently flip over and the bowl should slide out. At this point you can either place it back in the freezer until you're ready to serve, or serve immediately by filling with more ice and drinks to enjoy!
Notes
- You can add flowers or fruits either before adding any water, or after taping the second bowl in place and adding water, then moving the decorations where you want them using a knife or a long skewer. Both methods work fine!
- If used for drinks, any type of decorations will work. If you are using it for food such as shrimp cocktail, make sure that all flowers and decorations are edible and/or food grade.
- Do not overfill the water. You want to fill up to 1/2-1 inch from the top of the bowl as the water will expand when frozen. If it is too full, it can crack glass or plastic bowls. Overfilling can also cause the ice bowl to become difficult to remove.
- Shocking the ice bowls by running them under hot water can cause it to crack, making it unusable. Instead, leave the bowls out for 15-20 minutes at room temperature. Since it can adjust the temperature gradually, it won’t crack!
- When serving, make sure to place the ice bowl on a large plate or serving platter. Empty any excess water as it melts. Adding a towel beneath the bowl can help to catch any excess water as well.

Leave a Reply