Pâte Sucrée is delicious and easy sweet tart crust that tastes like a shortbread cookie. It is buttery, melt in your mouth good, but still has that crispy tart shell texture. Filled with anything from chocolate ganache to pastry cream and fruit; if you can make a pie crust you can master this simple Pâte Sucrée recipe.
Tarts are such a classic and versatile dessert, perfect for dinner parties, entertaining, or date night. If you're not familiar with Pate Sucree sweet tart dough here is the low down!
Pâte Sucrée is french sweet pastry dough that is perfect for tarts. The main ingredients are flour, sugar, eggs, and butter. This recipe adds a bit of cream as well. It is buttery delicious and tastes similar to a shortbread cookie.
While similar to a pie crust, pie dough is delicate and flaky, and because of this you serve it directly in the pan you've baked it in. Tart crust is much sturdier and when you remove it from a tart pan, it can stand up on it own.
Ingredients
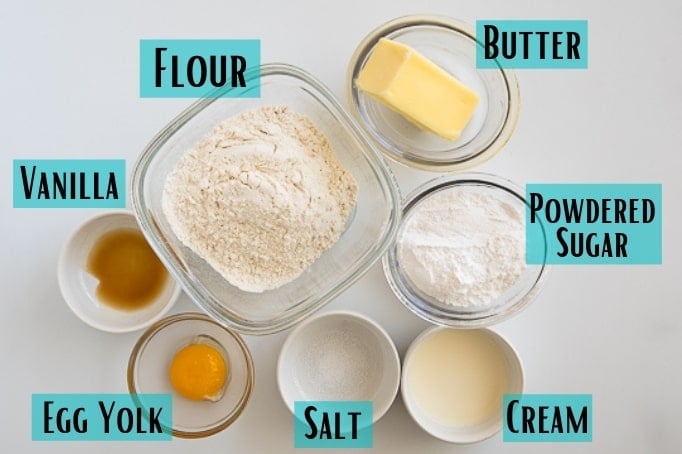
- Butter: the recipe calls for unsalted butter, but you can use salted if that is what you have on hand, just cut th amount of salt in the recipe in half.
- Salt: I recommend regular table salt or Kosher salt in the recipe
- Egg Yolk: this gives a richness to the crust
- Powdered Sugar: using powdered sugar instead of granular sugar makes the crust super tender
How to make Tart Dough
The method of making the dough is very similar to a pie crust! To walk you through the steps:
-
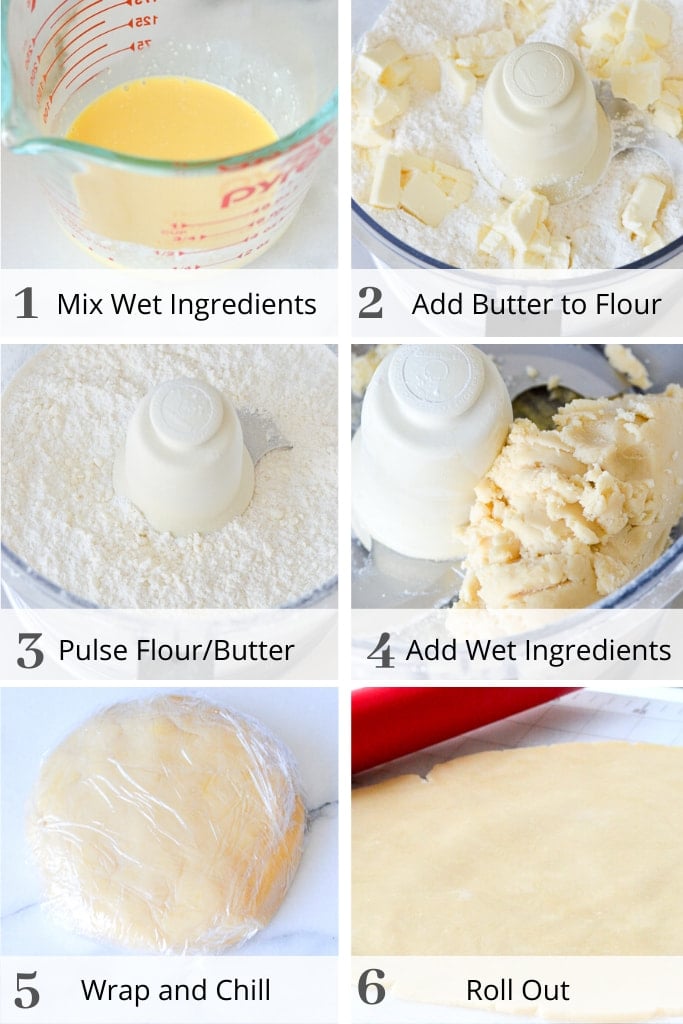
- Mix the egg, vanilla, cream, and yolk and set aside
- Combine the flour, powdered sugar, and salt in a food processor and spread the cold, cut up butter evenly around the blade.
- Pulse until the butter is combined and there are very few small pieces of butter.
- Slowly add the egg mixture, with the processor running. Process until it comes together and forms a ball, about 10-12 seconds.
- Once it's formed, wrap the dough tightly in plastic wrap and put it in the fridge at least an hour. This will relax the gluten in the flour and help to prevent the dough from shrinking too much when you bake it. At this point, after you chill the dough you can freeze it for up to two months.
- When you're ready, you can roll out the dough to use in your favorite tart recipe.
Blind Baking Tart Dough
Blind baking is the process of baking a pie or tart crust without any filling. This helps keep the crust from getting soggy with the filling and also ensures the crust is fully cooked if the filling doesn't need that long to cook or isn't being cooked at all, such as filing with panna cotta or pastry cream and fruit.
Blind baking is really easy:
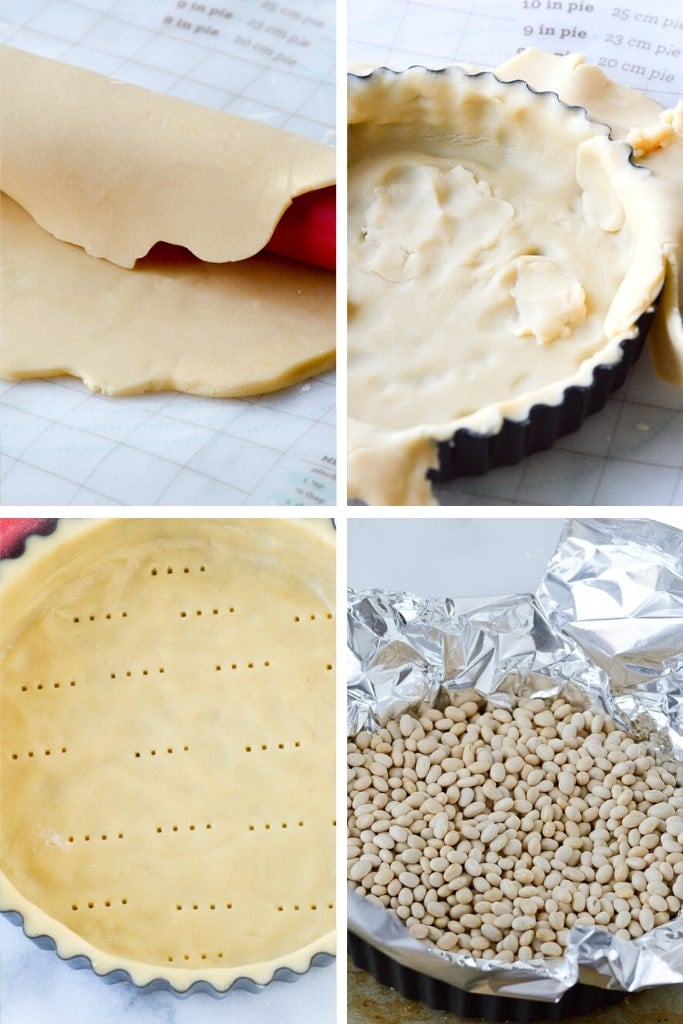
- You roll out the dough as normal. A trick to get the rolled out dough to the tart pan, is to roll over the rolling and shown and then gently place into the pan.
- Once you've rolled it out, take the end over a rolling pin and slowly lift up as shown above. This is a great way to move dough without ripping the rolled out dough.
- Then place the dough inside the tart pan and start forming the shell into the sides and bottom of the pan. Add more dough in areas if needed.
- If at any point it gets too soft when rolling it out and putting it in your tart pan, you can put it back in the fridge for 10-20 minutes to re-chill rather than adding more flour.
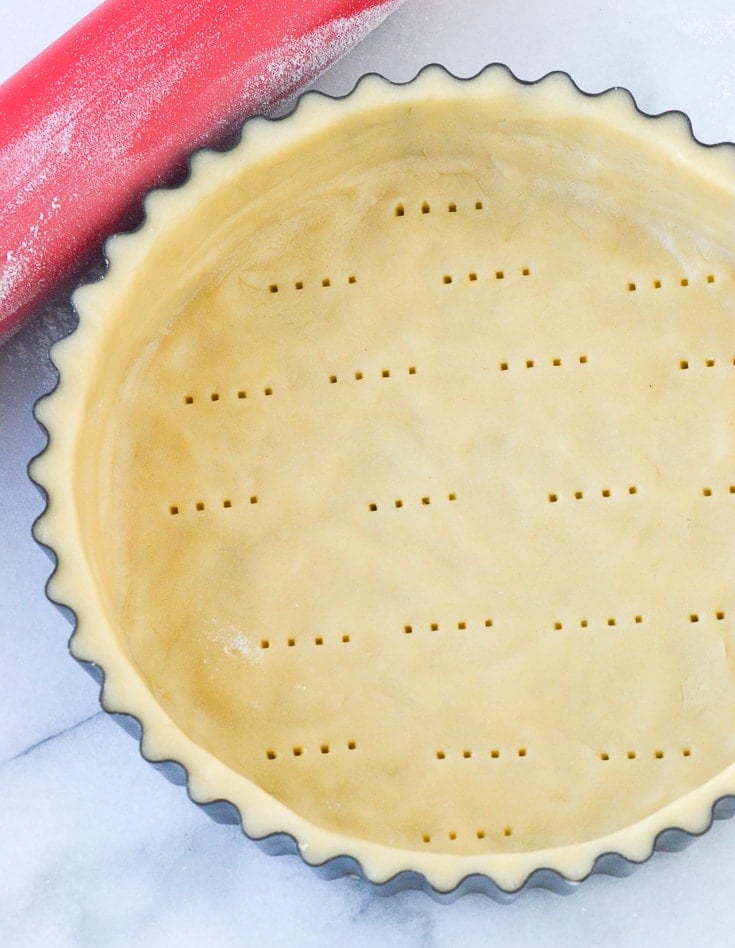
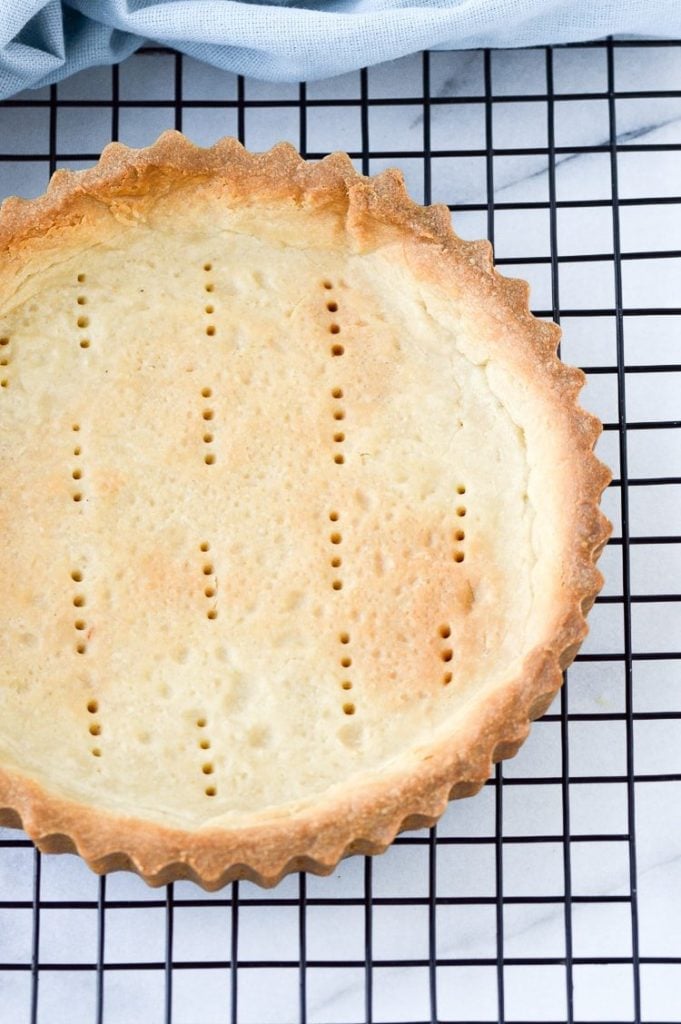
- Once the dough is molded into the pan, you can make the top even by taking a rolling pin or flat spatula over the top and then score the bottom with a fork.
- Re-chill in the fridge or freezer for about 30 minutes while you preheat the oven to 375 degrees.
- For blind baking the tart crust, add a large sheet of aluminum foil on top of the tart and fill it with beans or pie weights.
- Bake at 375 degree for 30 minutes, rotating at the 15 minute mark.
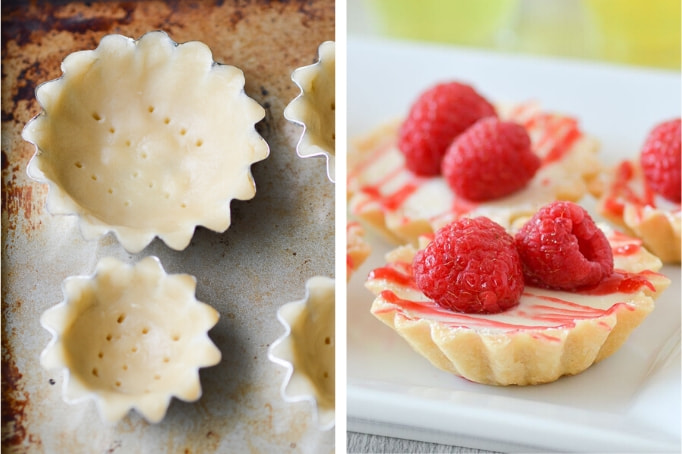
Mini Tarts
For making mini tarts such as these you can either press a small ball of dough into the tart pan and even it all the way around with your fingers, or roll it out and use a round cookie cutter to cut circles and then press it into the tart pan. Be sure to score the bottom of the tarts with a fork as shown below.
Then, bake at 350 for 10-12 minutes. No need to blind bake these little guys. If your mini tart pans are like mine and don't have a removable bottom, let them cool completely before trying to remove. Then, gently tap the side of the pan against a table or counter and it should slip out.
Tips and Troubleshooting for Pate Sucree Tart Crust
- With most baking recipes, especially french pastries, I recommend being exact with your measurements. That means either weighing the flour or if you don't have a scale, spooning the flour into a measuring cup and swiping off the excess with a knife. Dipping a measuring cup directly into a bag of flour is a surefire way to overfill and add extra flour to your recipe, therefore altering the final results.
- If the tart dough gets too soft when you're rolling it out, do not add more flour. Instead, put it back in the fridge for 10-20 minutes to re-chill rather than adding more flour.
- When blind baking, very carefully remove the pies weight by taking the edges of foil and wrapping inward. Then lift up. This will ensure you don't crack the crust and pie weights don't get everywhere.
Storing and Making Ahead
After you've made the dough and let is rest, you can continue to chill the unbaked dough in the fridge up to two days or freeze it for up to two months before you bake it. Just let the dough defrost in the fridge before baking.
What to make with Pate Sucree
Pâte Sucrée is most commonly used for tarts like fruit or chocolate tarts. That's why it's called sweet tart dough, it's perfect for sweet fillings like:
But, you can also use it in place of pie dough for a change of pace in your favorite pie recipe. You can also use it in place of the dough recipe in these mini tarts.
WANT TO JOIN THE PARTY? Subscribe to my newsletter and follow on Pinterest, Instagram, and Facebook for all the latest recipes!
Sweet Tart Crust
INGREDIENTS
- 1 egg yolk
- 1 tbsp heavy cream
- ½ tsp vanilla extract
- 1 ¼ cups all purpose flour (6 ¼ oz)
- ⅔ cup powdered sugar
- ¼ tsp salt
- 8 tbsp unsalted butter cold, cut into ½ inch cubes
Instructions
- Whisk together egg yolk, cream, vanilla in a small bowl or measuring cup and set aside.
- Place flour, powdered sugar, and salt in a food processor and pulse to combine.
- Place the pieces of butter evenly around the food processor and pulse 15 one second pulses. You want the butter combined with no large pieces.
- Slowly add the egg mixture, with the processor running. Process until it comes together and forms a ball, about 10-12 seconds.
- Form the dough into a small circle or rectangle depending on the tart pan you plan on using.
- Wrap tightly in plastic wrap and refrigerate at least one hour.
- When ready to use, follow instructions in desired recipe.
For making and blind baking tart shell:
- Remove tart dough from fridge and let sit until it is workable (this will depend on how long it’s been refrigerated).
- Roll out - if using a 9 in circle you’ll want to roll about a 13 in circle.
- If the dough at any point is too soft to work with, rather than add more flour, place back in the fridge for 10-20 minutes until it is more workable.
- Transfer the tough to the tart pan by rolling over a rolling pin to pick it up. Then unroll it over the tart pan.
- Once placed over the pan, gently work the tough into the corners by lifting the dough with one hand, and pressing with the other. You want to press it until it is even all around. You can use extra bits of dough to reinforce parts that look sparse or thin, to make it even all around.
- Run a rolling pin or metal spatula over the top to remove any excess dough. Score inside of tart with a fork.
- Put the tart on a plate or small baking pan and freeze for 30 minutes.
- While in freezer, preheat oven to 375.
- Remove tart from freezer and place a large sheet of aluminum foil on the tart pan and fill with pie weights or beans. You want to make sure the foil is big enough to cover the edges so they don’t burn and you can easily remove the weights when the shell is still hot from the oven.
- Bake for 30 minutes, rotating 90 degrees at 15 minutes.
- Remove from oven and very carefully remove the weight by taking the edges of foil and wrapping inward. Then lift up.
- Place back in the oven and baking 5 -10 more minutes, until golden brown.
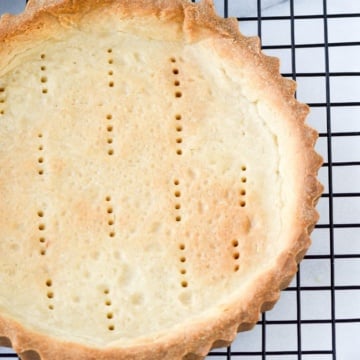
- Remove from oven and let cool on a wire rack.
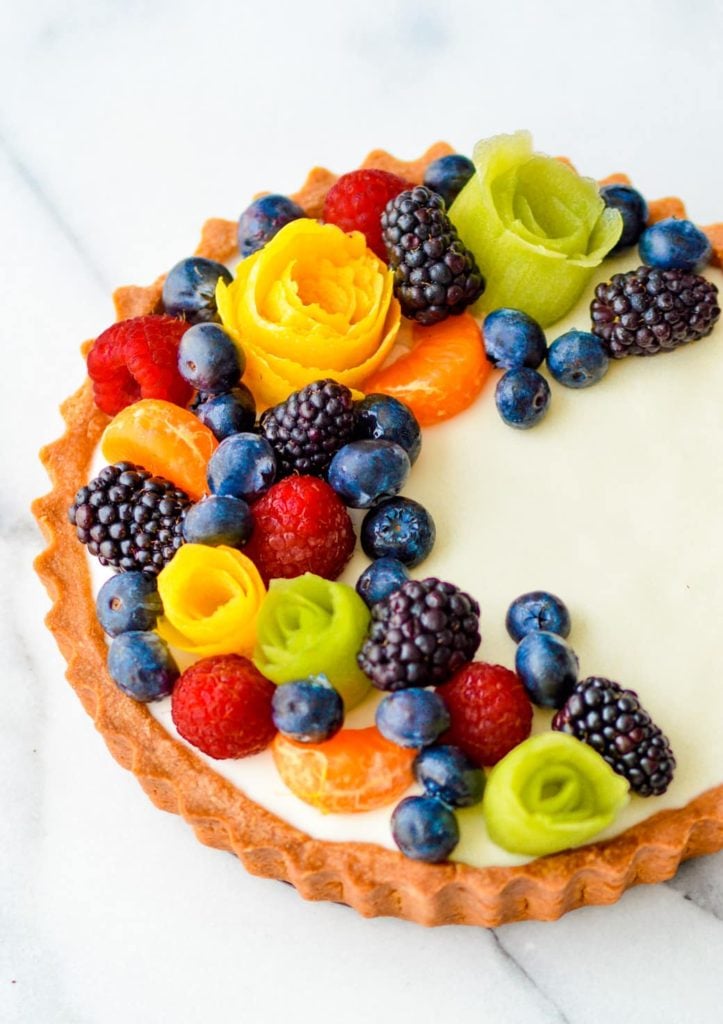
- Once completely cooled, fill with with tart filling of choice.
For Mini Tart Shells:
- Preheat oven to 350 degrees.
- Roll out tart dough as instructed above.
- Using a circle cookie cutter, cut out circles slightly larger than the size of the mini tart pans. Using the same method as above, press the dough into the tart pan using extra dough to reinforce sparse spots if necessary. Use a rolling pin or metal spatula to make tops even.
- Score the bottoms with a fork.
- Bake for 10-12 minutes.
- Let cool completely before removing from mini tart pans.
Notes
- With most baking recipes, especially french pastries, I recommend being exact with your measurements. That means either weighing the flour or if you don’t have a scale, spooning the flour into a measuring cup and swiping off the excess with a knife. Dipping a measuring cup directly into a bag of flour is a surefire way to overfill and add extra flour to your recipe, therefore altering the final results.
- If using salted butter, cut the salt in the recipe to 1/8 tsp.
- If the tart dough gets too soft when you’re rolling it out, do not add more flour. Instead, put it back in the fridge for 10-20 minutes to re-chill rather than adding more flour.
- When blind baking, very carefully remove the pies weight by taking the edges of foil and wrapping inward. Then lift up. This will ensure you don’t crack the crust and pie weights don’t get everywhere.
- After you’ve made the dough and let is rest, you can chill the unbaked dough in the fridge up to two days or freeze it for up to two months before you bake it. Just let the dough defrost in the fridge before baking.


Caroline says
Hi, your recipe is delicious! I’ve done it two times but my dough is hard to handle, it doesn’t hold the shape..It was super hard to put a circle in the mini tart pan. The first time I thought that I’ve messed up the measurements so the second time I was super careful, but the result was the same. Could it be the butter?, I find it hard to use spoon for measuring so I used a conversion chart (1 stick). Any advice? Everyone loved them so I’m going to do it again 🙂
Sophia says
Hi, i’m glad you liked it!! I stick of butter is the correct amount. The dough softens pretty easily so keeping it cold and chilled really helps. You can even pop it in the freezer for 15-20 minutes before cutting out the tart shells. If it gets too soft, put it back in the fridge/freezer until it firms up. I do have a recipe specifically for mini tarts here as well!
Georgia says
Hi Sophia, I’m wanting to use this recipe but was wanting to know if it is alright for me to use Gluten Free Flour instead of normal flour? Will the recipe still turn out or should I make adjustments
Geneva says
Can I mix this dough and freeze it for later use?
Sophia says
Yes, it’s very freezer friendly!
Hannah says
Do you recommend baking the crust for a slightly shorter time if the crust will be filled and the assembled tart then baked for an additional time?
Sophia says
Yes, you can partially bake it (15-20 minutes) if you’re going to be baking it again with filling.
Cheryl says
What are the “flowers” made of in the picture above?
Sophia says
Hi, they’re made out of lemon peel and kiwi
Marisol says
After pulsing dough is it supposed to be sticky. My dough didn’t form into a ball.
Sophia says
Hi Marisol, it should not be super sticky, more like the consistency of sugar cookie dough. So if you press your finger into it will leave an indent, but not stick to it. There is not a lot of liquid in the recipe, so it shouldn’t be super sticky or hard to handle. If it’s still sticky or doesn’t ever come together then i’d add more flour 1 tbsp at a time until does. But, first I’d check to make sure your butter is super cold and that your measurements are right and that you didn’t add any extra liquid (for example, adding a whole egg instead of just the yolk, etc.).
alena@mydeliciousmeals says
These look amazing and I like how simple the ingredients are. I’m responsible for dessert for my 5 year old school party, I really like the size and think they’ll work great for kids. Thank you for all the tips, so helpful!
Jere Cassidy says
Great tutorial for the pastry and those mini tarts look so good.
Kris says
What size tart pan are you using?
Ali Hanson says
This crust looks amazing. I am not much of a baker but I am looking to improve. This recipe makes it look easy!