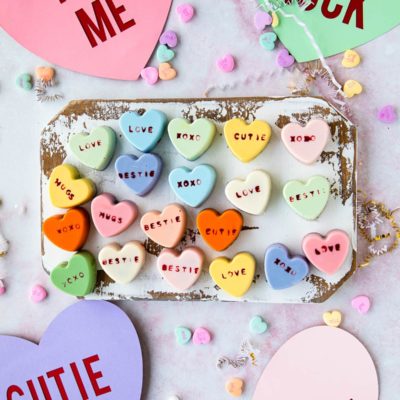
Heart Cake Bites
These heart cake bites are an adorable mix between cake pops and cakesicles. Plus, there is an option to add conversations so they look like sweetheart conversation hearts. A fun Valentine’s day treat for your loved ones so try it today!
Equipment
- Heart Silicone Mold
- Spoon or Paint Brush
- Knife or Offset Spatula
- Letter Cookie Press (optional)
- Red Candy Colors Food Coloring (optional)
Ingredients
- 8 x 8 in Cake Baked and Cooled
- 2 tbsp Frosting up to 4 tbsp
- 24 oz Candy Melts
Instructions
- Melt your chocolate according to the instructions on the package.
- You can also melt the chocolate in a heat proof bowl in the oven on the lowest setting. It takes about 20-30 minutes to melt 12 oz of chocolate.
- Once the chocolate is melted, add 1-2 tsp of melted chocolate to each heart and spread around using a paint brush, spoon, or other utensil. After you’ve spread the frosting along the sides of the mold, you can shake the mold to get it even.
- The amount of chocolate you will need per heart needed will vary depending on the size of your silicone molds.
- If necessary, add more chocolate to the edges of the heart molds as those are common areas that can break when removing the hearts.
- Be sure to view the heart molds from all different sides and angles. Its easy to miss spots and then the hearts break when removed.
- Let chill in fridge 5-10 minutes until hard.
- While the chocolate hardens, make the cake mix by adding the frosting to the cake and mix using a spatula or your hands. It should come together when you press it but not be too wet with frosting. Remember you need way less frosting than you think. If it's dry add a bit more frosting, 1 tsp at a time.
- Remove from the mold from the fridge and add 1-2 tsp of cake mix to each heart leaving room from at the top for more chocolate. Again the exact amount of cake mix can vary depending on the mold.
- Spoon another teaspoon of chocolate on the cake mix in the molds and using a bench scraper or knife scrape the chocolate chocolate off the top of the mold.
- Let harden. Once the chocolate has completely hardened, gently remove the hearts from the silicone mold.
Adding Words (optional)
- If adding sweatheart conversations, create the word in the stamp, making sure the letters are backwards so they’ll stamp the correct way.
- You always do a practice stamp on a paper towel to ensure they are lined up correctly.
- Candy colors stay the best as they are oil based food coloring so it doesn’t slide off the plastic stamp. They take longer to dry so try not to add too much food coloring to the stamp. You can also use an edible setting spray to seal it once stamped.
- Line up the stamp where you want it and gently press down on the heart. Try not to push too hard or it can break the heart.
- If it messes up, you can wipe it off and stamp again. But, conversation candy hearts tend to not be prefect, so I the think it adds to the authenticity if the stamps also are not all perfect.
- Let dry and enjoy.
Notes
- You can use any cake or frosting recipe for these.
- Check out this cakesicle post for tons of tips and tricks for using silicone molds.
- Do not add liquid or gel food coloring to white chocolate or it will seize up and get grainy. If you want hearts in a specific color buy chocolate melts in that color of use candy coloring which is oil based food coloring.
- Do not thin out the chocolate. The thicker chocolate helps ensure the sides don’t break.
- Make sure the words are backwards in the stamp so they’ll stamp opposite the way you enter them. You always do a practice stamp on a paper towel to ensure they are lined up correctly.
- If adding words, candy colors stay the best as it is oil based food coloring so it doesn’t slide off the plastic (but they take longer to dry and are a pain to clean off the stamp - so beware).
- You can use an edible sealant if you’re going to be transporting these.
- These will last a day at room temperature or up to three days in the fridge.
